Les and I left this morning for a mini work trip/vacationlet to DC and NYC. I can’t actually remember the last time I was in DC, but it might have been on that first road trip I took with Leslie in 2002. Anyway, I’m ecstatic to get a few days out of the office. We were greeted on landing by some nice rain, thunder, and lightning that I miss so much in the bay area. Tomorrow we’re striking out into the heart of DC for some quick museuming, then I’ll be taking myself on a (potentially damp) walking tour of all the major monuments and memorials while Leslie does the work that prompted this trip. Then on Monday we leave for NYC… can’t wait!
To celebrate our second wedding anniversary, Leslie and I decided to spend the day in San Francisco eating. We started at Samovar Tea Lounge, where we shared a pot of green tea and another of Pu-erh, which is fermented Chinese green tea–Leslie was a fan. The caffeine seems to have affected my eyebrows.
From there we did lunch at the Monk’s Kettle, which is kind of like Toronado in that it has an amazing bottled and draft beer selection, but minus the sticky counters and loud punk music and plus a very tasty food menu. We kicked things off with 0.5L of Weihenstephaner Hefe, which reminded us of our newlywed summer in Berlin where we drank it in the Weihenstephaner restaurant in Hackescher Markt.
From there, we did some shopping, saw Up at the Castro theatre, then quickly got back to eating at the Anchor Oyster Bar in the Castro. The oysters were just a warm up for the main event, though: Kiss Seafood.
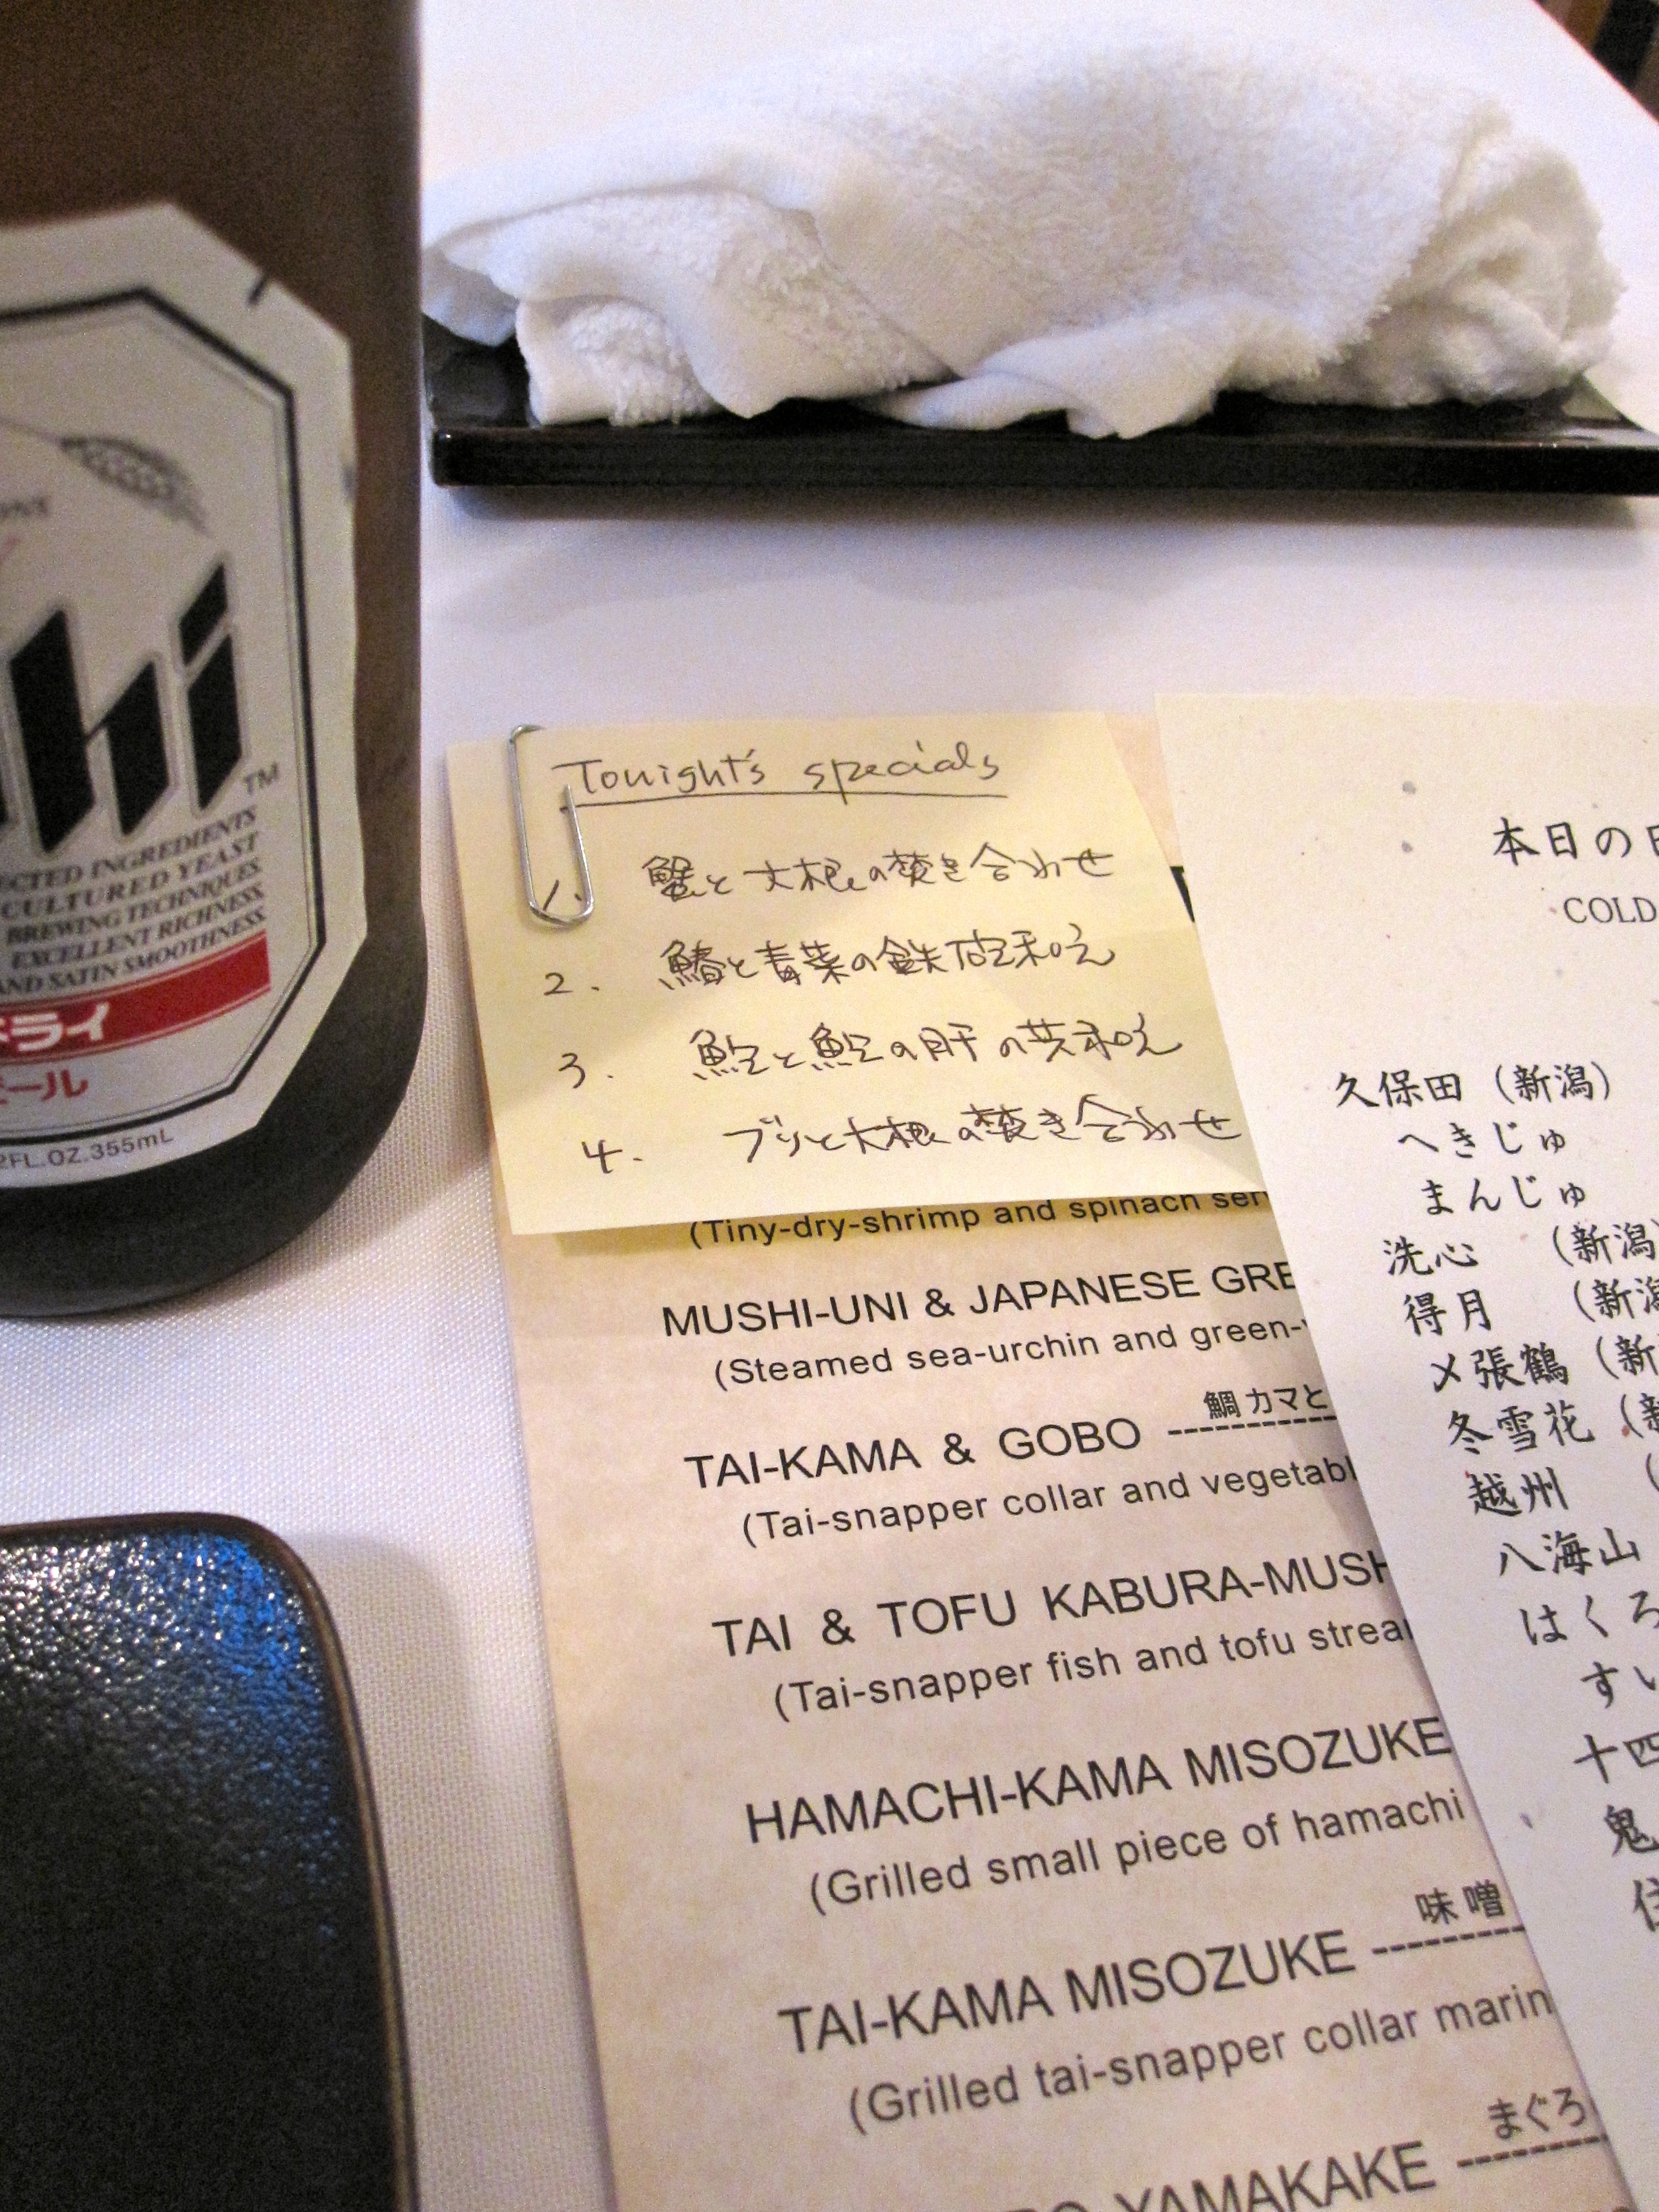
I linked to the Yelp page because Kiss Seafood doesn’t have a website. They also don’t have a lot of other things like a good location, nice decor, a large menu, any employees besides the husband (chef) and wife (waitress) who own the place, nor room to seat more than 12 people (including at the bar). What they do have is the best sashimi I’ve ever eaten. We sat down and ordered the chef’s omakase menu, which is like a prix fixe menu at a French place where the chef decides what you eat. This menu came recommended, and it was also the most convenient option because we couldn’t read the specials anyway:
I’m now going to bore you with a description of each course because this, my friends, was a dinner worthy of rememberance and it is my website after all. We didn’t get enough pictures of the food, but just imagine everything coming out looking half like a sparse, modernist painting and half like something you really want to eat, now. First was a sweet, light salad of soybeans, bean sprouts, and seaweed with a delicate vinegar and sesame dressing. Then, we got a trio of flavors that I’m not used to at a japanese place: smoked (maybe braised?) octopus with what I swear was a barbecue sauce—and it tasted like brisket, not rubbery at all; turnip slices with the most amazing hash of marinated scallop on top; some unidentifiable, firm, delicious root vegetable.
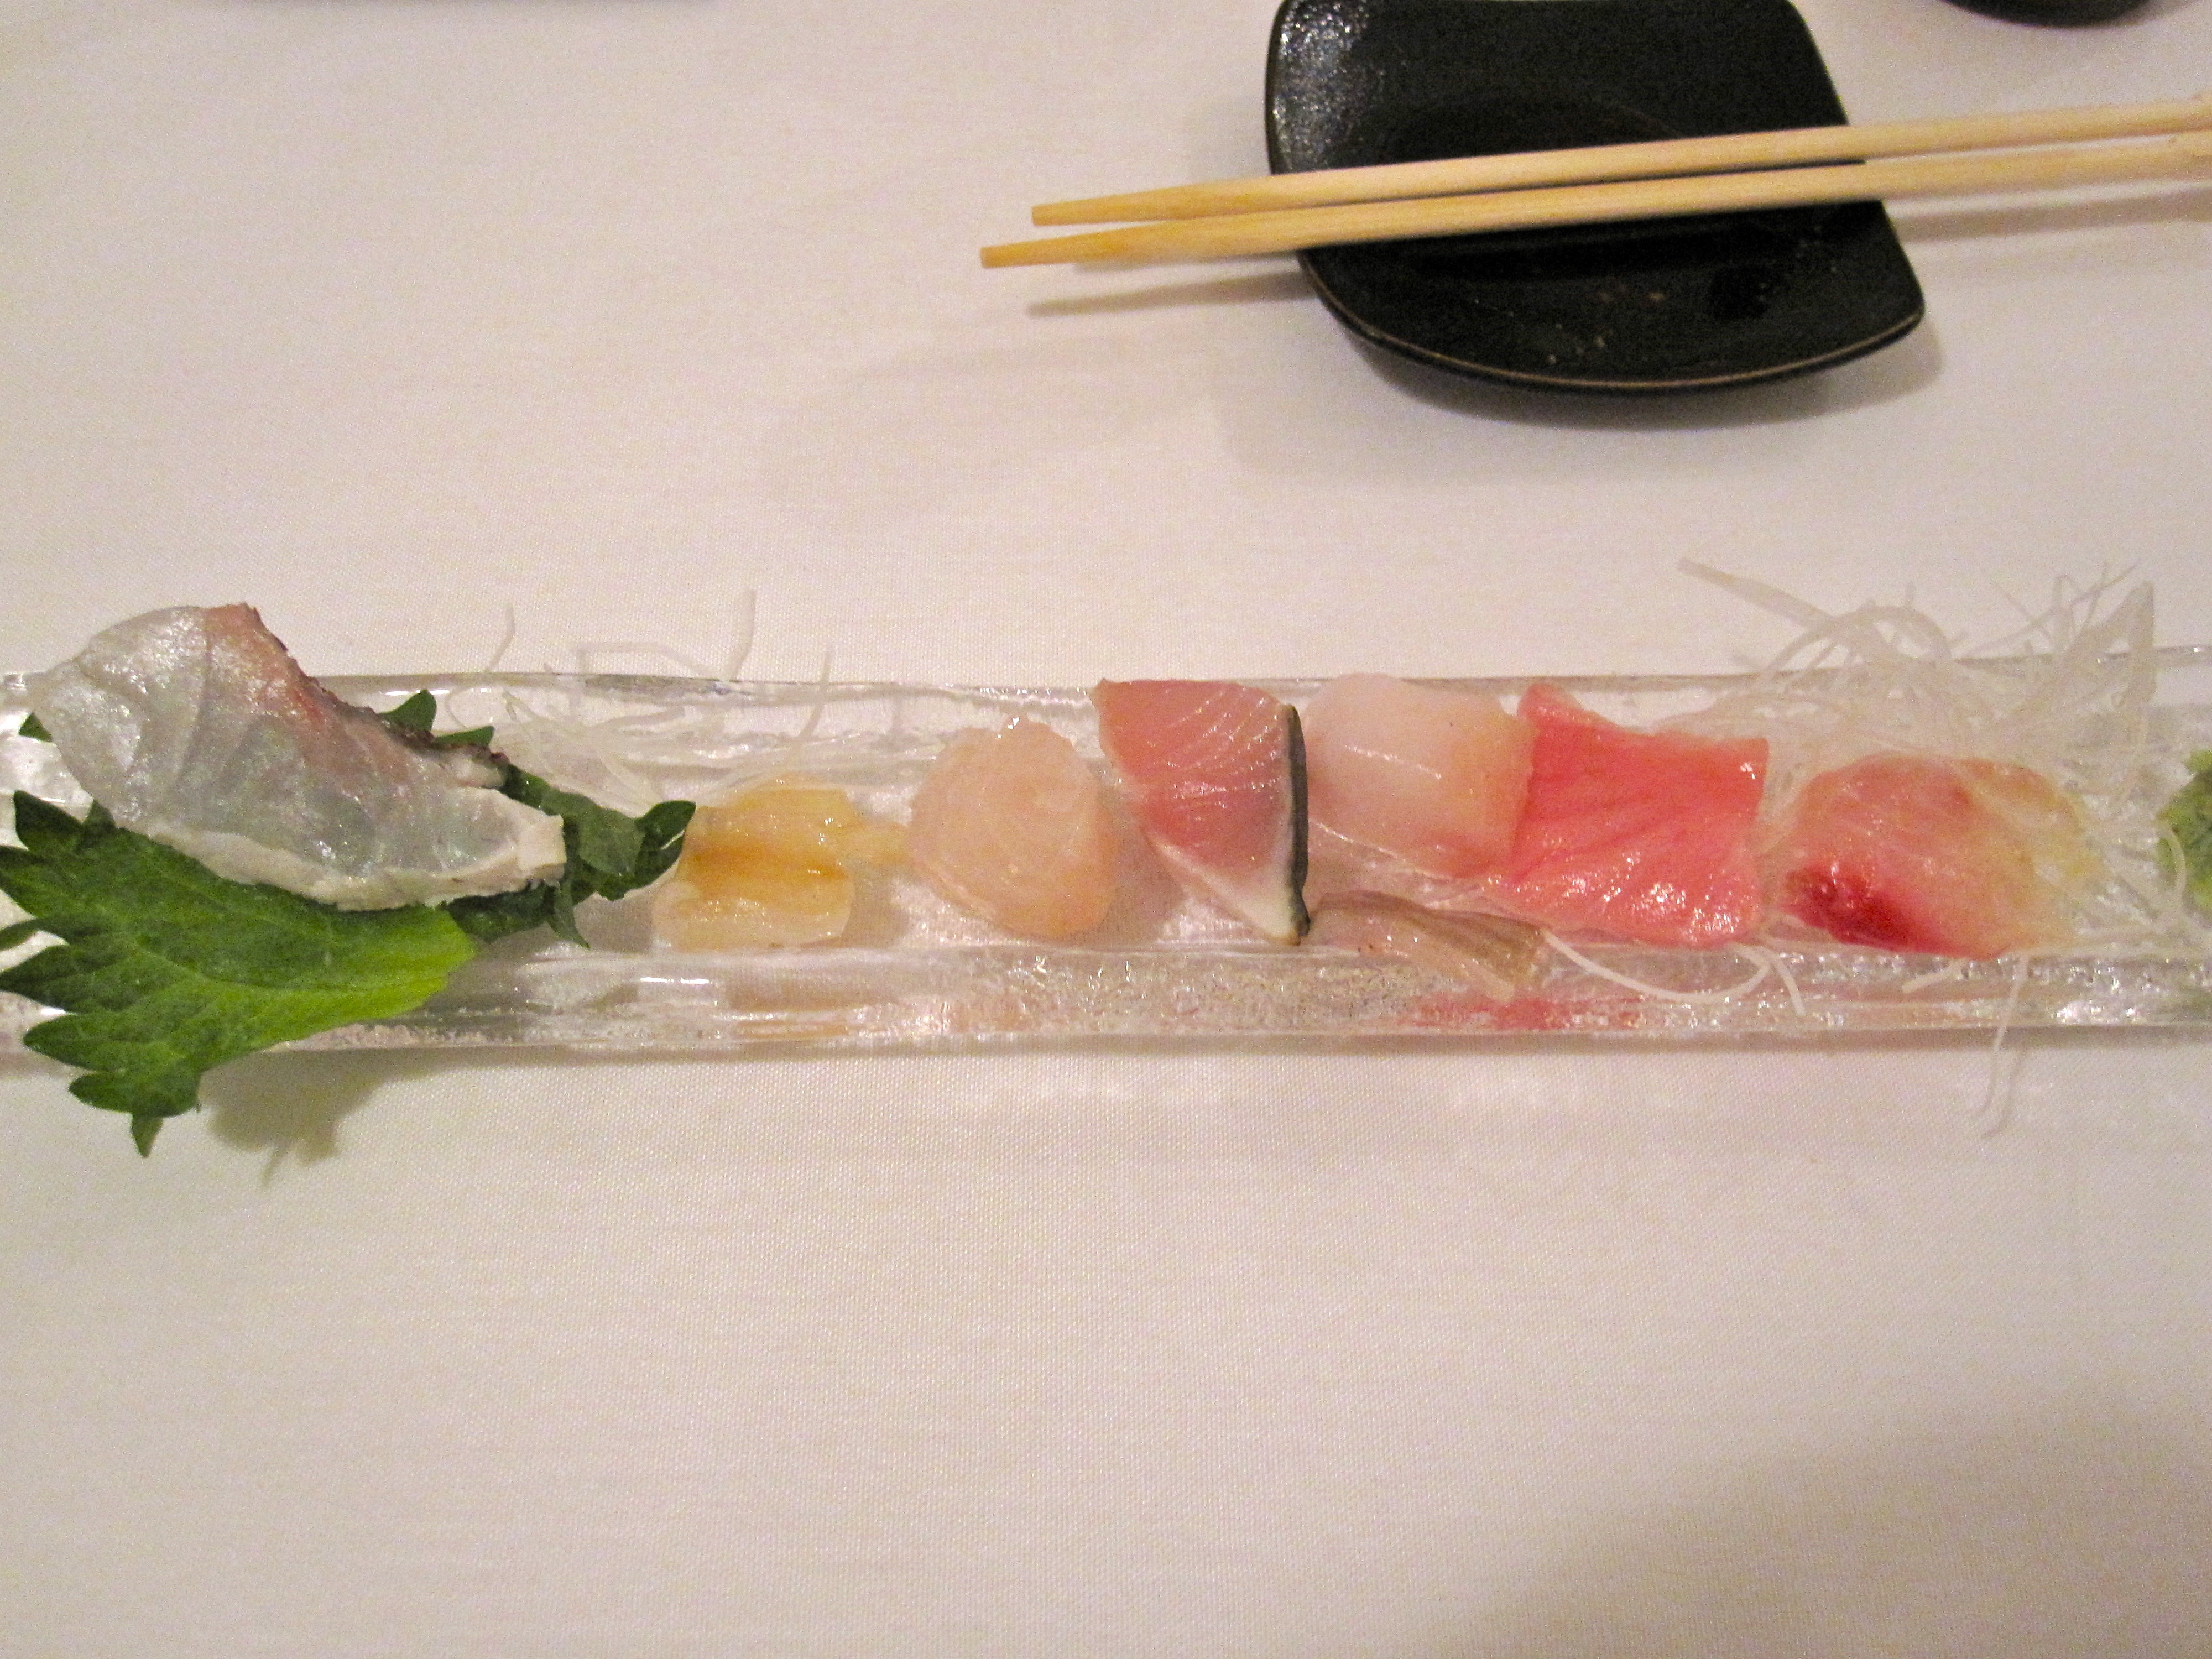
The third course we hit the fish. It was a plate of two slices each of six kinds of sashimi. Here’s the plate after one of each has been eaten:
Let’s be clear: this was the best sashimi I’ve ever had. The pieces were bite-sized, bursting with flavor, each one an adventure of texture in my mouth. I wish had gotten down all the names; here are some snippets from my notes. (Yes, I started taking notes. It’s not weird at all.)
“Something like red striped bass that tastes, according to Leslie, ’like the deck of a ship—but in a good way.’” “Giant clam. Crunchy like the plumpest oyster, but smoky sweet and not salty at all. Wow.” “Thai snapper with the skin still on. Delicate. Perfect.” “Mackerel fin. Totally unique texture, not marinated.” “A chunk of white fish that looks like that flavorless, crunchy stuff you get everywhere but which tastes like cod that was force fed melted butter for its entire life.” “Please, don’t let the sashimi be over.” You get the idea.
The fourth course was a clam broth with steamed clams and turnip slices and a ground fish patty. I wasn’t blown away until I had all the ingredients together, then quipped “Wow! Turnip + patty - what a combo. I’m a bad person for judging it early.” Fifth was a miso soup with egg custard, steamed veggies, lotus root, trumpet mushrooms, and chunks of poached whitefish. It was like the platonic ideal of miso–every other bowl I’ve had is a dancing, hollow shadow. I thought for sure that was the end, but no: round six brought an entire plate of nigiri, bite sized and and just as astronomically good as the sashimi (so I guess Kiss is taking “best nigiri” title as well). We waddled out of the restaurant and headed home for sleep.
Not a bad way to celebrate two years.
Comments
Ann — 2009-06-17 06:58:59
Sounds like a really fantastic meal!! I got hungry just reading about it. This is a place to look for when we next get to San Francisco.
Thanks for the review!
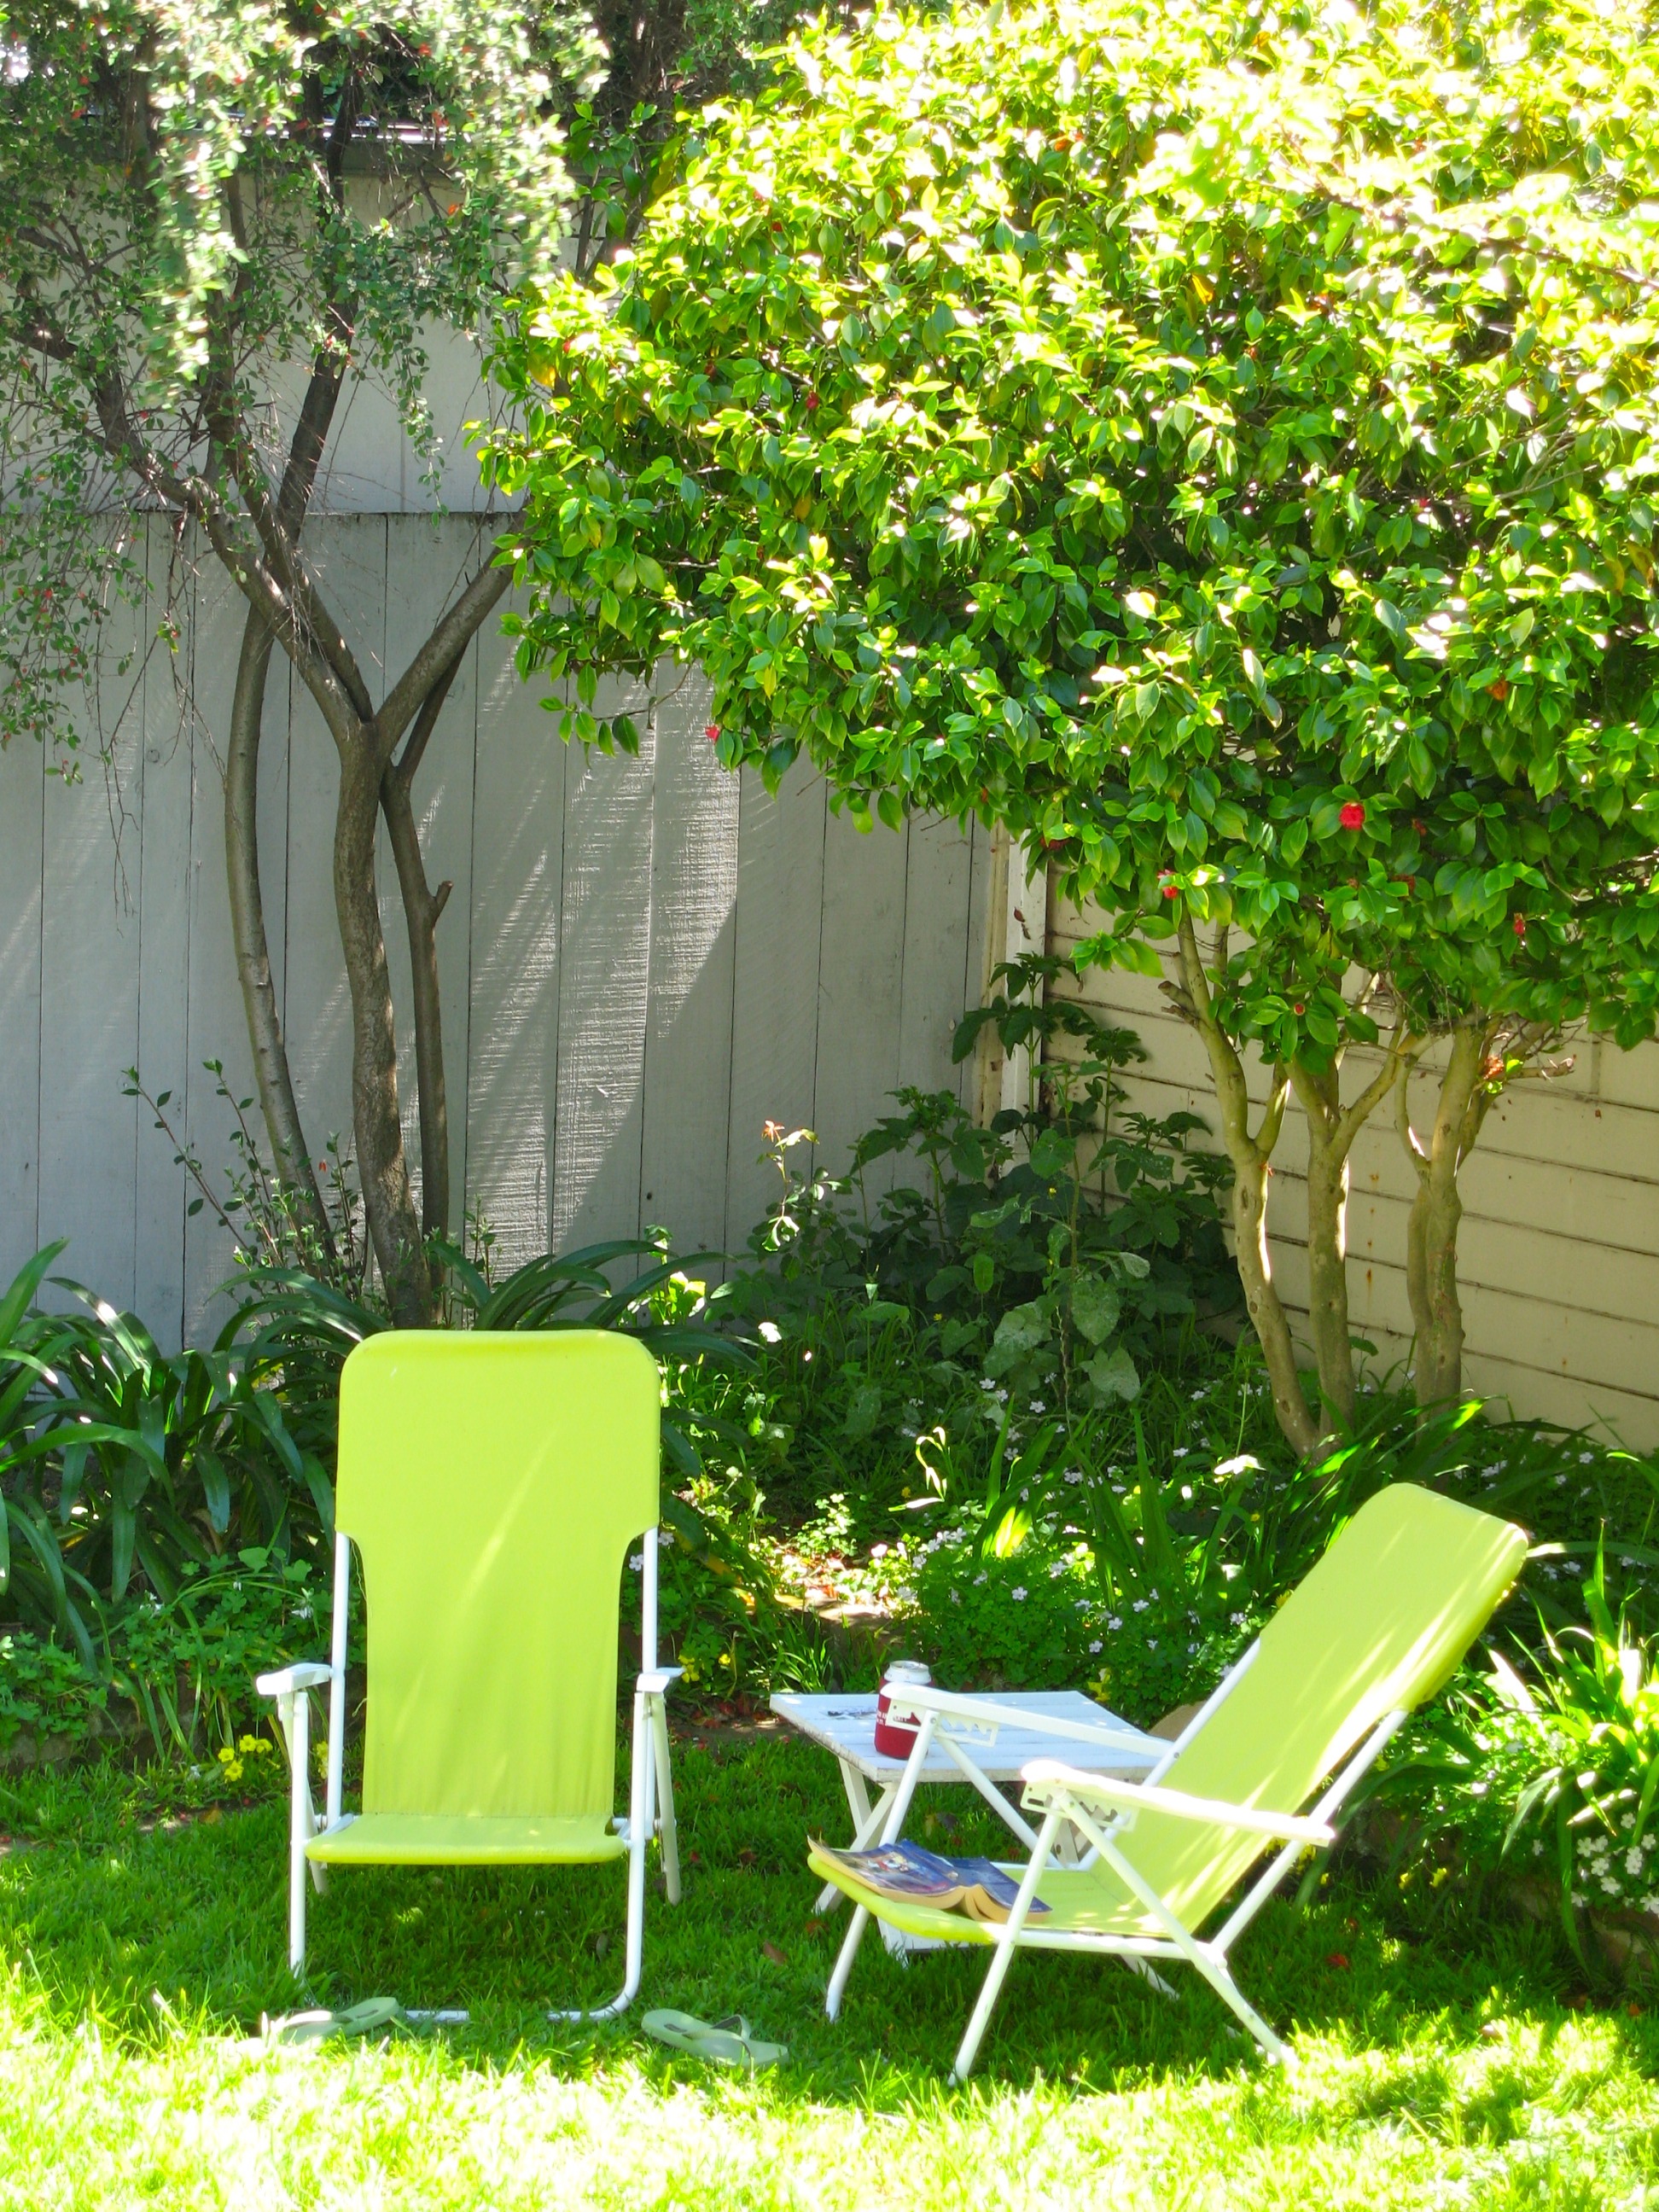
Leslie has posted some pictures from this spring that give some indication of how things have been on a day to day basis in spring of this year. For example, on any given Saturday afternoon you’re likely to find us here:
Comments
Cameron — 2009-04-30 06:12:14
Having been approximately THERE I can vouch for its awesomeness.
Now that I’ve escaped from Berkeley, I have free time again. Evenings, weekends–they exist. Almost organically, my desire to do things has been recovering. So I hatched a new project: a MAME box. MAME stands for ‘multiple arcade machine emulator,’ and it’s a project to resurrect classic (and modern) arcade games by meticulously emulating the original hardware that they ran on. It can run everything from Galaga to Street Fighter. At first, I planned to do the whole shebang: a full-size arcade cabinet with a classic arcade monitor. I was inspired by Doug’s MAME cabinet that he built in college.
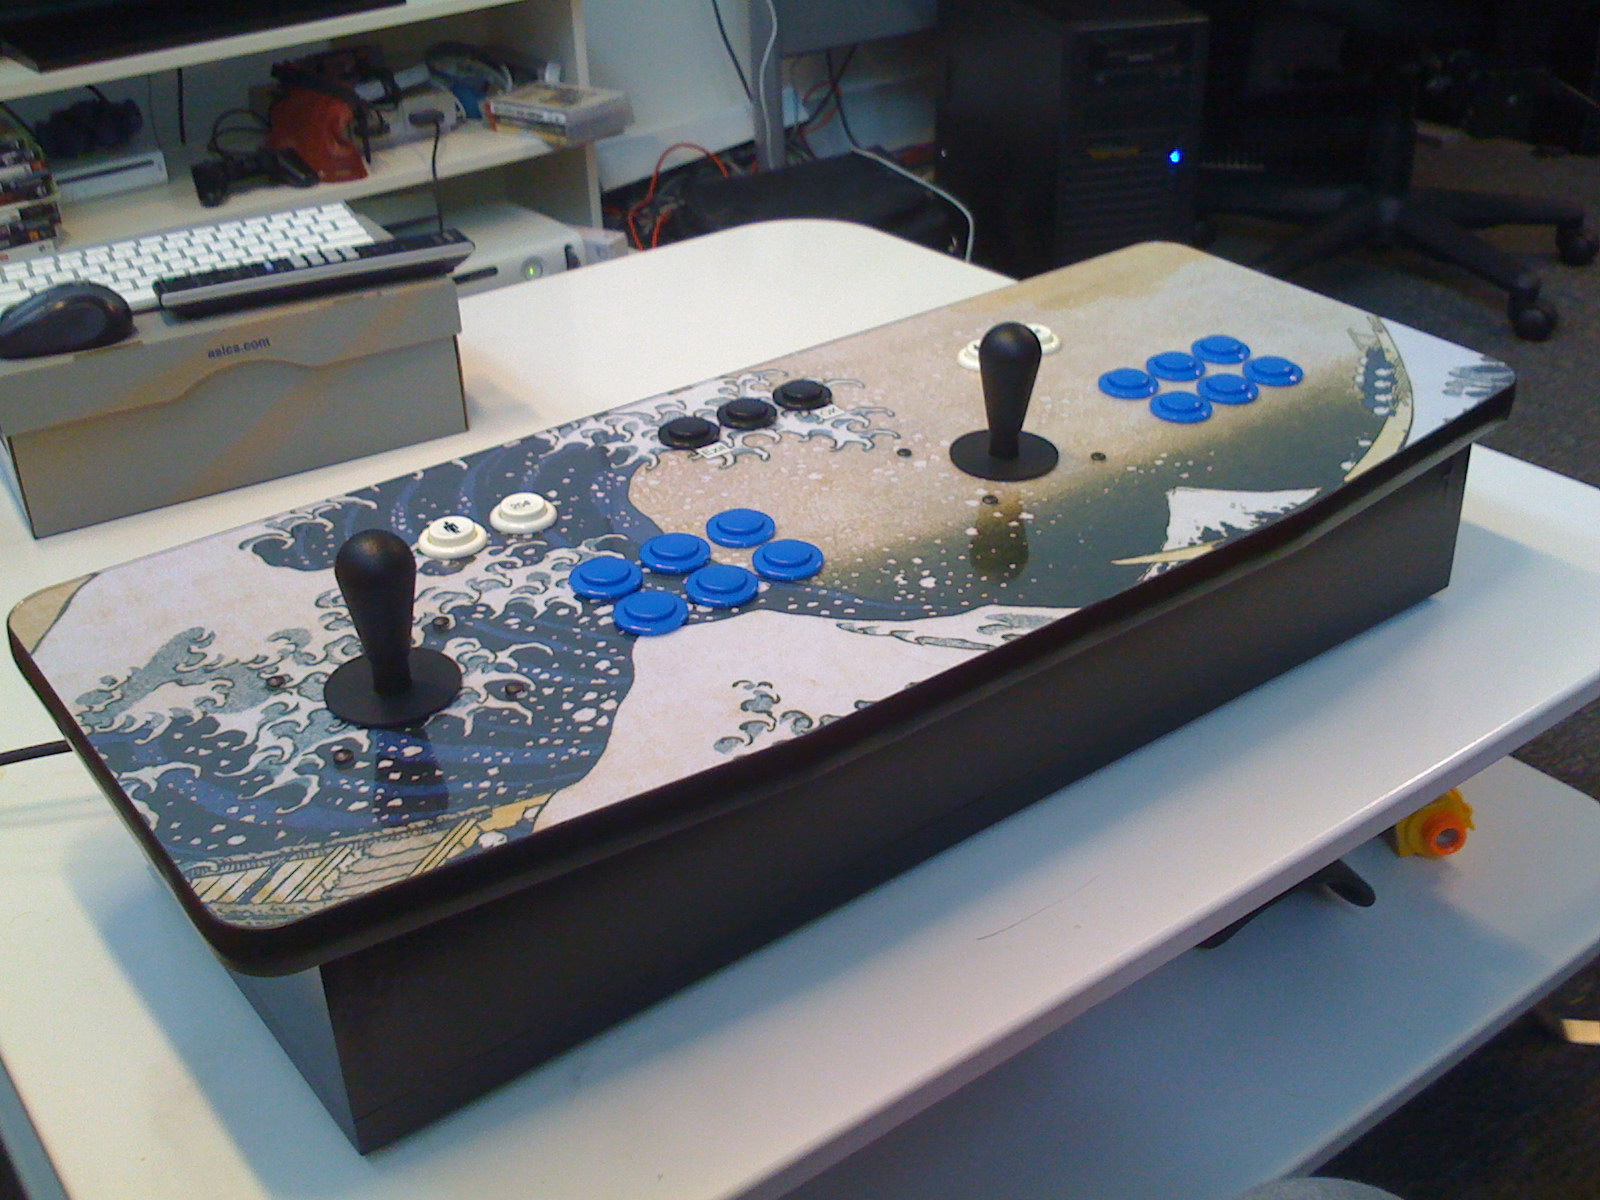
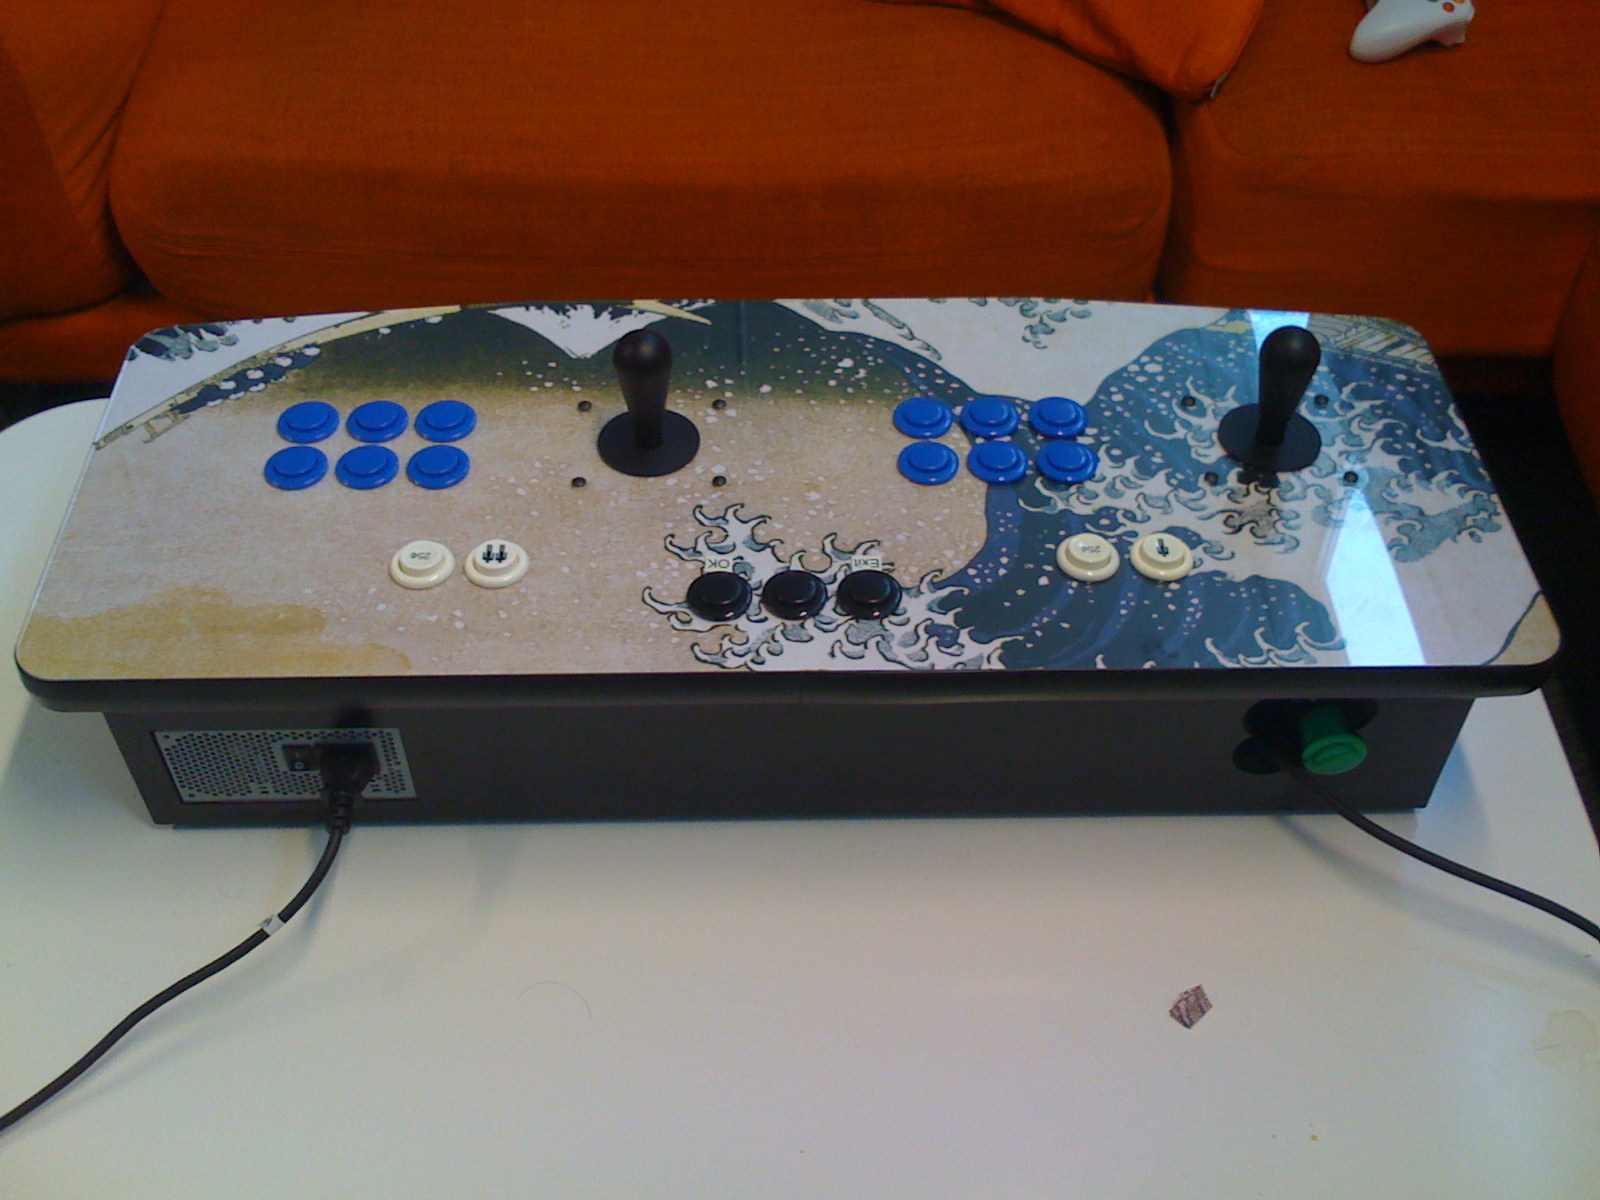
I couldn’t get over one serious drawback of the full cabinet: it is immobile. Done properly, it’s about 6 and a half feet tall and weighs a couple of hundred pounds. So wherever I built it would be where it stayed. Instead, I decided to build just the control panel of the cabinet, with a computer running MAME inside the control panel enclosure. The finished product would fit easily in a car, and connect via HDMI to existing A/V setups. I batted the idea around until Doug and George surprised me with a set of computer-cut wood pieces to make the box out of. From there, it all came together pretty rapidly. The finished product:
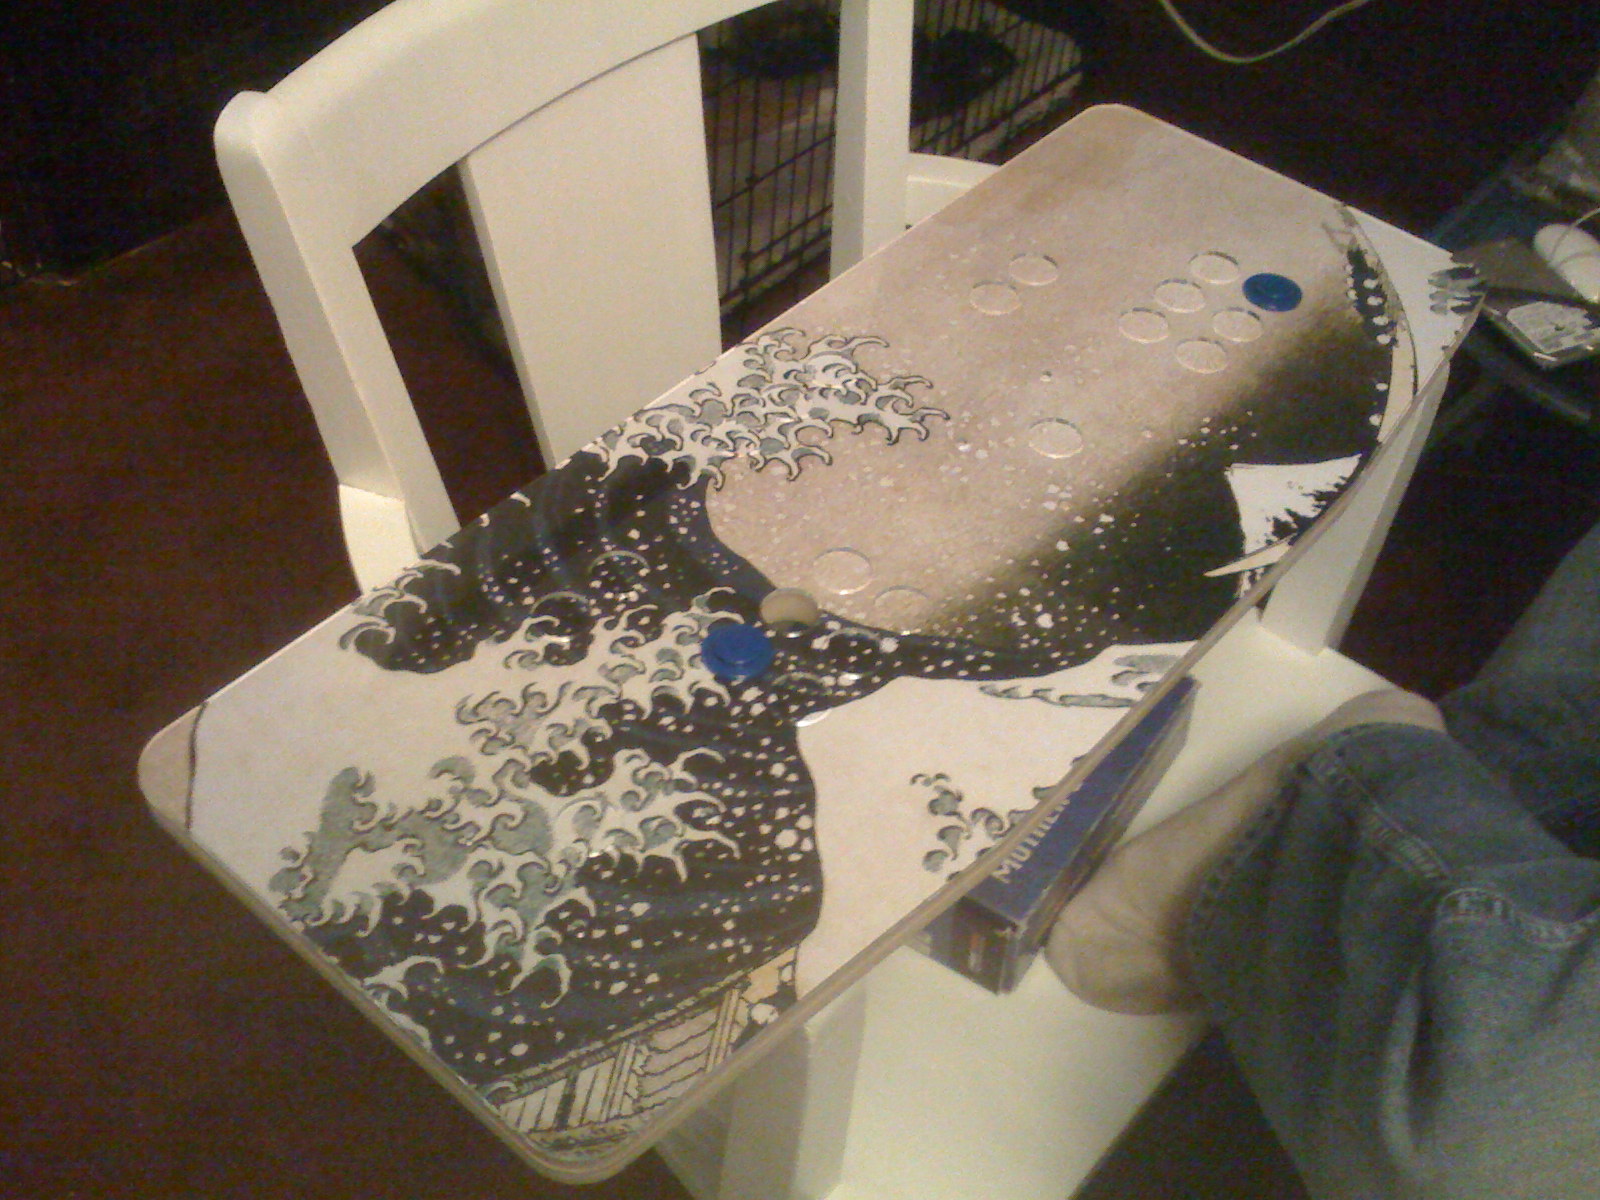
I decided to call it “The Great Wave” because I used Hokusai’s famous woodcut The Great Wave off Kanagawa as the artwork for the top surface. Here’s a description of how we (Doug, George and I) built it over about six weekends at the beginning of the year.
First, the box design and woodworking. Doug and George went to an arcade to measure the control panels of a stock Street Fighter cabinet, just to make sure the spacing of the buttons and the joysticks was legit. He transferred the measurements into a Corel Draw design for the top of the board. Here’s what it looks like:
Each player gets six buttons, which is enough for pretty much any game from an arcade or classic console. The two buttons above each player’s layout are for player one/player two start and coin insert. The three at the top are dedicated to navigating through the emulator menus.
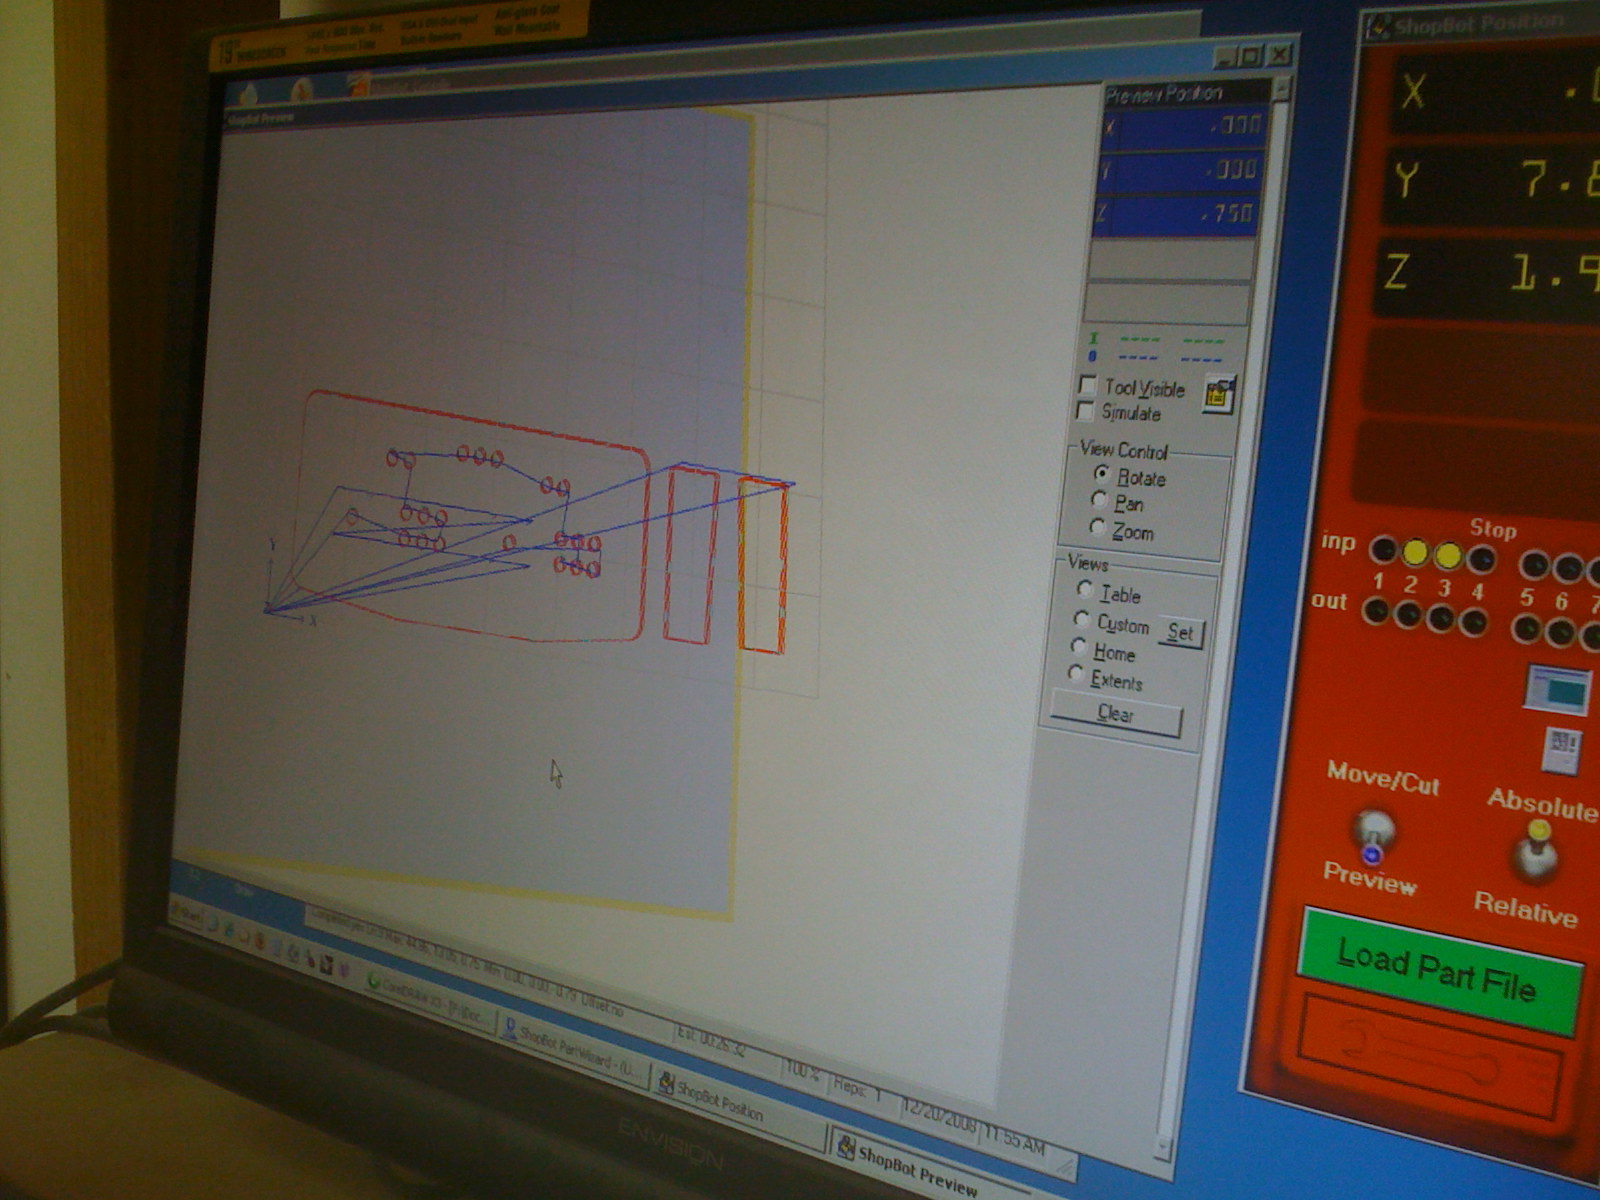
The other five sides of the box were considerably simpler, but Doug did put a nice subtle tilt in from back to front for comfort. Designs in hand, Doug and George headed to the Sawdust Shop, a treasure trove of woodworking equipment that you can rent time in by the hour, to actually do the cutting. The precision cutting on the top was done by a computer-controlled CNC router. The material was medium-density fiberboard (MDF for short), a particle board with good strength that is cheap and easy to work with. Here’s the design loaded into the CNC computer software:
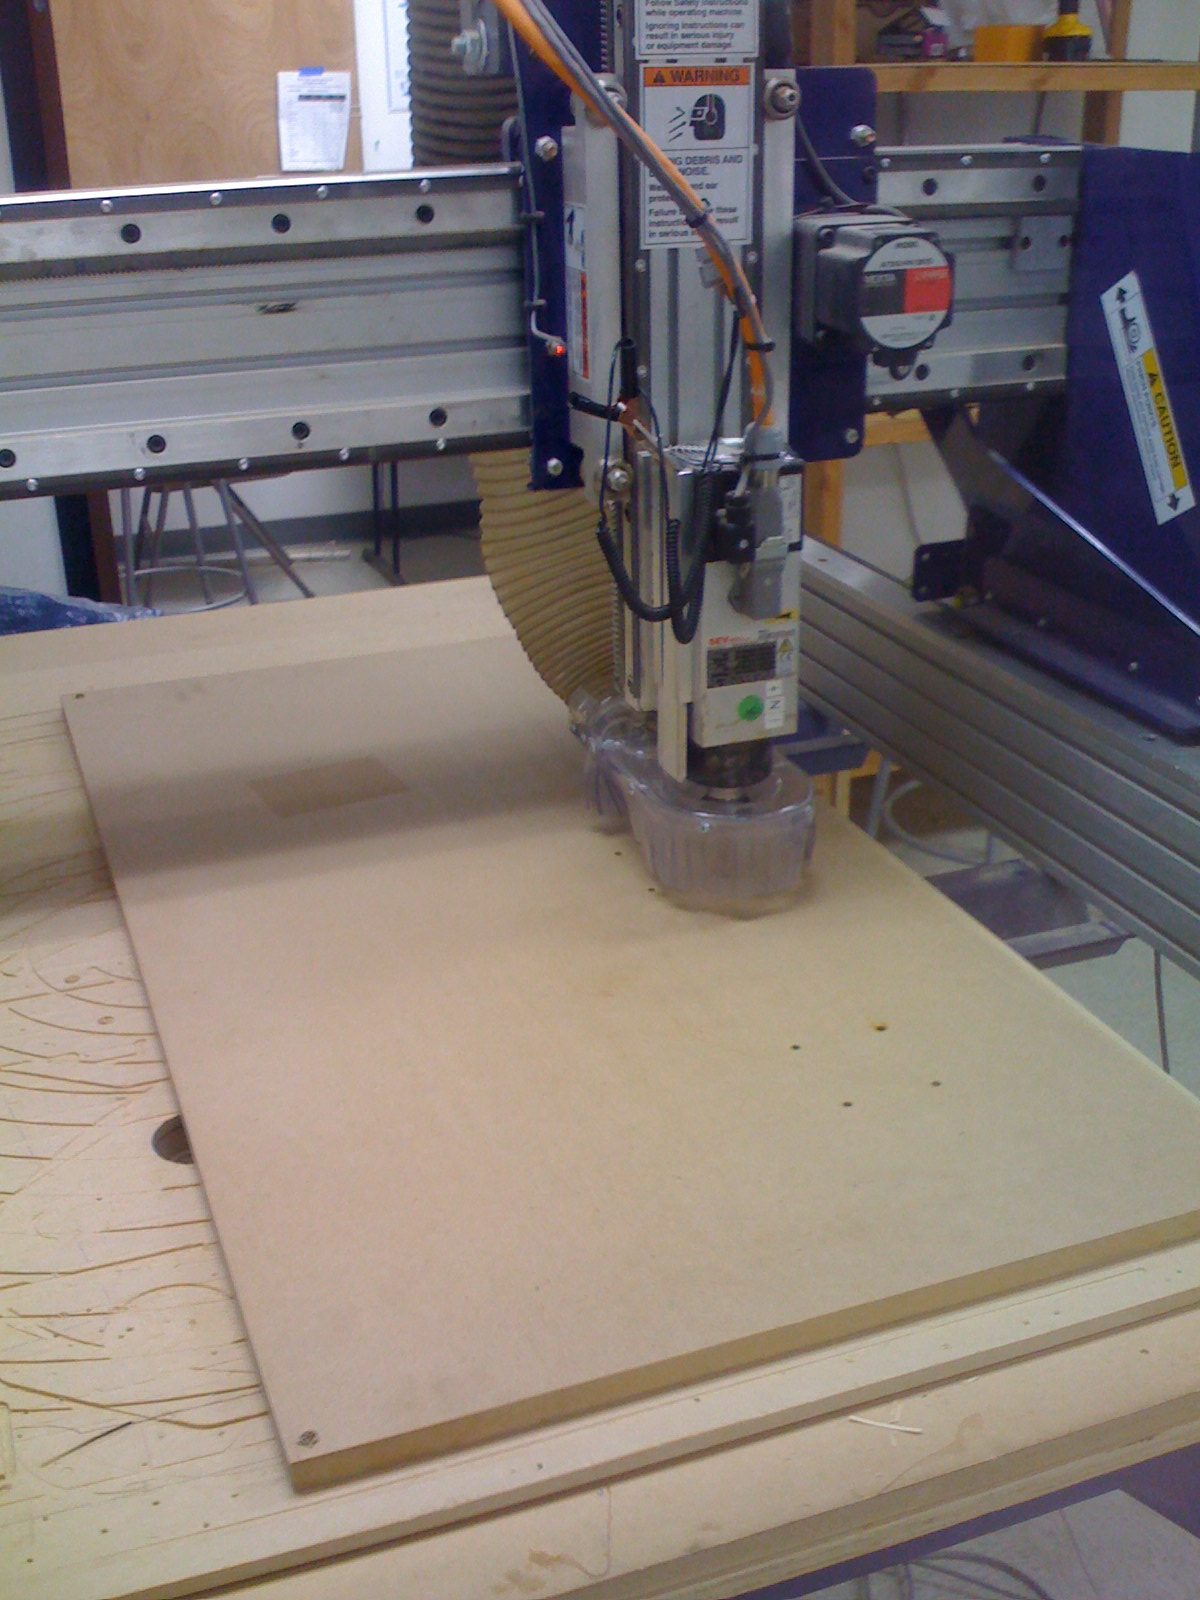
Here’s a shot of the machine starting to do the cutting:
After all the pieces were cut, Doug and George presented me with them. The intent was to then hassle me until I got off my ass and finished the rest of the project. Hardly any hassling was necessary, it turned out.
Along with the MDF cutout of the control panel, they had a piece of plexiglass (acrylic) cut to lay on top for a nice, plastic finish. Trouble was, the acrylic chipped when the CNC router bit (made for wood) tried to cut it, leaving a rough edge all around. You can buy router bits made to cut acrylic, but for the price of the bit alone (about $40), I had a new acrylic overlay custom laser-cut by Pololu custom laser cutting. These guys were great. Even with the time to look over the design and give me a quote, I had the finished piece in my hands within a week.
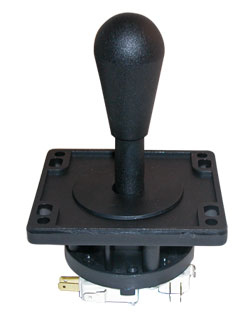
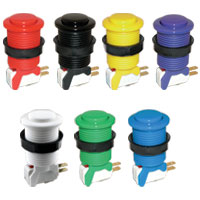
With all the pieces of the box in hand, it was time to think about the controls. I bought my pushbuttons and joysticks directly from Suzo-Happ, manufacturers of American-style arcade equipment. These are the controls you remember from your youth, if you ever visited arcades in the US–big, beefy joysticks capped with bat-shapped plastic handles a clicky, indestructible-feeling buttons.
Despite some quite lengthy arguments that Japanese-style arcade controls are superior to American parts, I find that the Japanese parts feel flimsy and don’t offer the same satisfying feedback. Also, I intended the control panel to withstand pounding on from drunk and/or infuriated players, so the delicate precision of the Japanese controls seemed like a bad way to go.
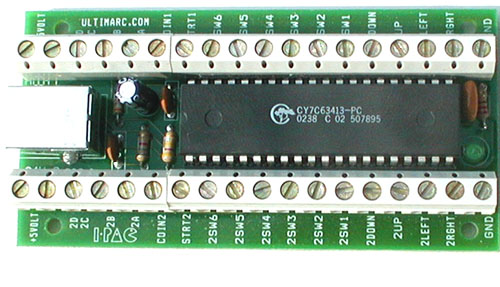
The buttons themselves use small microswitches (the white things with the prongs attached to the bottom) to close an electric circuit when you press them. To use them to control the MAME software, you have to translate the opening and closing of the circuit into a keyboard button press. Building MAME cabinets is common enough that a company, Ultimarc, has sprung up specifically to provide circuit boards that translate arcade control signals into keyboard button presses. In particular, I used their IPAC VE board to connect all my controls via USB to the computer running MAME.
The last big piece to consider was the computer that would fit inside the box and run MAME. I didn’t have a lot of space to work with, so I was restricted to looking for very small-form-factor boards. I ended up going with Intel’s DG45FC, a mini-ITX board about 8 inches to a side that had integrated video with HDMI out. To keep power consumption low and noise down (and to save money), I paired it with a low-end but still speedy 45nm Pentium 5200 dual-core chip. I got an ITX power supply to mount elsewhere in the box (more on that later).
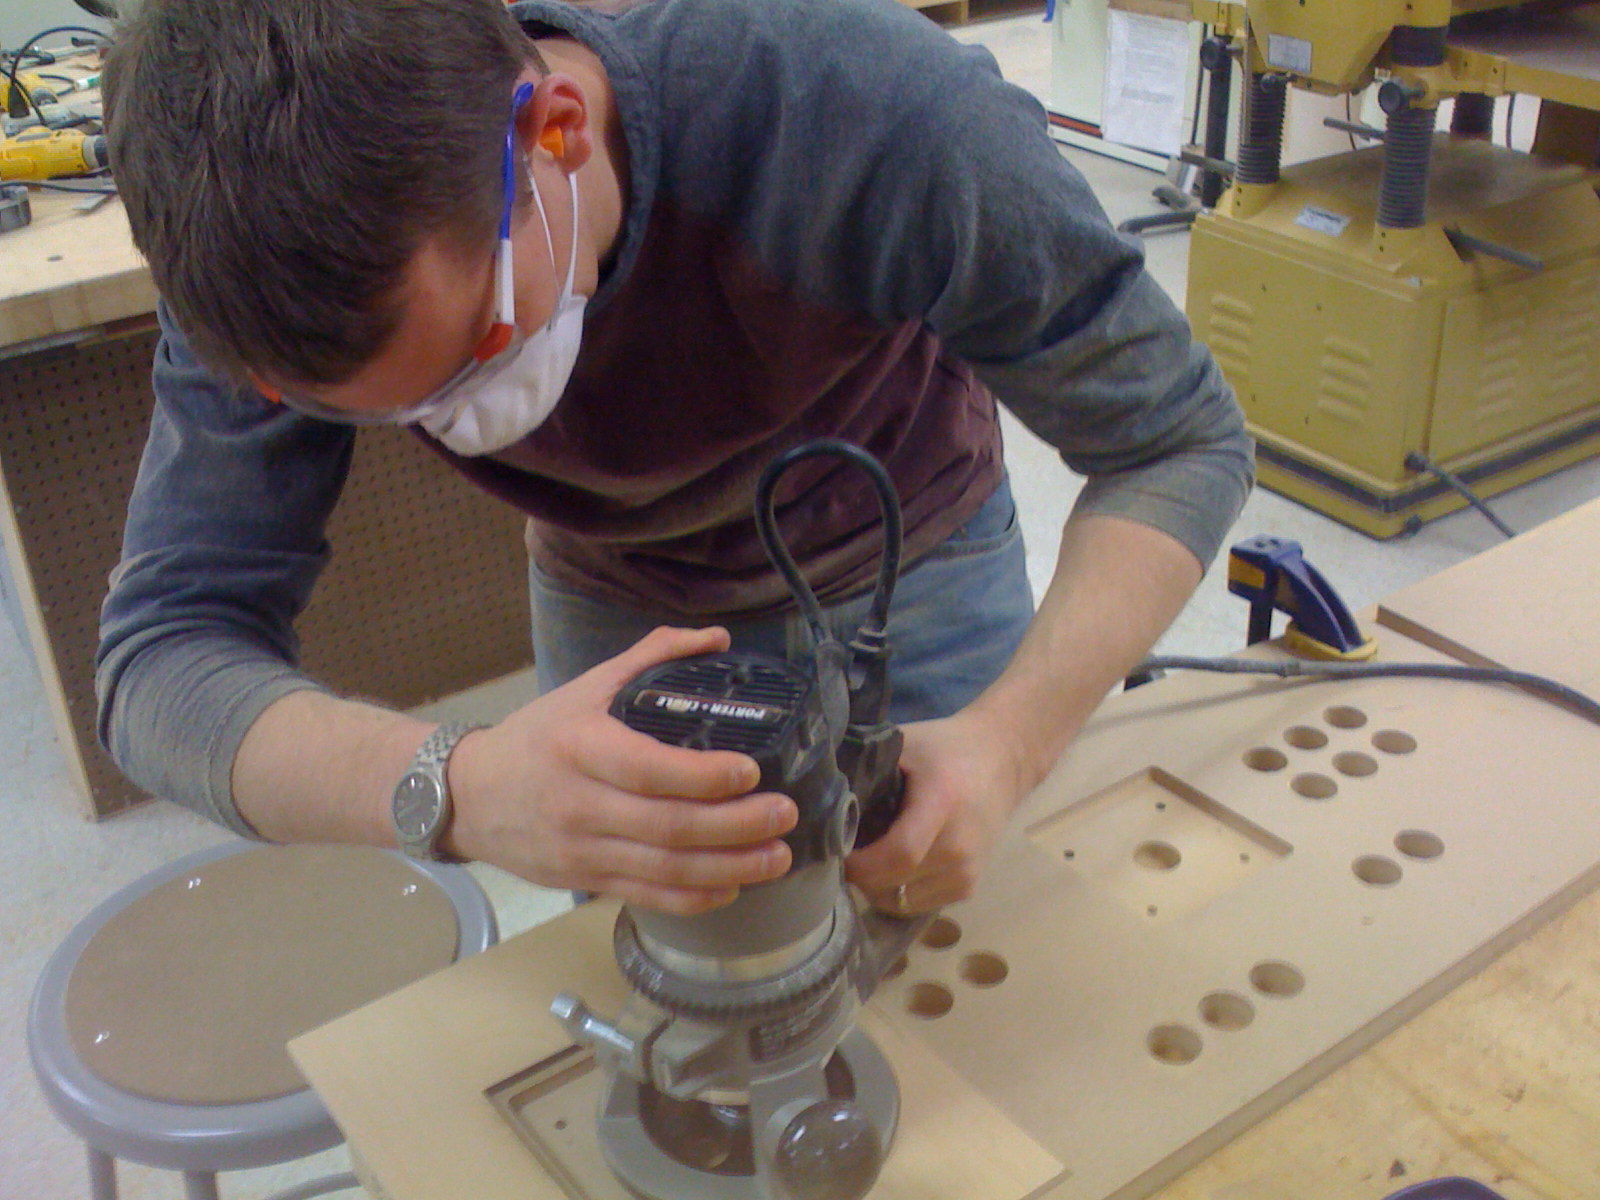
With the parts decided, Doug and I headed back to the wood shop for another day of construction. The control panel is cut out of 3/4" MDF, which is pretty thick, and I thought it made the joysticks sit too low. So, we started out by routing out half the thickness of the board around the joystick mounts. It was my first experience using a router, which seems to be the solution to pretty much every wood working problem. Not pictured is the trickiest routing task we faced that day: cutting a 1/16" slot all around the edge of the control panel to install T-molding for a nice finish to the edge. Doug had to handle that one.
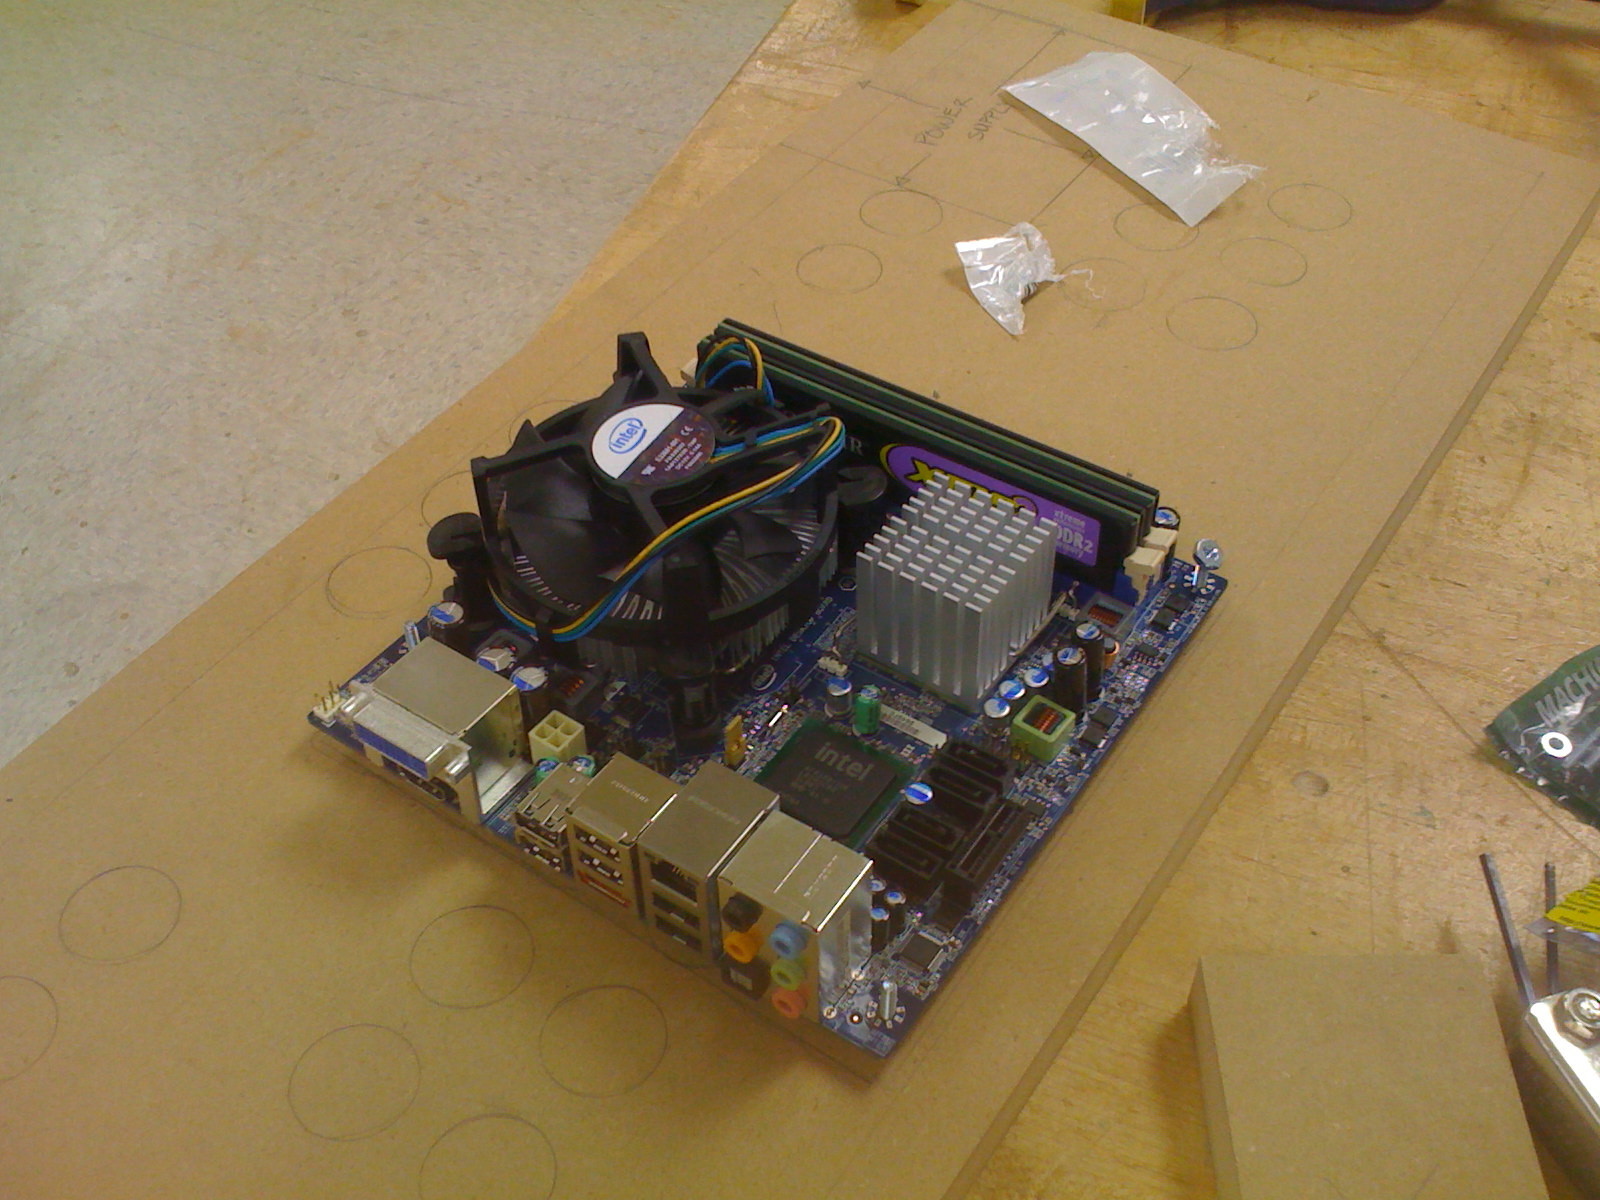
Next, we drilled holes in the bottom of the box to mount the motherboard. Here’s a test of the fit–the fan gives away how tiny the board is:
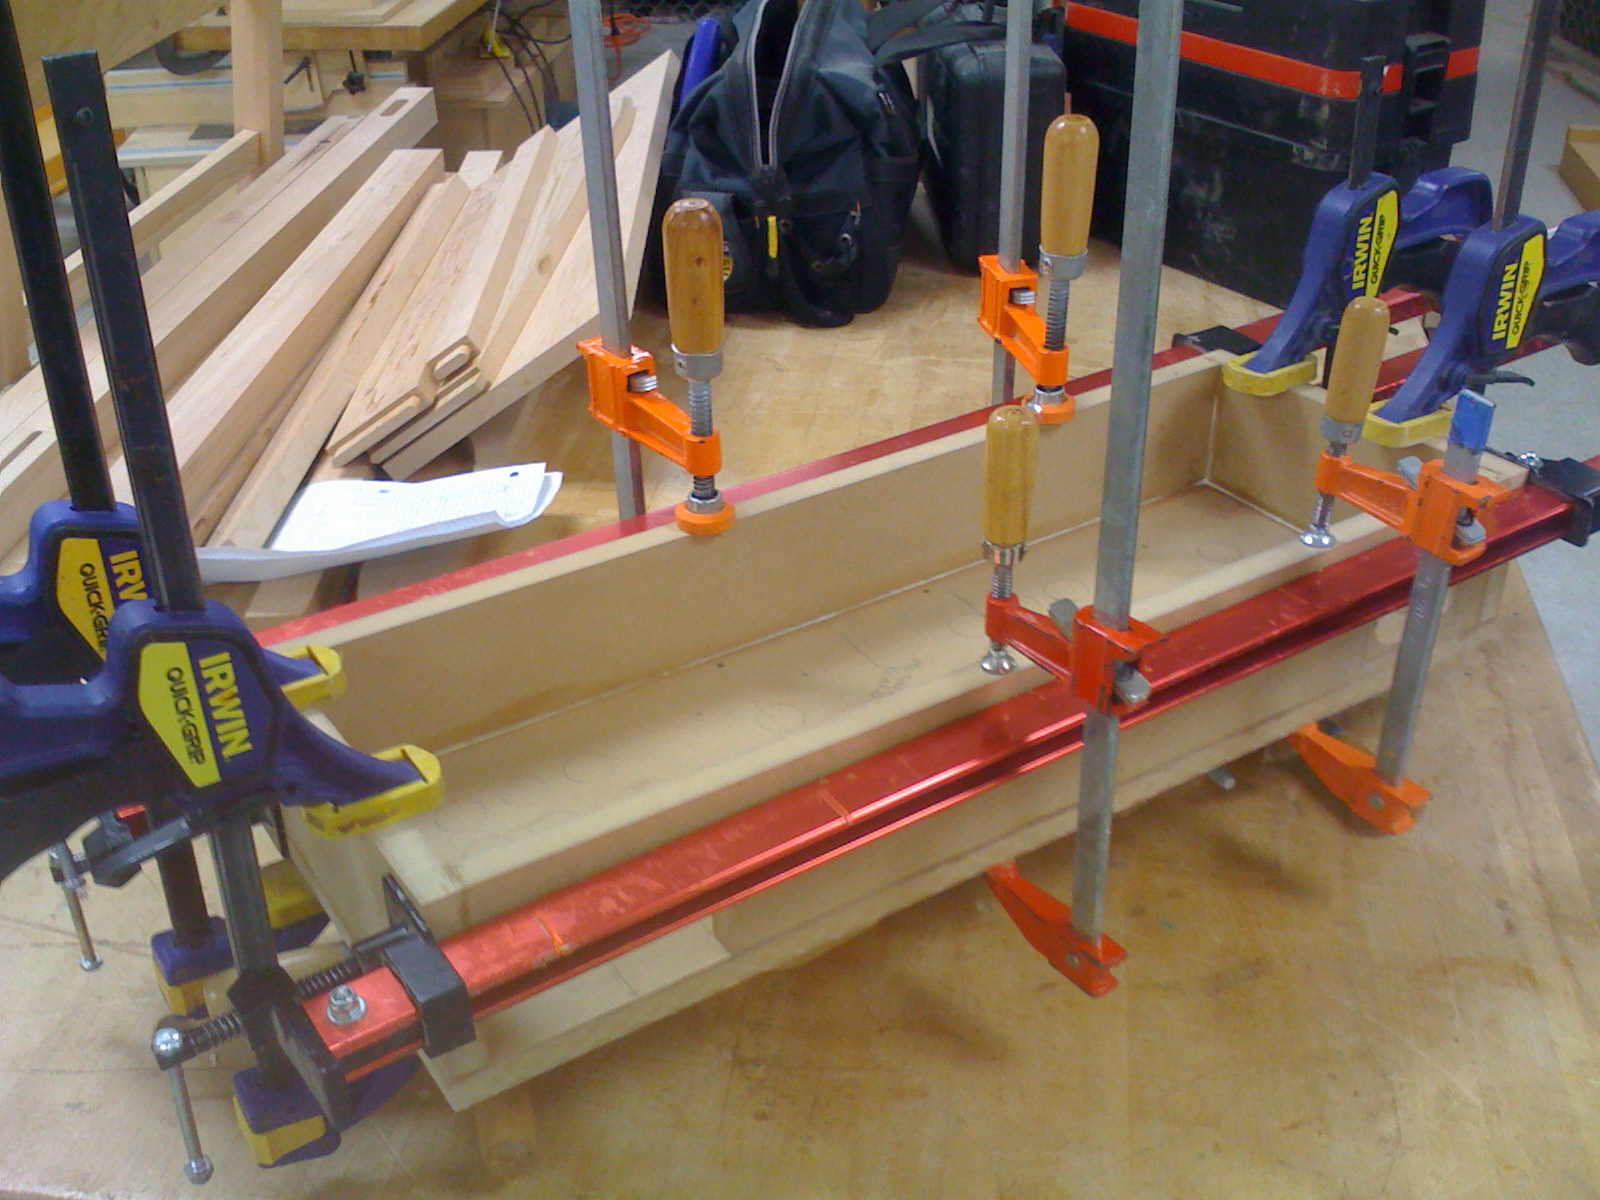
After cutting holes in the rear panel for the power supply and cords, we loosely assembled the box to prepare to glue it all together.
We covered all the mating pieces with standard wood glue, squared them up and clamped them. One of the nice things about renting time in a big wood shop is access to an unlimited supply of clamps. We may have taken things too far.
We let the box set up while we got dinner, then picked it up and drove back to Oakland. We got in at 9pm, but we had too much momentum not to start working on the electronics of the control panel immediately. We sandwiched a print of The Great Wave between the MDF and the laser-cut acrylic. We tacked it in place with two buttons, then trimmed away the excess from around the edge and each button hole.
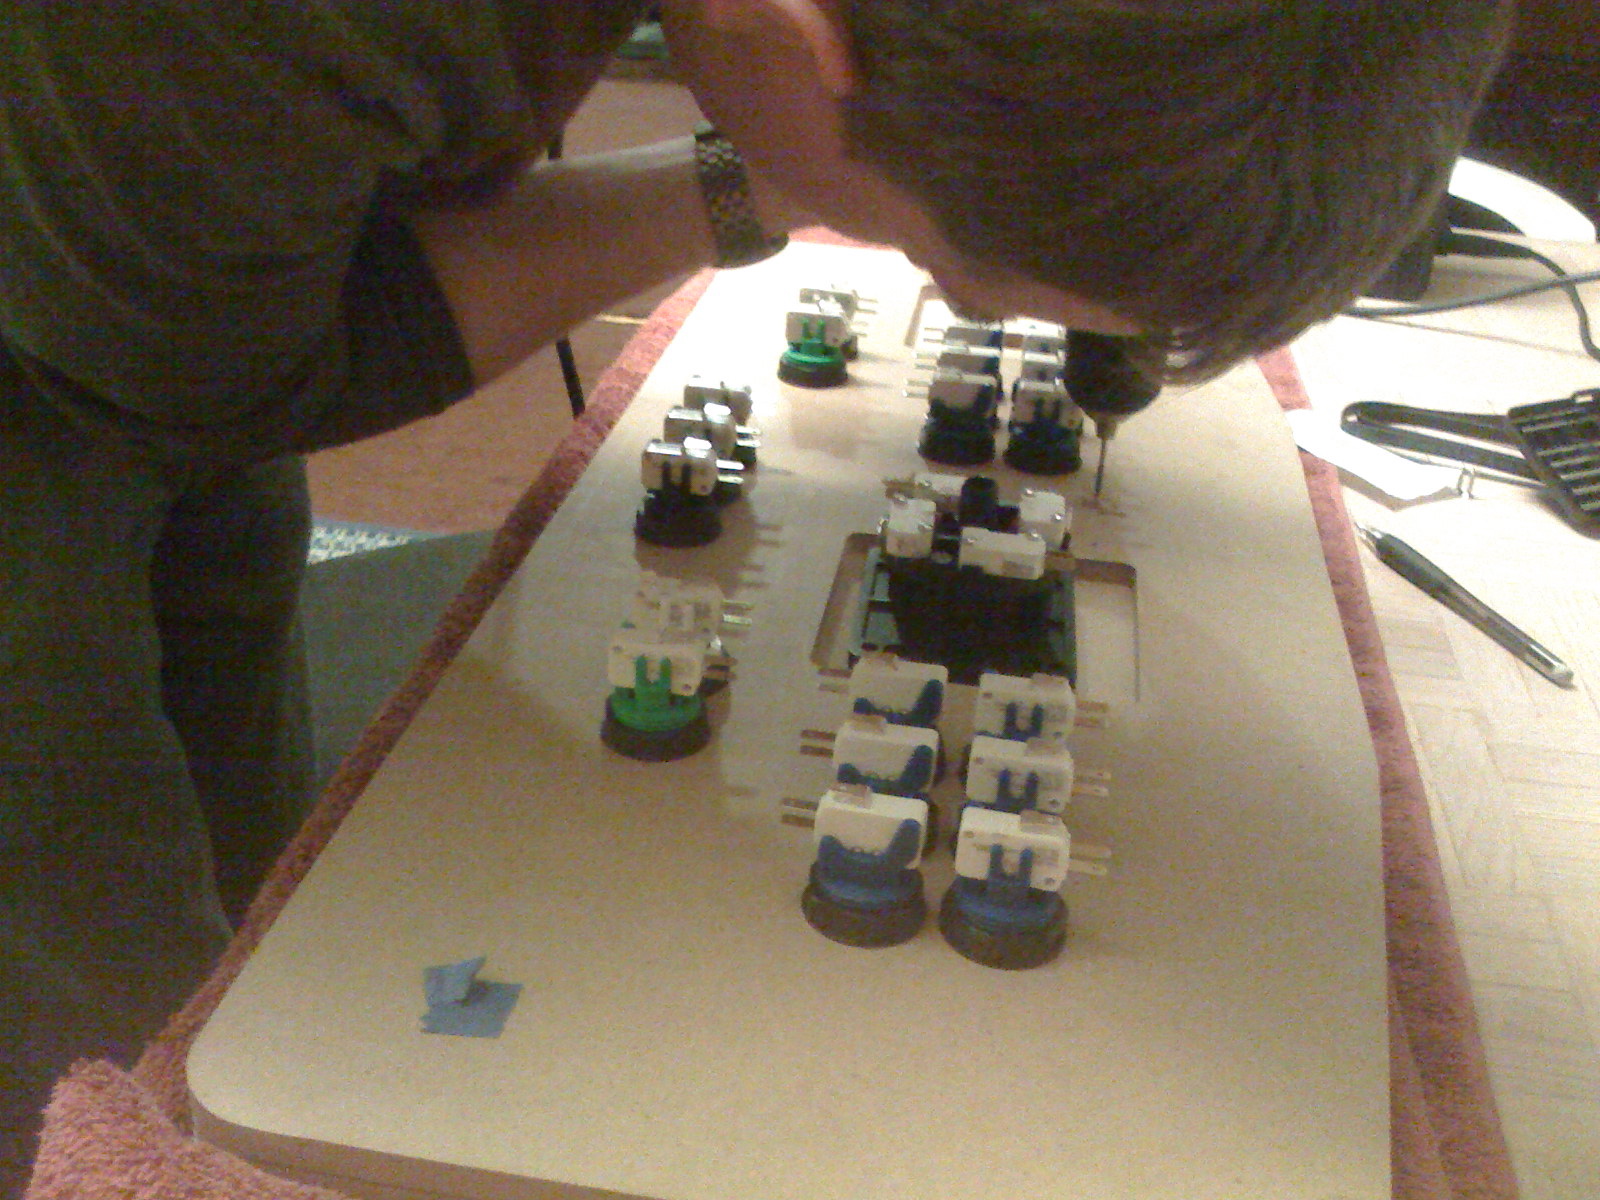
Next, we bolted on the rest of the buttons and the joysticks and drilled holes to mount the keyboard encoder.
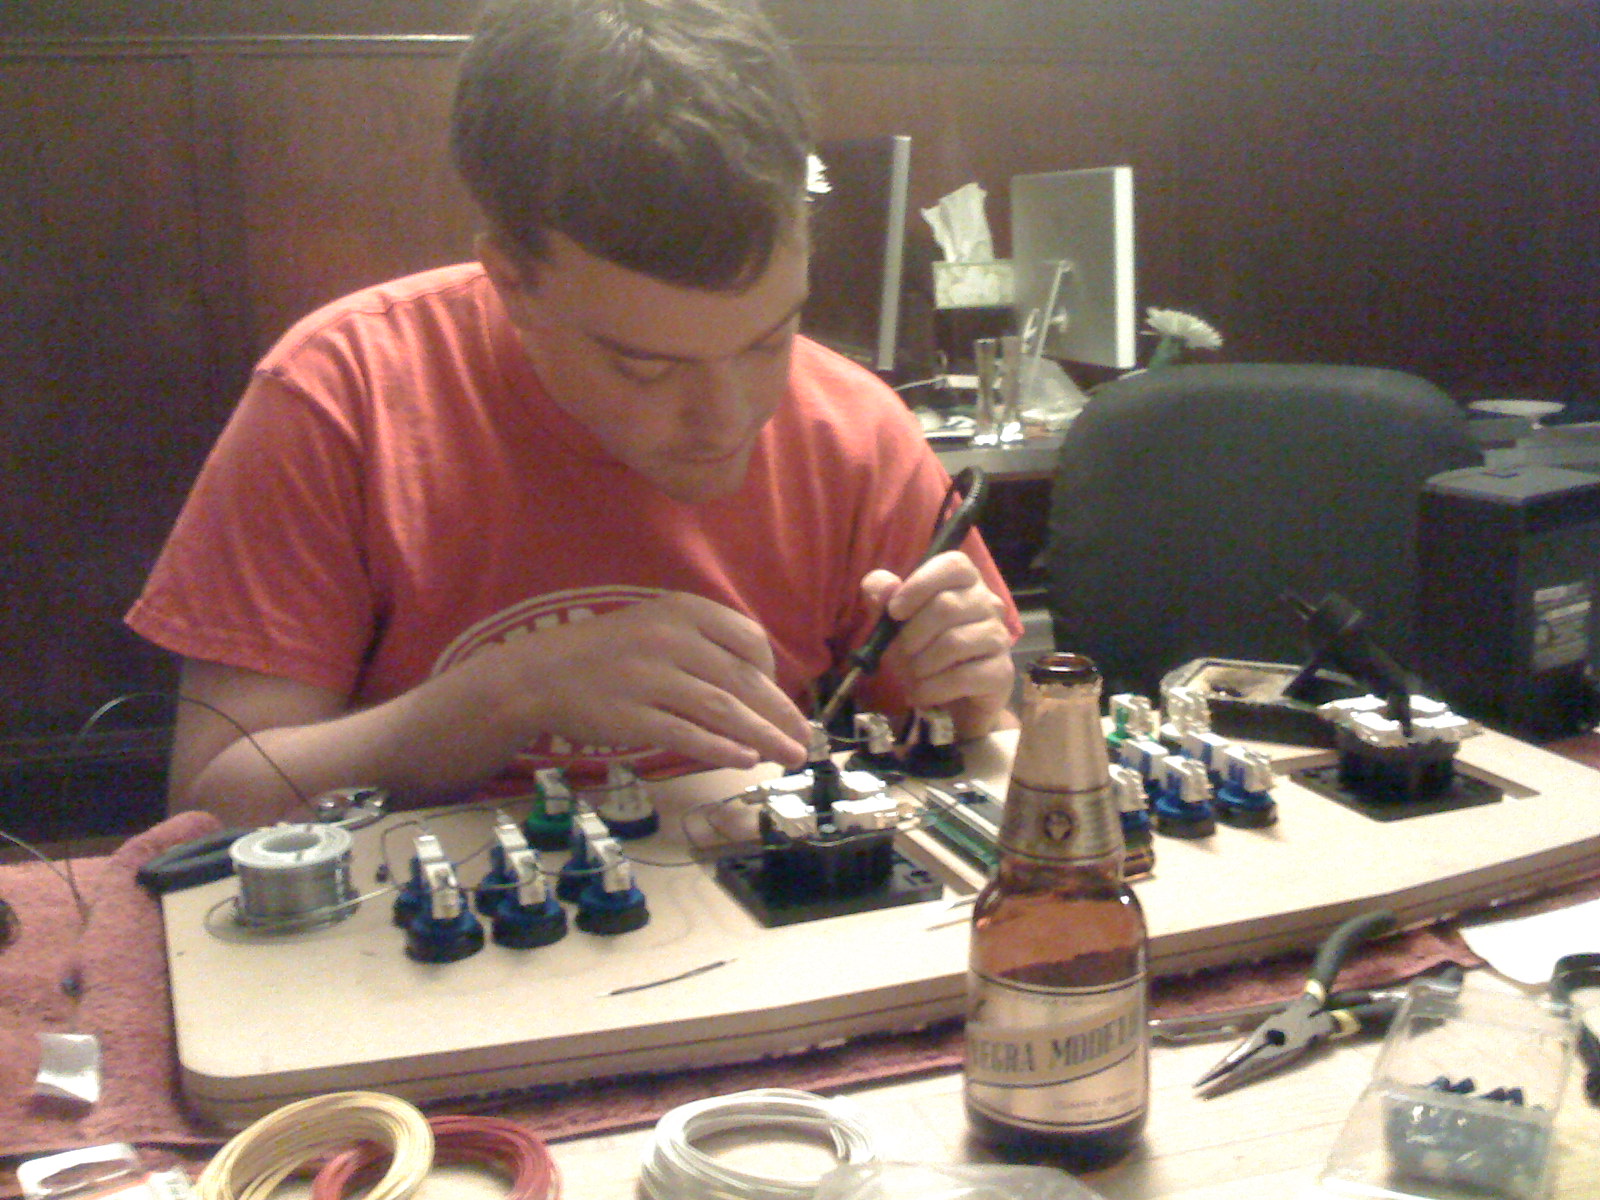
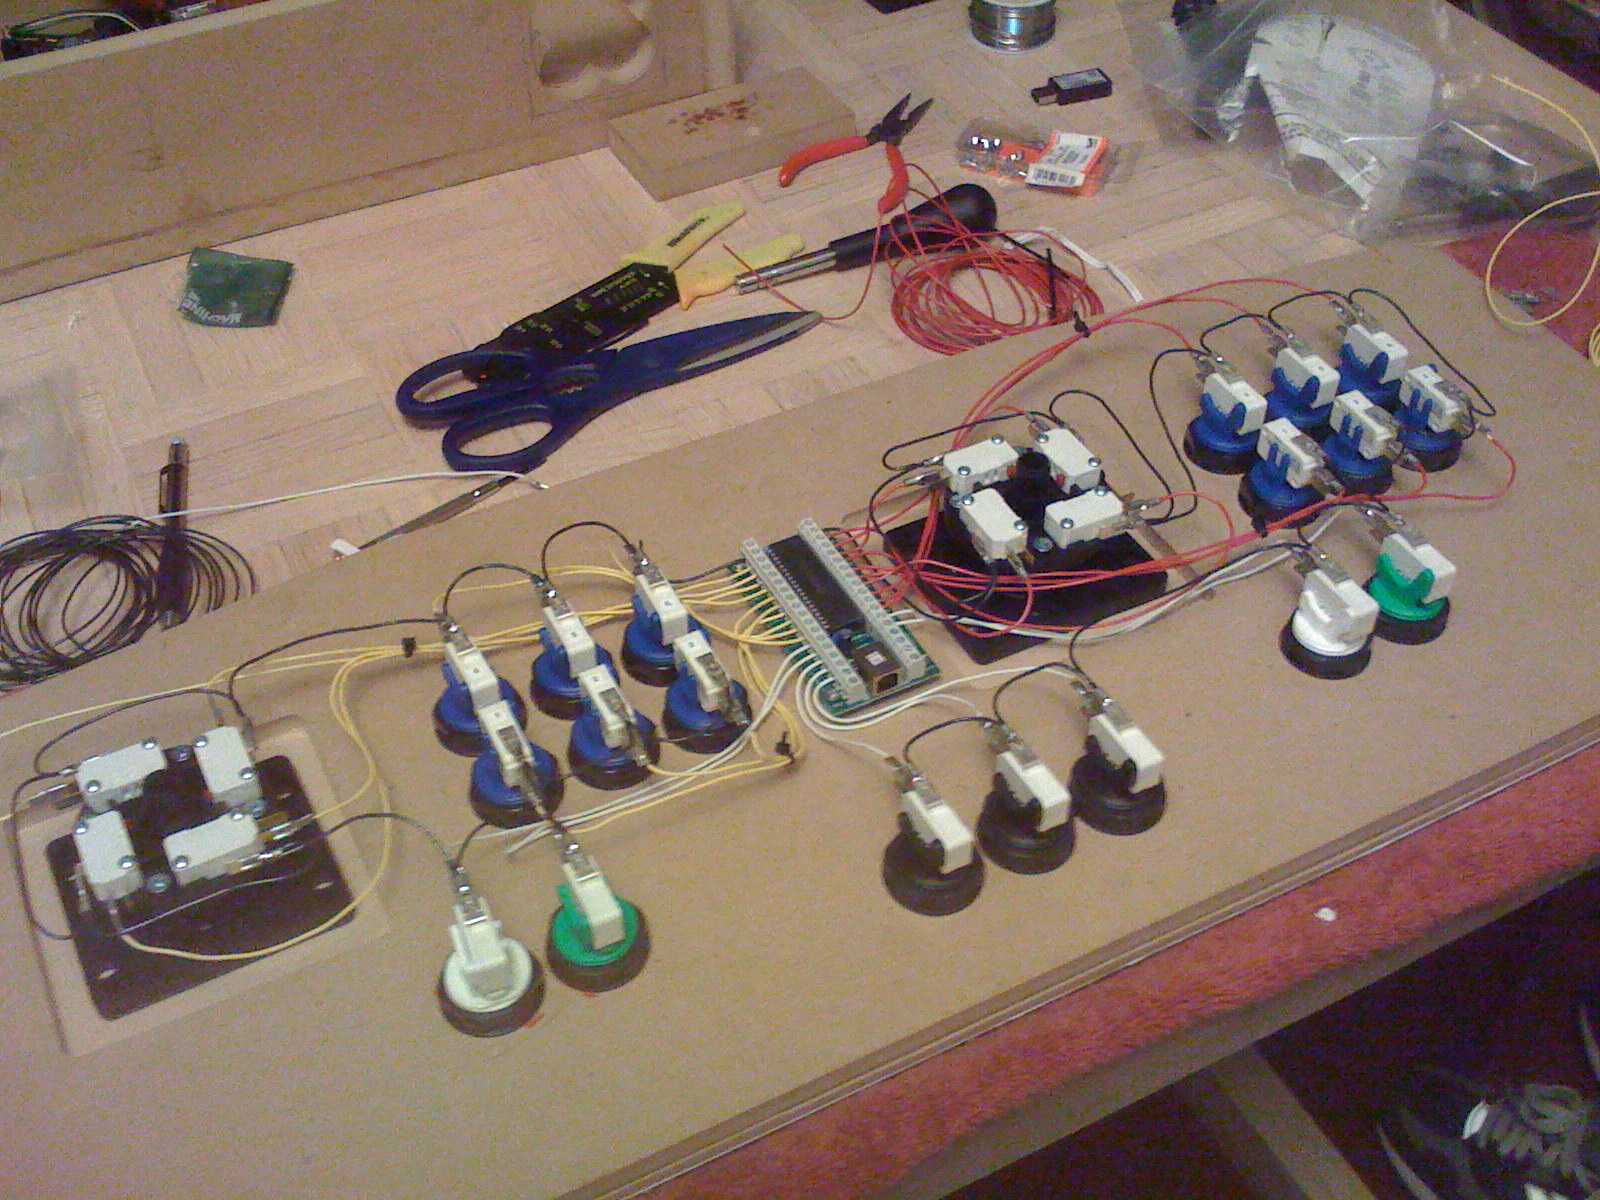
Fueled by mexican beer, we dove into stripping, crimping and soldering the signal wires for all the controls. Doug brought his Metcal soldering iron, which made the whole thing a breeze.
By the time we went to bed, all the wiring was complete.
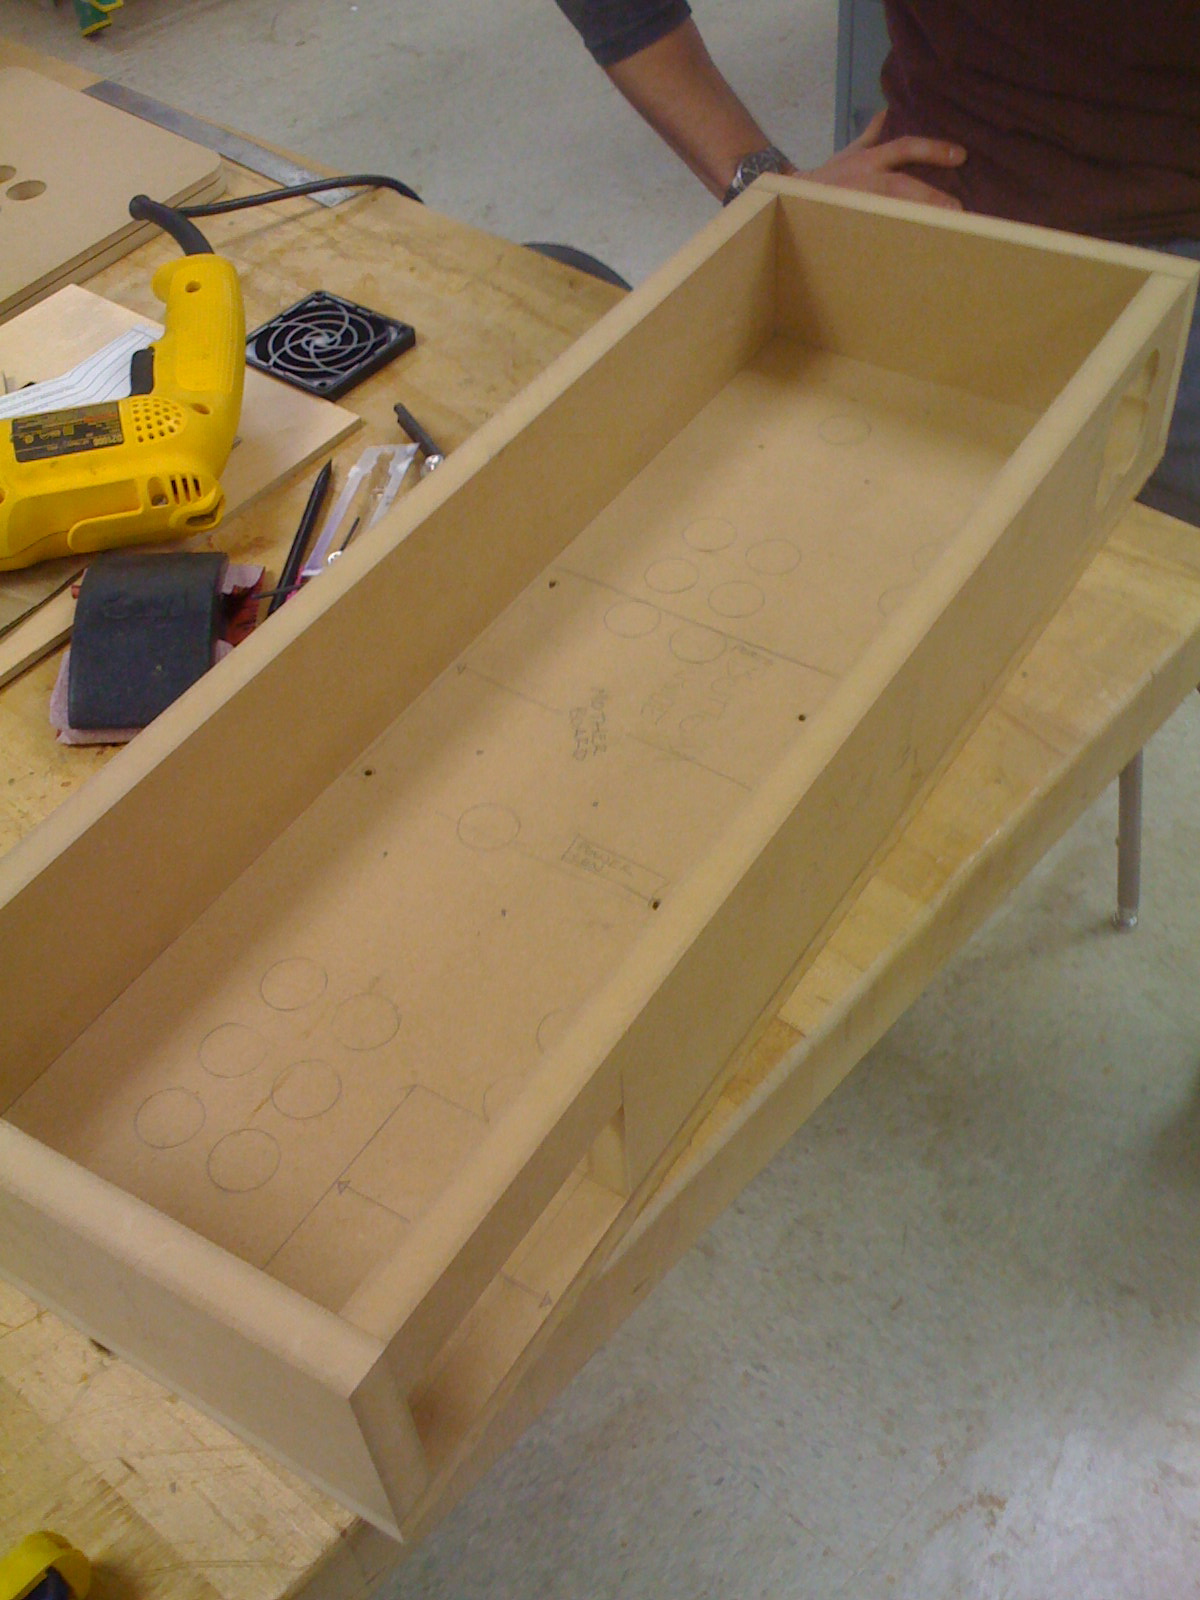
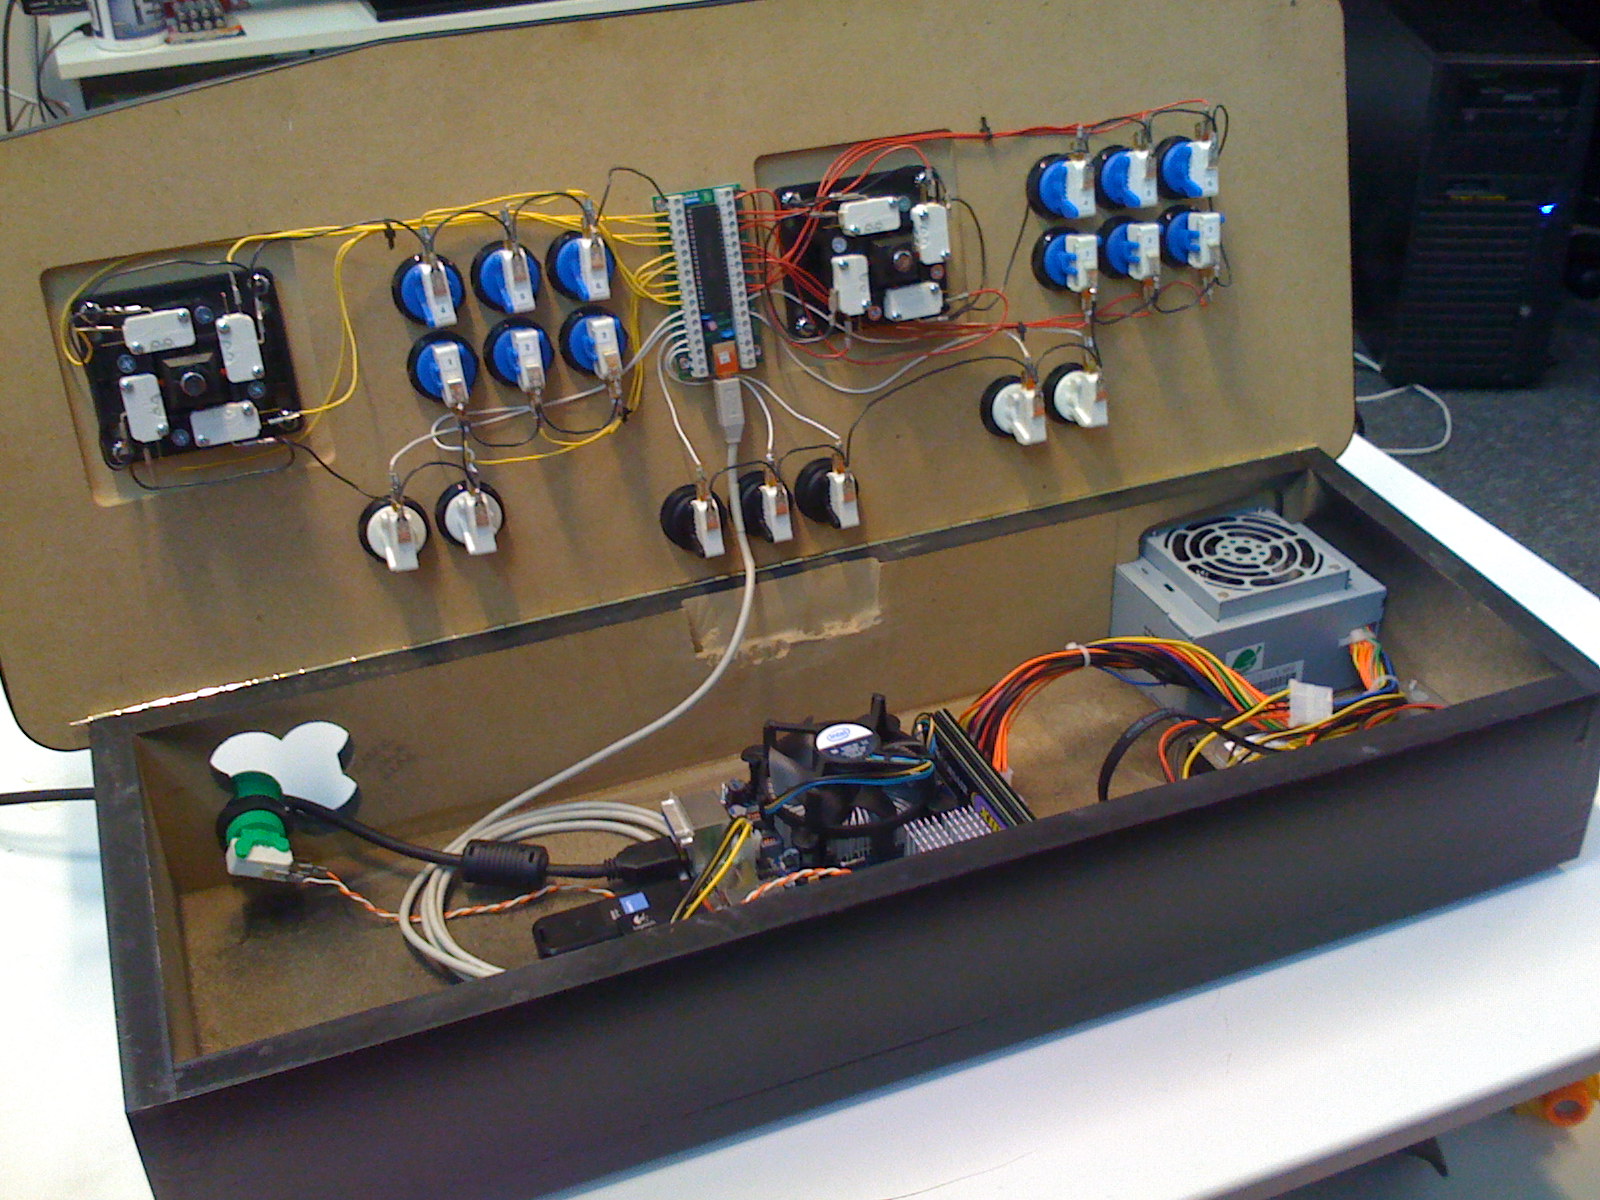
Over the next week as the last parts arrived, I painted the box, installed the hinge to hold the control panel on, and added the T-molding around the edge. Here’s a picture of the interior of the final, assembled box:
The one cable you see leaving on the left is the HDMI cord that carries audio and video to the TV. I rigged up an extra green button for the power switch of the computer. Here’s one more shot of the box, from the back. You can see the cutout for the power supply, which also provides hot air exhaust for the enclosure.
Comments
Dan — 2009-02-22 13:17:35
Wow, awesome awesome. When can Johanna and I come over to play some Ms. Pacman or Centipede? I’ll bring more Negra Modelo, since the spirit of it seems to run more on beer than on quarters.
bryan — 2009-02-22 21:07:09
Indeed it does… and I welcome all comers who bring the beer.
julie — 2009-03-30 23:33:17
that’s all very impressive. : ) and the clamps photo+caption actually made me laugh out loud.
Stevo — 2009-04-18 23:30:17
Love the simplicity of the design, a top notch MAME setup. Any chance you still have your plans lying around ? If so ,any chance I could have a look, would love to convert my Coffeecade (coffee tabel MAME ) into something portable
Cheers,
Stevo
Brisbane, Australia
bryan — 2009-04-19 19:40:24
Sure, I’ve posted them (in Corel Draw format, which is what the CNC machine would accept) at http://overt.org/images/mame_final.cdr. Glad you liked it, good luck!
cs — 2009-06-02 10:20:07
i’m not sure, but isn’t the cpu fan completely enclosed in this box? i dont see any vent for it. might wanna sort that out before your motherboard melts.
bryan — 2009-06-02 11:00:24
cs: Not quite. If you look at the last pic, you see on the right there is an air intake hole while on the left is the exhaust fan of the power supply. The power supply pulls warm air from the top of the enclosure with an 80mm fan and exhausts it, while fresh air is drawn in from the cable hole on the right. I measure stable, low temperatures for the CPU and northbridge even after hours of operation. This is part of why I chose a slower CPU on a small process, as well as integrated graphics.
nother — 2009-06-04 06:56:20
Why did you choose the standard square layout for the buttons instead of an arched layout, which seems to me to be easier on the fingers? It would also have fit well with the name (and artwork). Great work still.
The PSU fan looks like it’s on the top, so how does it pull air out? Anyway, a good copper heatsink might do the job of keeping the CPU cool too, if it gets too noisy. I have an old 667MHz Pentium 3 machine which only has a copper heatsink on the CPU (same size as modern CPU fans). Never overheats.
bryan — 2009-06-04 09:35:20
nother: I used the square layout mostly because it was classic–my buddies went and measured the button spacing and layout from a Street Fighter machine in the arcade and went with that.
The fan on the top of the PSU is an intake fan that sucks air in and forces it to exaust out the back of the enclosure. I haven’t had any trouble with overheating or a noisy CPU fan… it stays spinning pretty low even under heavy use.
jjMan — 2009-06-24 19:59:40
Nice job! The clean wiring shows the amount of attention to detail.
Sam Hanley — 2009-06-25 18:19:17
Really awesome setup you have here – the last thing I was curious about, though, is the software itself. What operating system? What software runs the menus? I’d really appreciate any of those sort of details you wouldn’t mind sharing. Thanks!
bryan — 2009-06-26 09:05:36
Sam: Sure! I wanted to run a variety of emulators (not just MAME but also for classic Nintendo and Sega home consoles). By far, the cleanest, most seamless product I found out of the many I tried was Maximus Arcade. It’s a flash-based frontend that’s very easy to customize (for example, I made a custom theme with the Great Wave print in the background). It’s got nice, big menus, and full support for game marquees and videos, so that as you scroll through the game list it loads the corresponding marquee and video (check out this youtube video for an example). It’s not free, but at $25 it’s probably the cheapest component of my box and was totally worth the price.
saitokthx — 2009-07-06 23:21:04
the design looks cool
Shae — 2009-07-08 12:52:29
out of curiosity, what was the total cost breakdown for this? Always wanted to throw together a MAME unit like this.
chris hadden — 2009-07-11 14:12:17
dude,your totally like my hero.i still would rather build a full size machine but you still pulled off something really cool good job!


