I’ve maintained gallery.overt.org in one form or another for about twenty years as a way to self-host my photos. I wrote the initial version in Cold Fusion soon after I got my first digital camera around 2000.
For the last 10+ years, it’s run on Piwigo, a PHP clone of the now-defunct Menalto Gallery. These platforms are great, but they are definitely meant for showing of a curated subset of all the photos you take.
To manage the ongoing stream of photos our family takes, we’ve been using Google Photos for over ten years. It offers automatic backup of photos as you take them, easy group albums, and slick ML-based search–I don’t even know why I’m describing it as it is ubiquitous, probably the best new Google product to come along since GMail. But it does expose you to reliance on Google to store and organize your photos–something that the self-hoster in me has always chafed at. I’ve also been vaguely worried that I could lose my photos if I ever lost access to my Google account.
Along comes immich, an open-source clone of Google Photos you can host yourself. It has all the key features of Google Photos without its basic problem of a third party controlling your photos. I set up an instance on my home server and used immich-go to ingest the ~60k photos we had saved to Google. It took a couple of days, but now I’ve got ongoing automatic backups from my phone and Leslie’s phone.
I’m leaving Google Photos turned on as a parallel solution, and to make it easier to share with others, but it feels good to have a self-hosted copy of all our photos now. Nice work immich team!
Slightly longer version of the Strava description :)
We had a week in Maui as part of our epic 8-week sumer road trip. I’m training for a half Ironman, so have been looking for interesting rides along the way.
Haleakalā is the big volcano that makes up most of Maui, and it’s a famously cool view that Leslie and I visited when we were here 14 years ago. We thought it would be cool to take the kids up. Then I thought, hey, can you ride up? Yes, you can! After reading the description I figured this one was beyond me, but a friend suggested that it might be doable if I planned my day carefully. So I started to get excited and booked a bike rental in Maui.
Alas, a wildfire started near Crater Road, which is the only road to the summit. The summit was closed and remained so for a couple of weeks as our time in Maui approached. After we got to Maui with no change in the status, I put away my hopes to try the climb and started planning for the West Maui Loop instead. The night before my ride, I checked the park service website one last time and was delighted to discover they’d reopened the summit
So just like that, the original plan was on! This morning I threw the rental bike in an Uber at 4:30am for a ride to the start in Paia.
It was an awesome climb (reputedly the world’s longest paved climb?) and quite a challenge for me. I was riding almost exactly for 5 hours, with only a few hundred yards total that wasn’t uphill. I took the “slow and steady” approach, keeping my heart rate low. I wasn’t sure how the altitude would hit me as I climbed toward the 10,000ft summit. It was not too bad, but if you look at the Strava report you can see that my power drops a lot as I approach the summit.
My wonderful and understanding wife drove the kids to the summit to meet me and give me a ride back down.
It’s hard to describe an experience like this that is so internal and hits everyone differently, but I will say that at a certain point about 2500ft of climb / 2 hours from the top I started to really believe I would finish, and a banger of a Justice remix came on my earbuds, and I actually started to cry with joy. There is absolutely no reason to do things like this–they are time consuming, self-absorbed, and physically demanding beyond any reasonable fitness benefit you might gain. But somehow there is also something profoundly affirming and grounding about them, too.
Leslie says that this ride means I can no longer say I’m not a cyclist :) Notes for the future:
Things I should have brought but didn’t: more snacks, chamois butter.
Things I brought but didn’t need: my large chainring, brakes.
File this under ‘further adventures in pointlessly fast home internet.’
I noticed on a billboard that Google Fiber was offering new 5- and 8-gigabit speed tiers for their home internet. I absolutely did not require an upgrade, as I was already on an unusably fast 2 gigabit plan, but that has never stopped me in the past. Just ask my parents, whom I enrolled in the beta testing programming for Road Runner cable internet when I was a tween in the nineties.
I hopped on the Google Fiber site and signed up for the next available appointment, one week away. A couple of days before then, I got a call saying we’d need to delay for 10 more days so they could ‘upgrade the fiber in my neighborhood’ (?)
I knew that I couldn’t take advantage of this new speed without making some gratuitous home networking upgrades, so I got to work on that to pass the time.
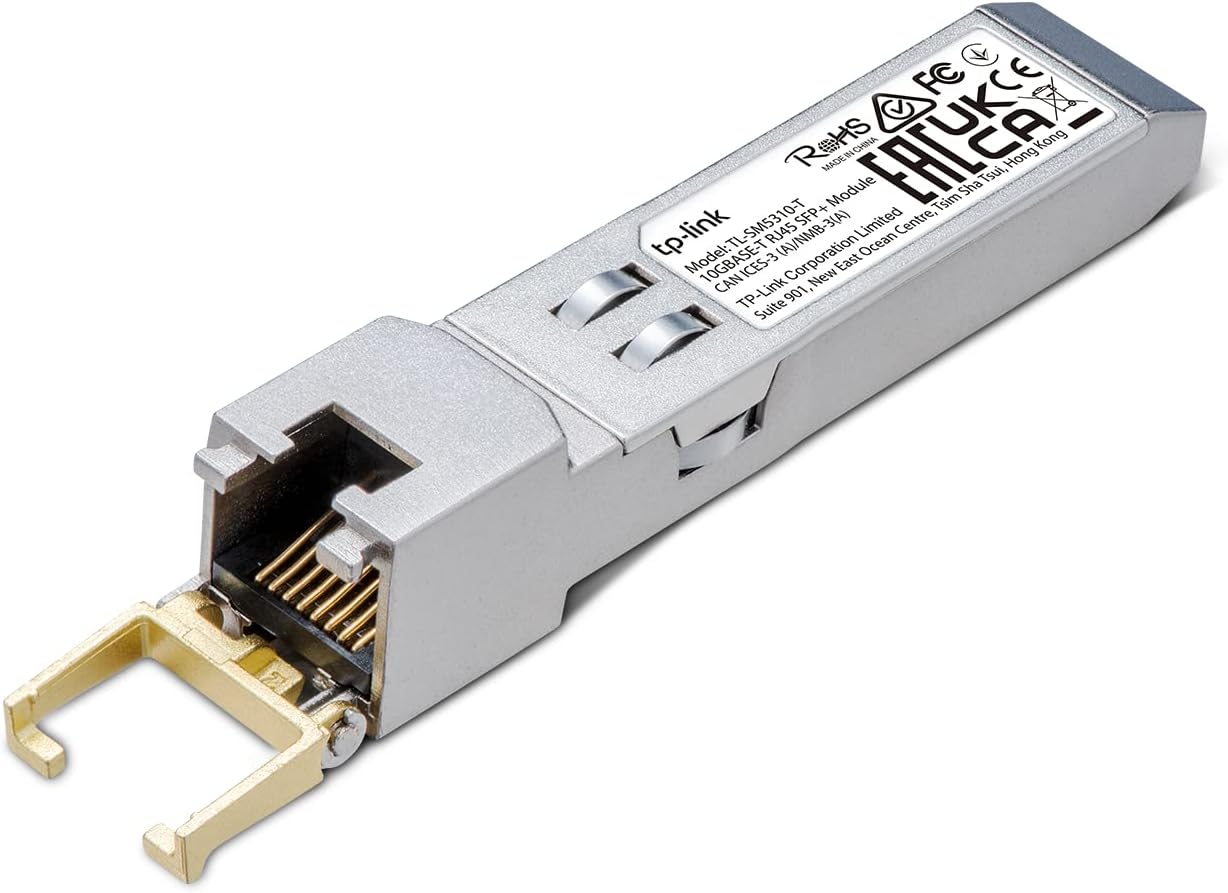
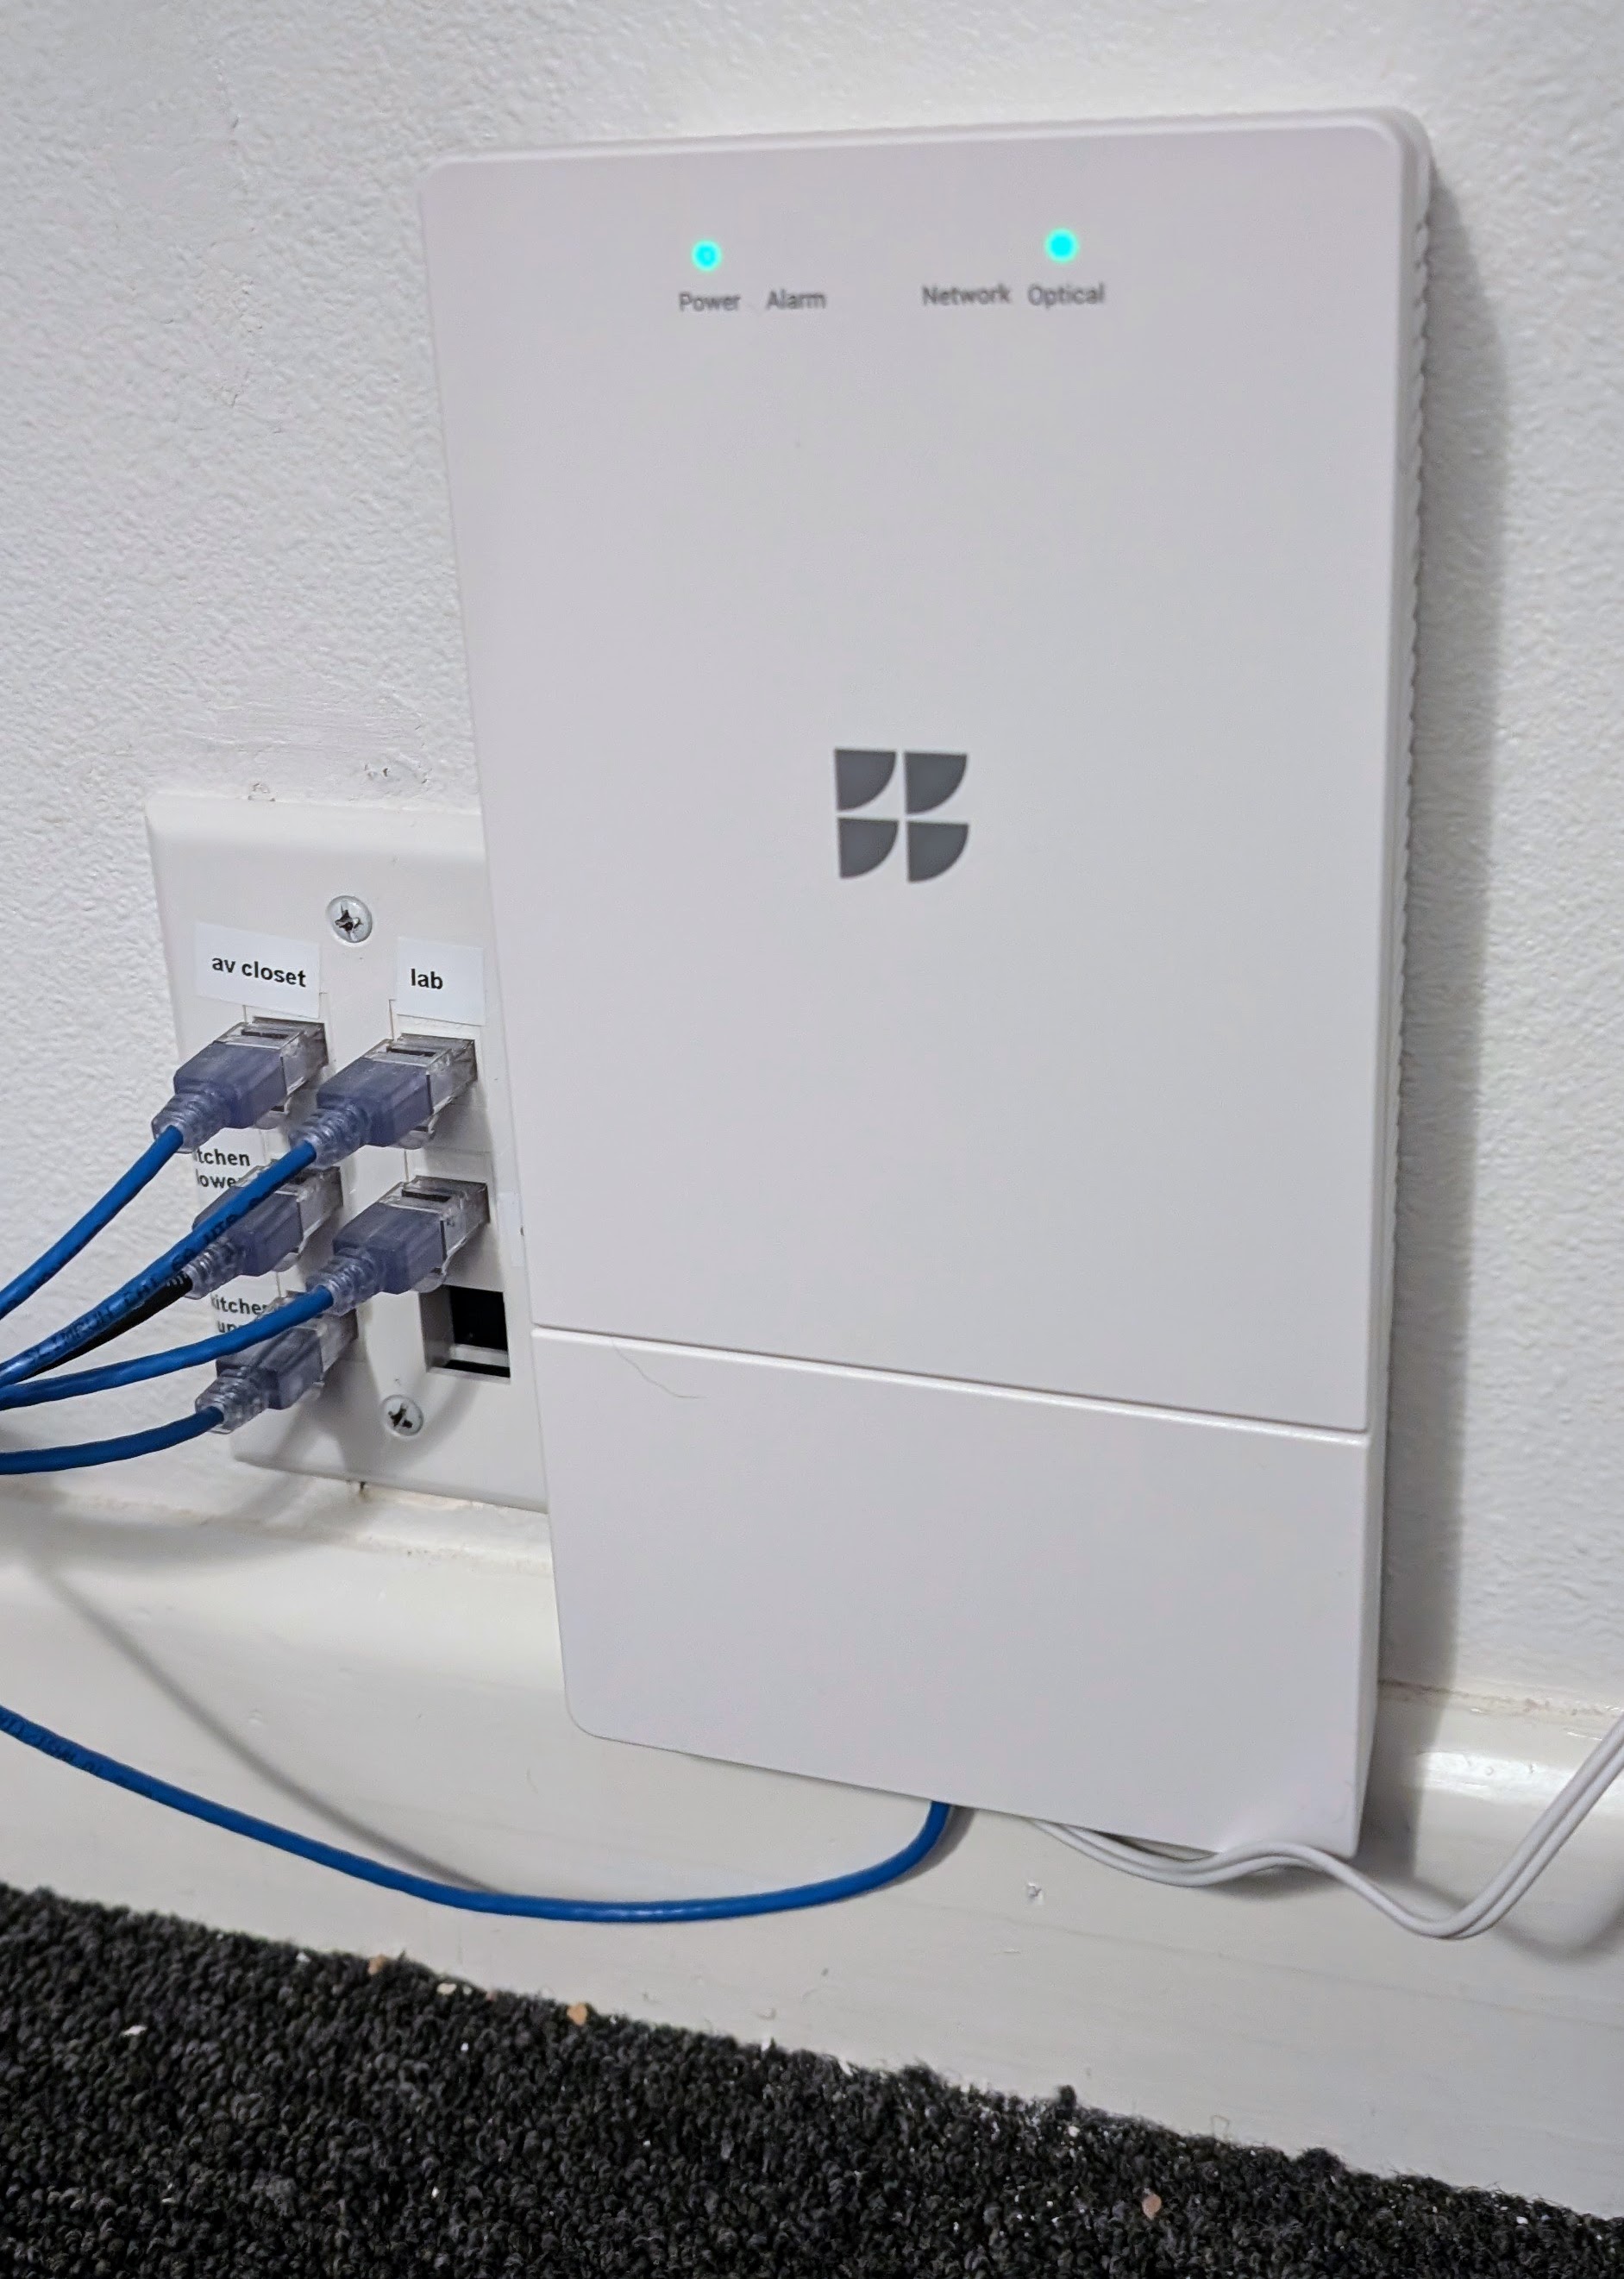
I already use a Unifi ‘Dream Machine’ SE (UDM SE) as my home internet gateway, which supports a 10Gbps WAN connection via SFP+. My existing Fiber Jack, model GOGP220C, had an ethernet port that will train at 1, 2.5, or 10Gbps, and so I started out by plugging in a generic 10GBase-T SPF+ module into the UDM SE WAN port and verifying it came up as 10Gbps.
Next, I needed to upgrade the connection to my home server to 10Gbps. It sits in a media closet separated from the gateway by a ~20ft run of CAT6 going through the crawlspace. So, used another couple of the above SFP+ ethernet adapters and placed an inexplicably cheap switch that had 2 10Gbps SFP+ ports (and 4x2.5Gbe ethernet ports, all for $50, how?) next to the server, using a cheap direct-attach copper cable between the switch and a basic 10Gbps SFP+ PCIe network card based on the Intel 82599EN chipset that unRaid supports out-of-the-box.
A week later, the Google Fiber tech arrived and upgraded my Fiber Jack to the newer GOXP330C model that supports speeds higher than 2Gbps. It’s slightly bigger than the old model, and requires a 1-amp (vs. 1/2-amp) power supply. He didn’t touch the fiber drop to my house, which was a relief, because I have rerouted the entry into the house into my back utility room using my own armored cable that I carefully installed and didn’t relish the idea of redoing. It turned out the ‘fiber upgrade’ was actually a card installed in the neighborhood’s fiber hutch to support the higher speed.
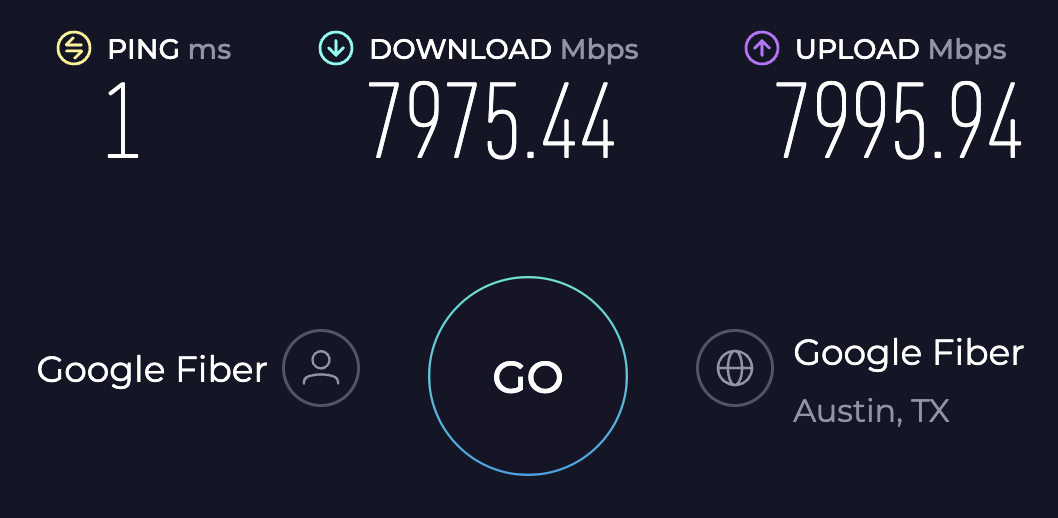
The tech was immediately able to pull the full 8Gbps symmetric to his laptop, but I was only getting about 3.5Gpbs down and 6Gbps up. A bit of research revealed that the UDM SE can only handle 3.5 when doing ‘deep packet inspection. After I disabled that I was able to get the 7.9/6.6 you see at the top of the post from the Speedtest CLI running on a VM on my NAS box.
I guess now I just have to wait until we break into the double digit gigabits!
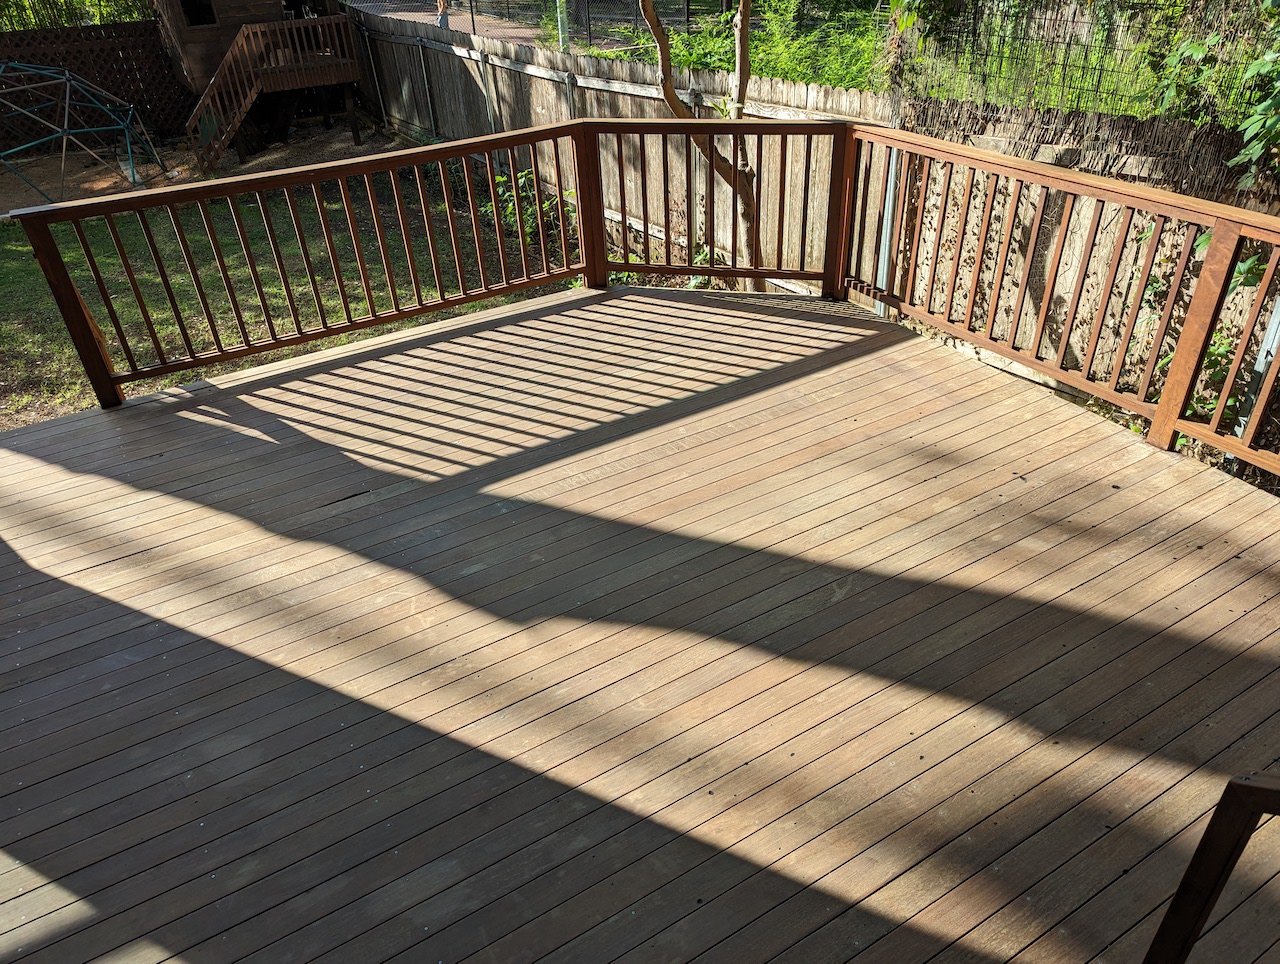
When we moved into the new house last year, one of the things we inherited was a big back porch and deck, built around 1999. It was impressively sturdy for something over 20 years old, but it was gray and dingy and I assumed we’d have it replaced, because 20 years seemed like more than a reasonable lifespan for a wood deck.
Then I was trying to put a screw in a post to mount a light, and the screw just snapped as I tried to drive it. The wood was incredibly hard and dense, and after some googling I concluded it must be a hardwood, probably ipe, also known as an ‘ironwood’ because it sinks in water. This wood can last for generations and I wondered: could I restore it?
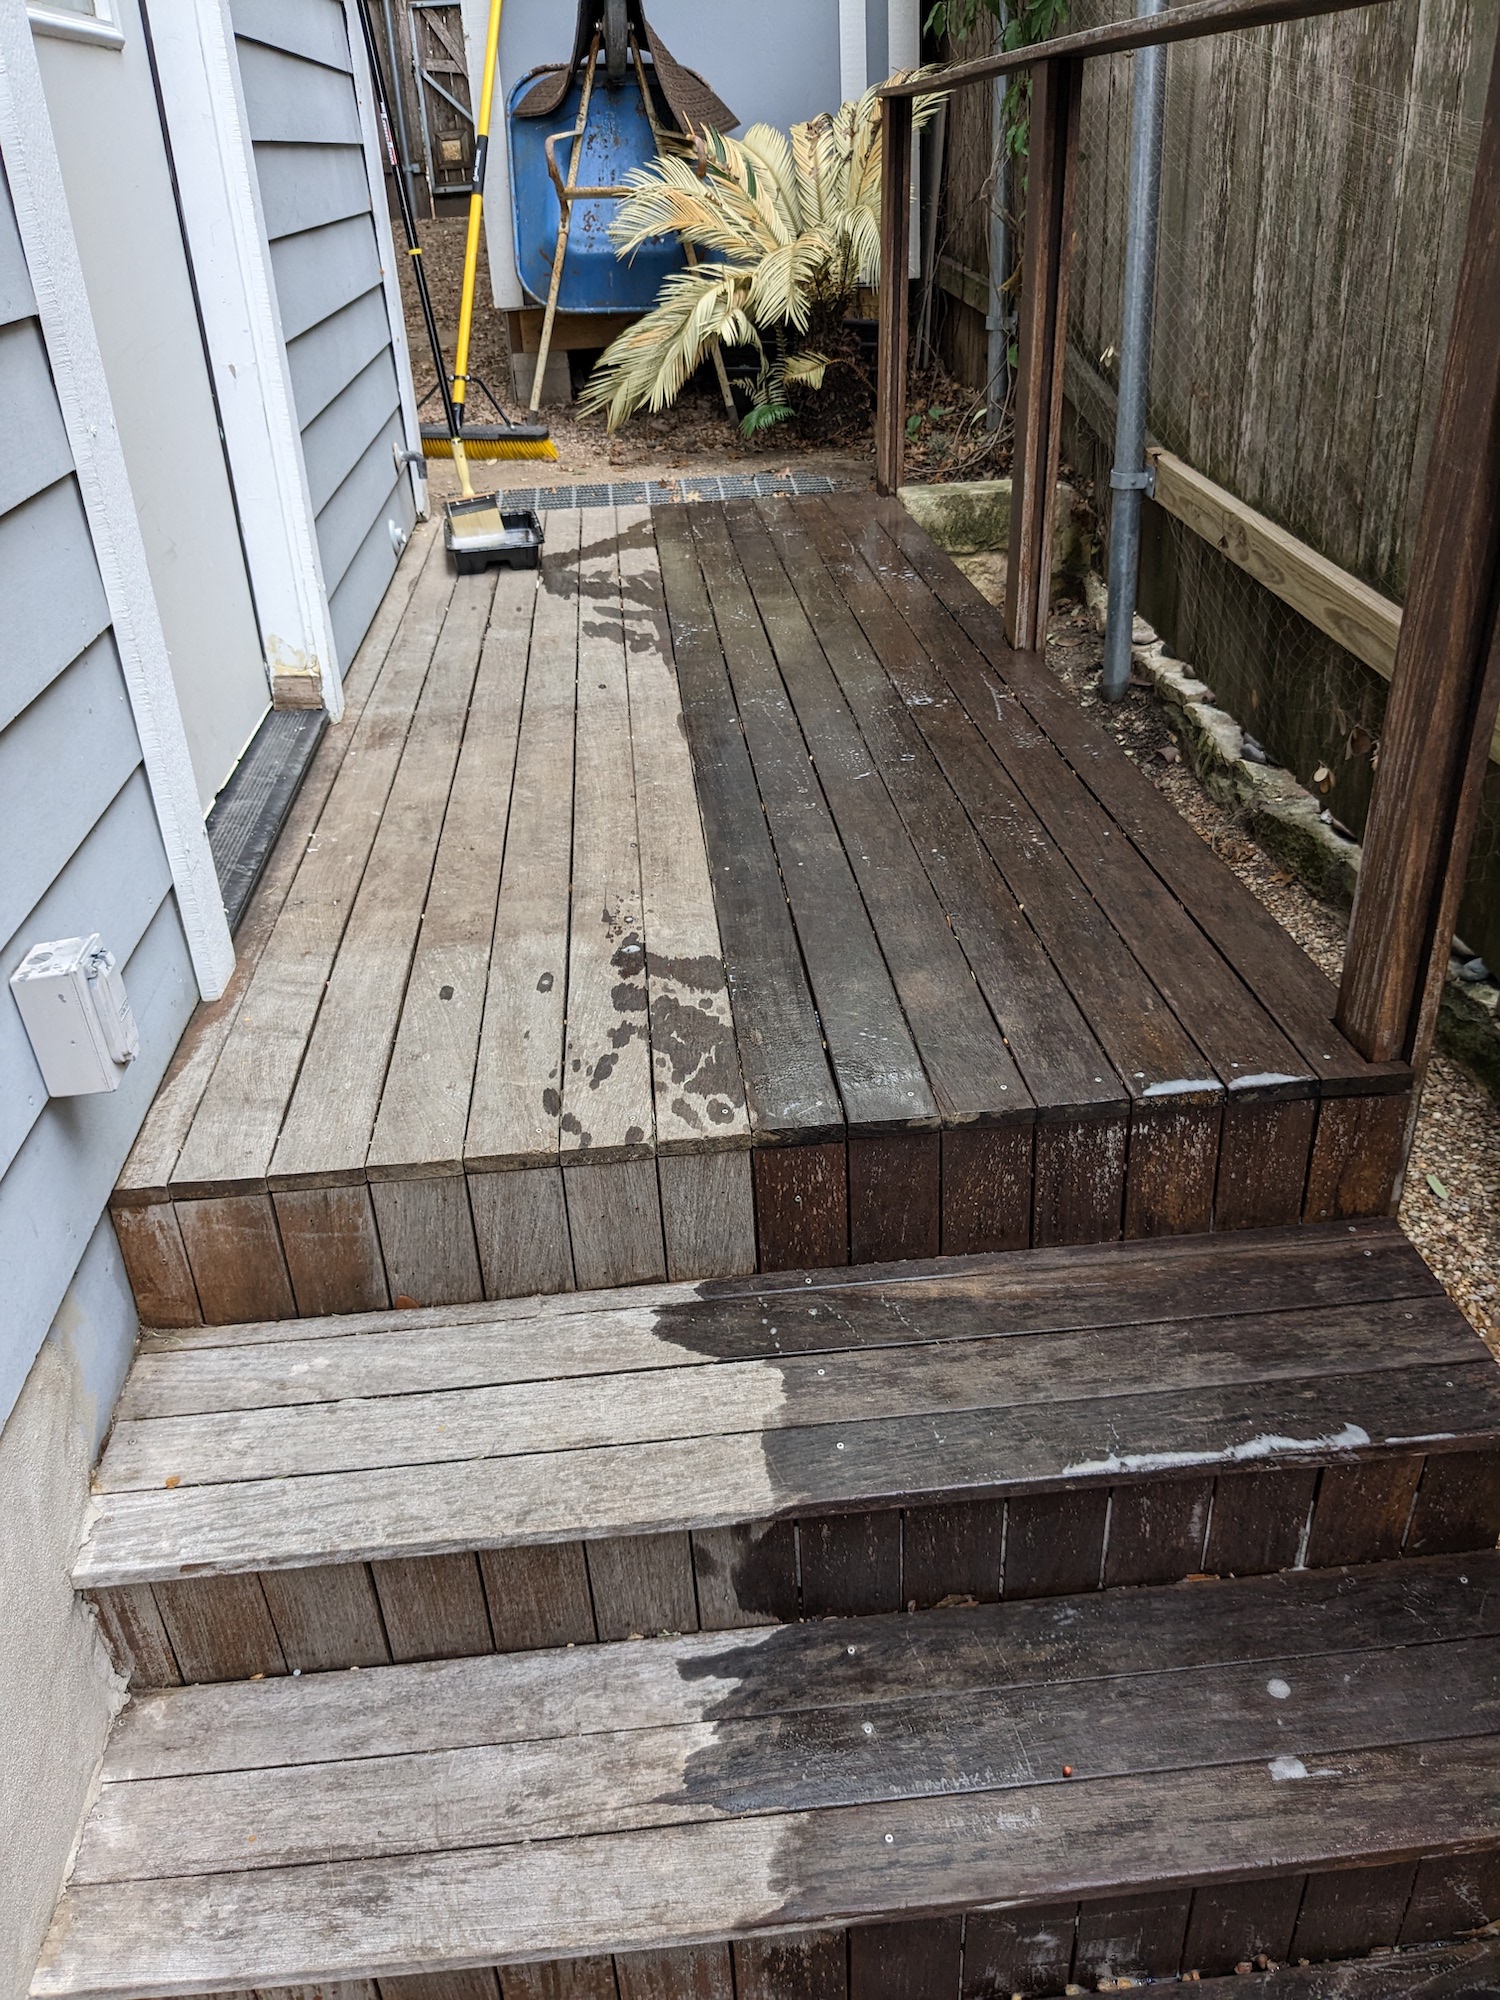
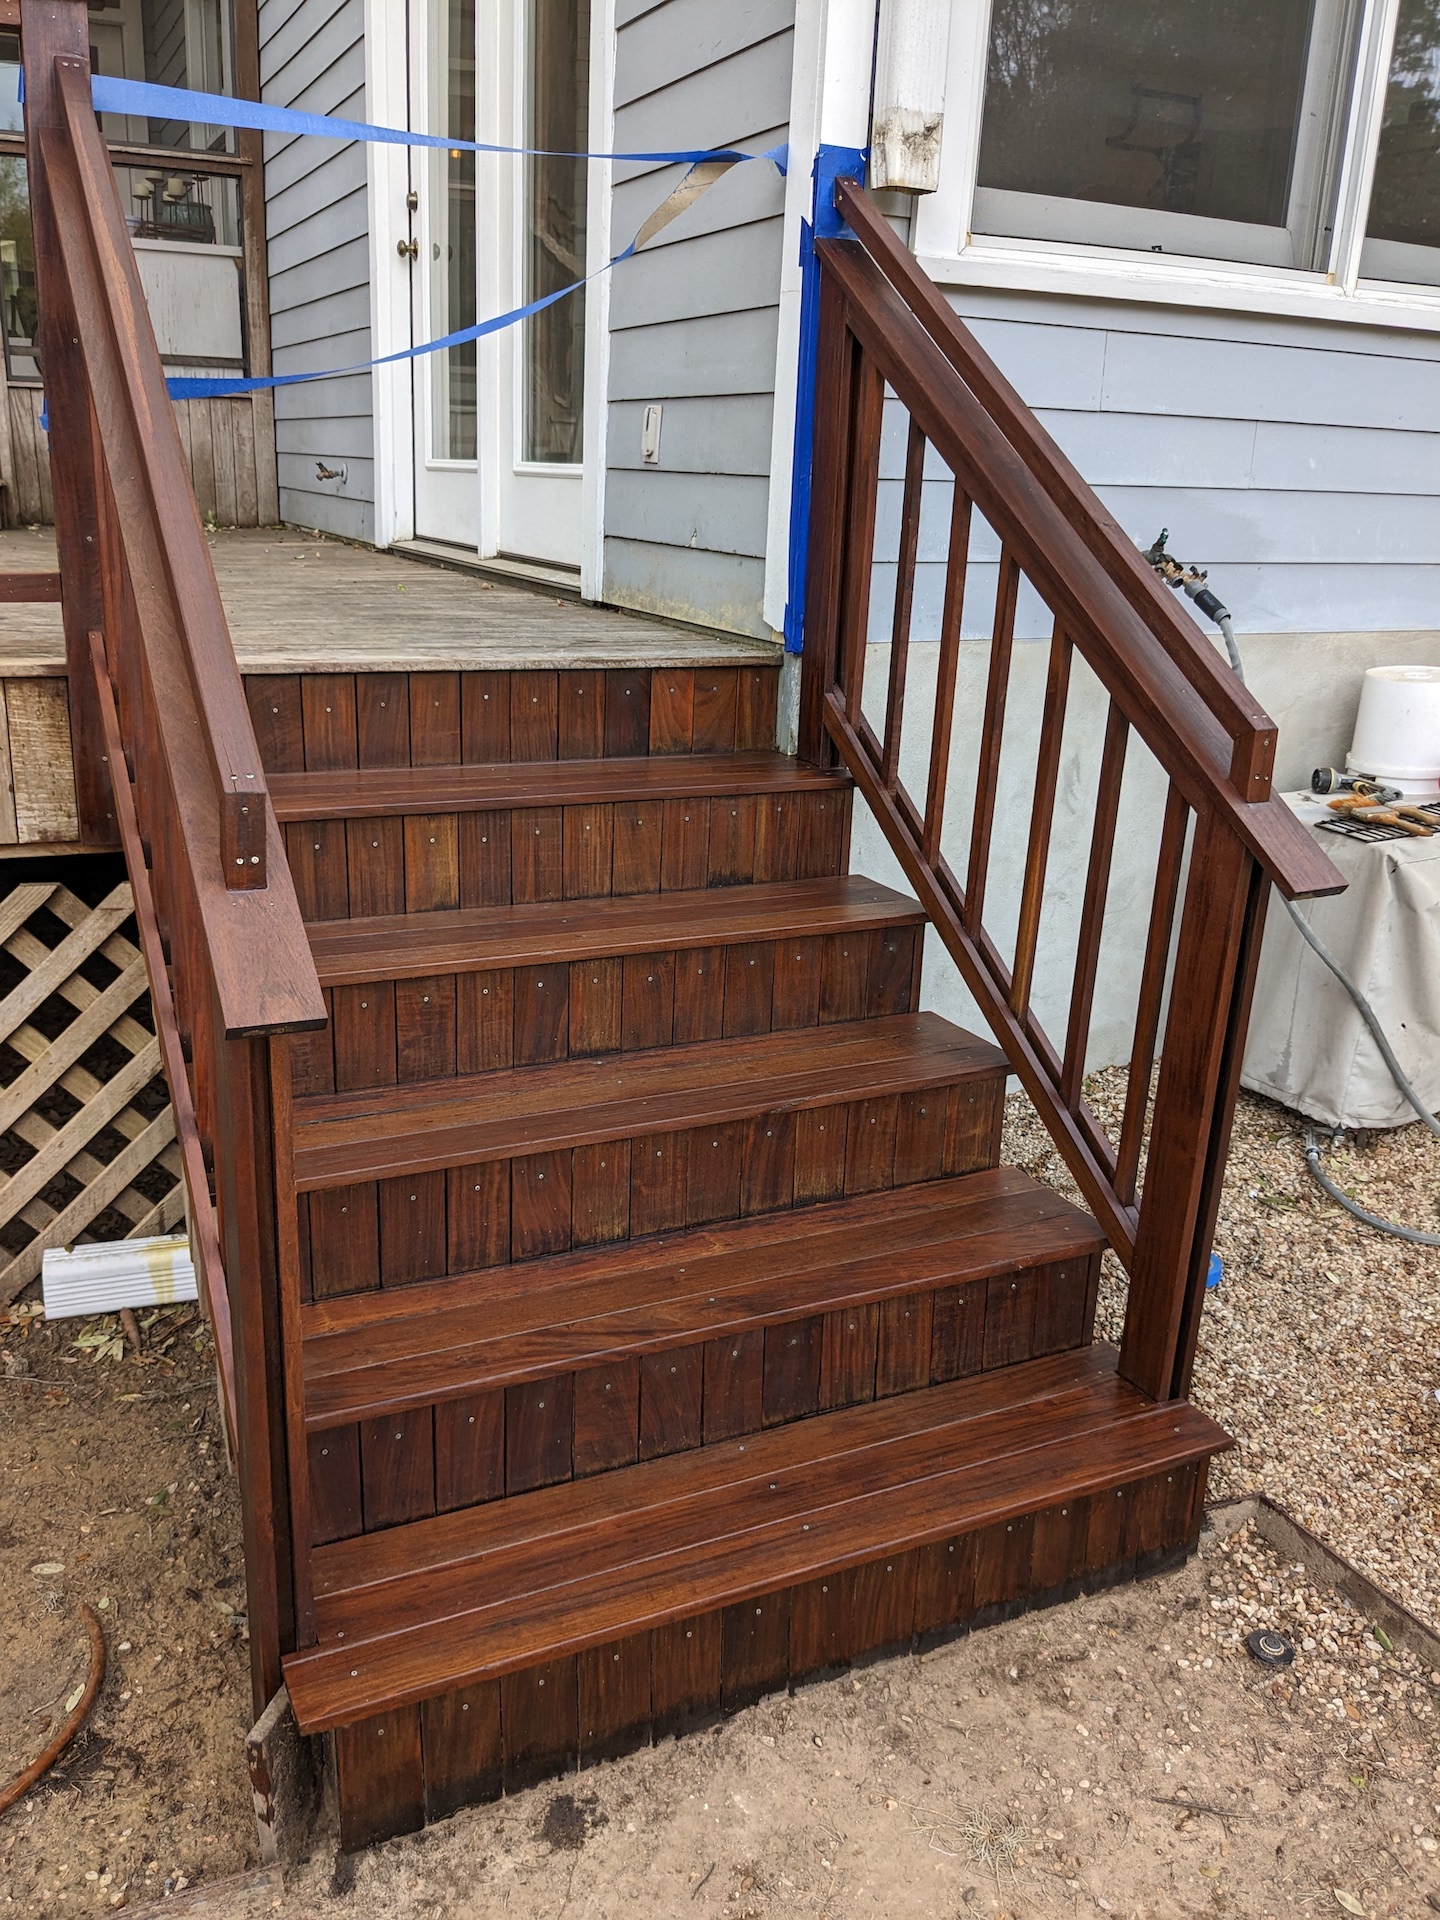
The side-deck test
The was a small landing and stairway on the side of the house made of the same wood that I decided to use as a test. Here’s the deck in the middle of stripping–probably unnecessary given how little finish was left.
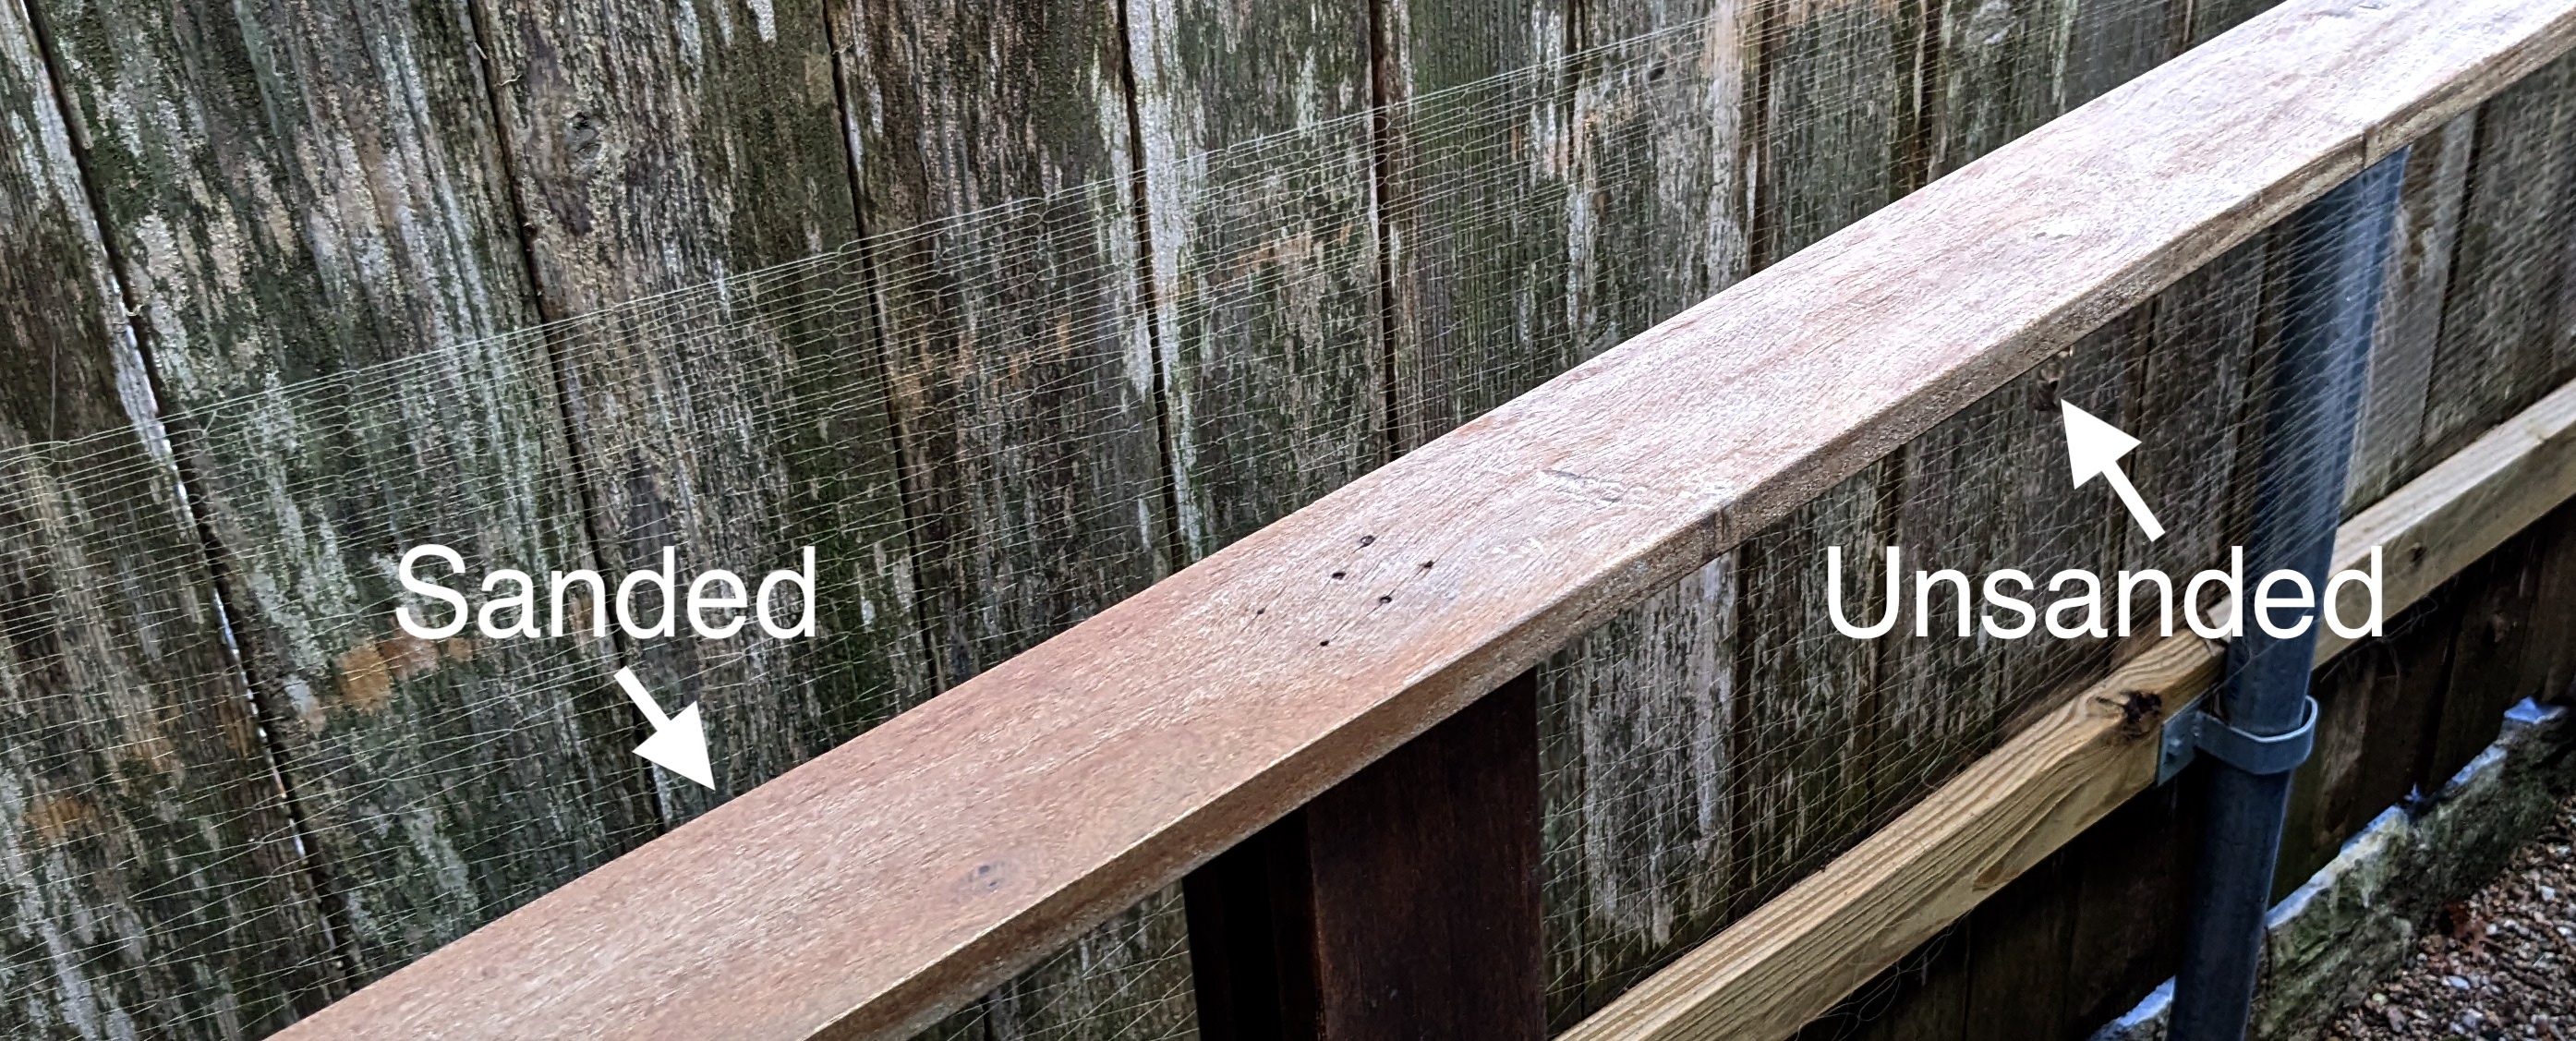
What was really amazing is when I started to sand it. Just getting a tiny layer off was a lot of work–this wood is harder to sand than anything I’ve ever encountered, eating up 80-grit sandpaper in just a few minutes. But it revealed brand-new looking wood underneath:
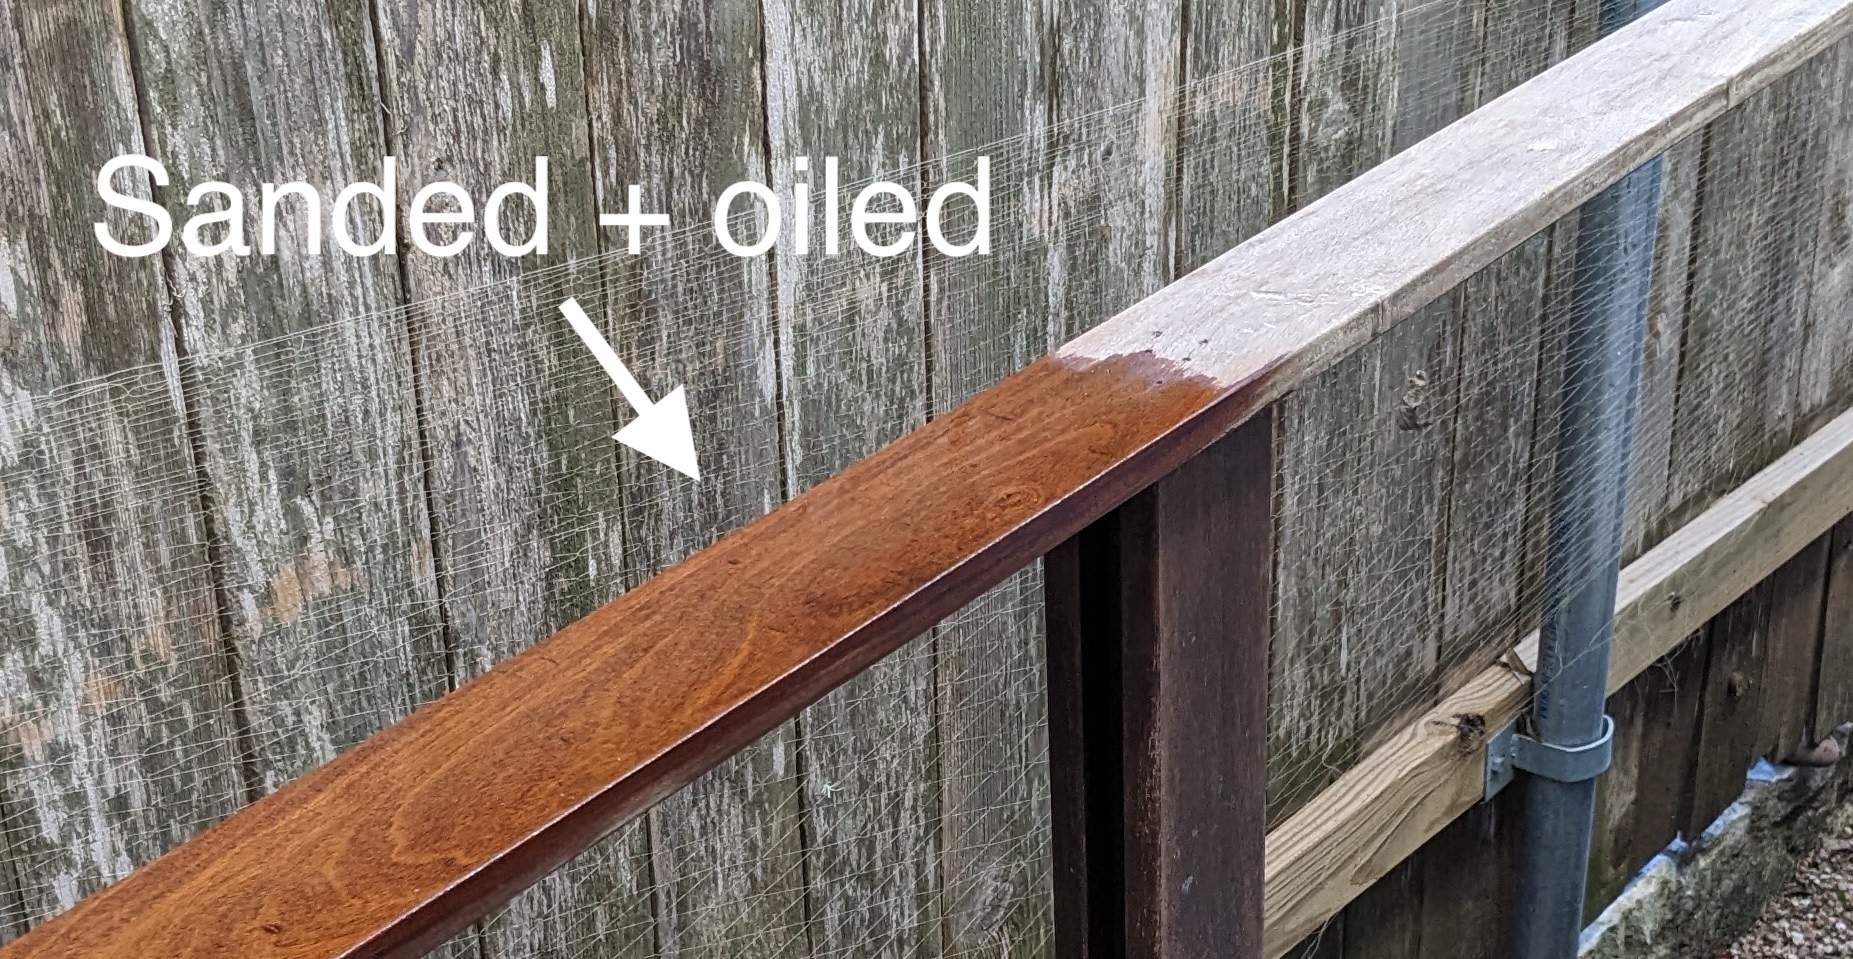
And then adding a layer of hardwood oil (Penofin) really made it pop:
Wow! I got pretty excited by this result and went ahead and sanded the rest of this small side deck, steps and railing. I was pretty happy with the result.
So I decided to undertake refinishing the entire deck. Given that this small side deck took me about 10 hours to sand, a wiser man would at this point hire a professional to take over the job. But there is something about this kind of work I actually find incredible soothing and satisfying, so I decided, what the heck, I’ll do it myself!
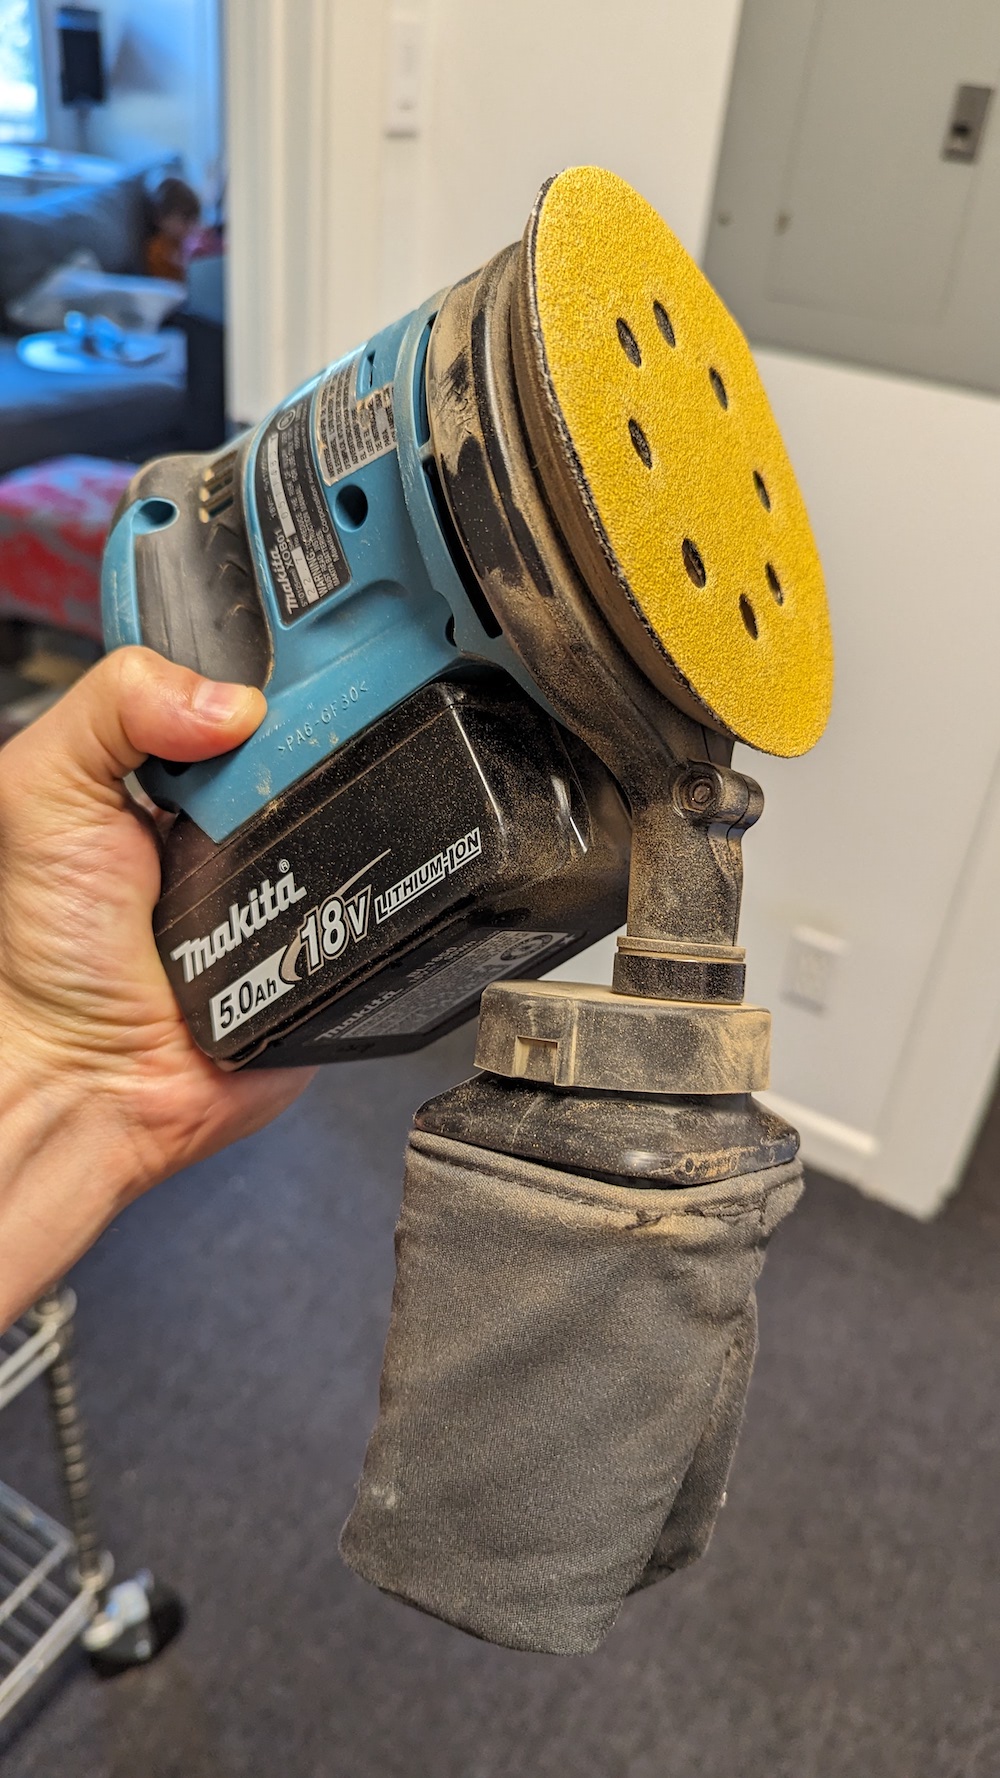
The tools
I decided to start my work on the main deck with the railings, which needed to be sanded with a hand-held sander. I alternated using a 5 inch random-orbital sander:
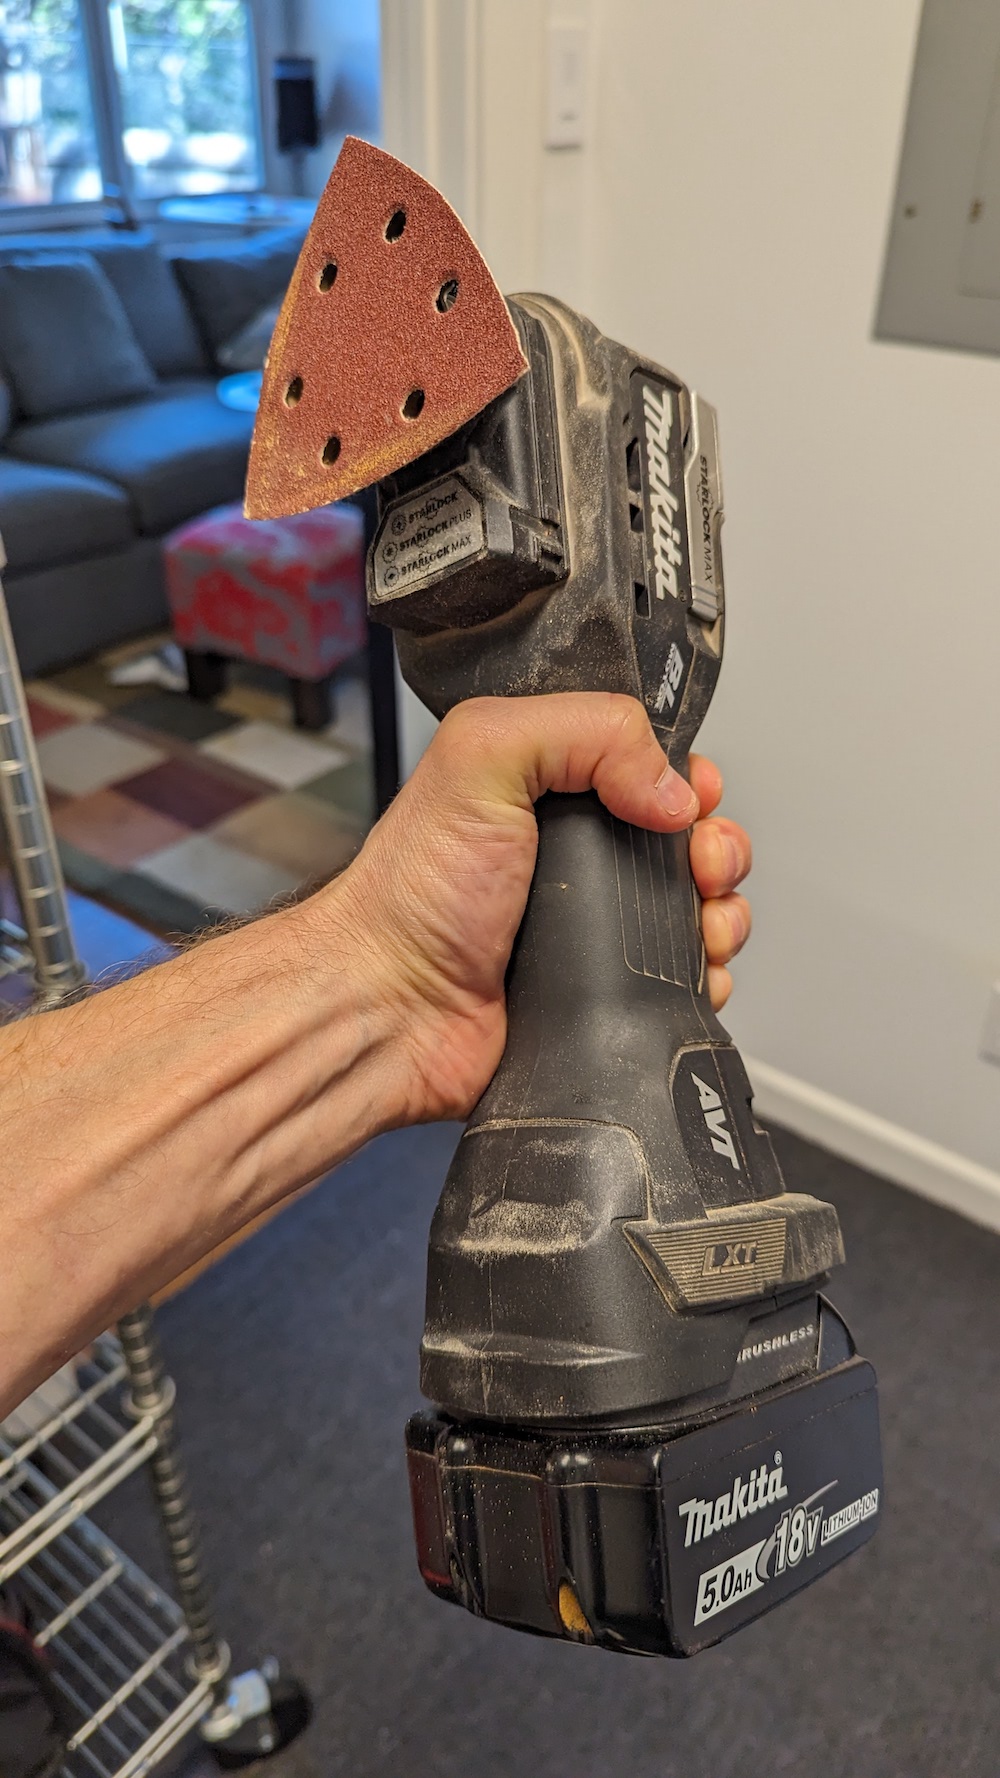
But this was too big to fit between the slats of the railing, and it couldn’t reach into corners. For that, I had to use a sanding attachment for my multitool:
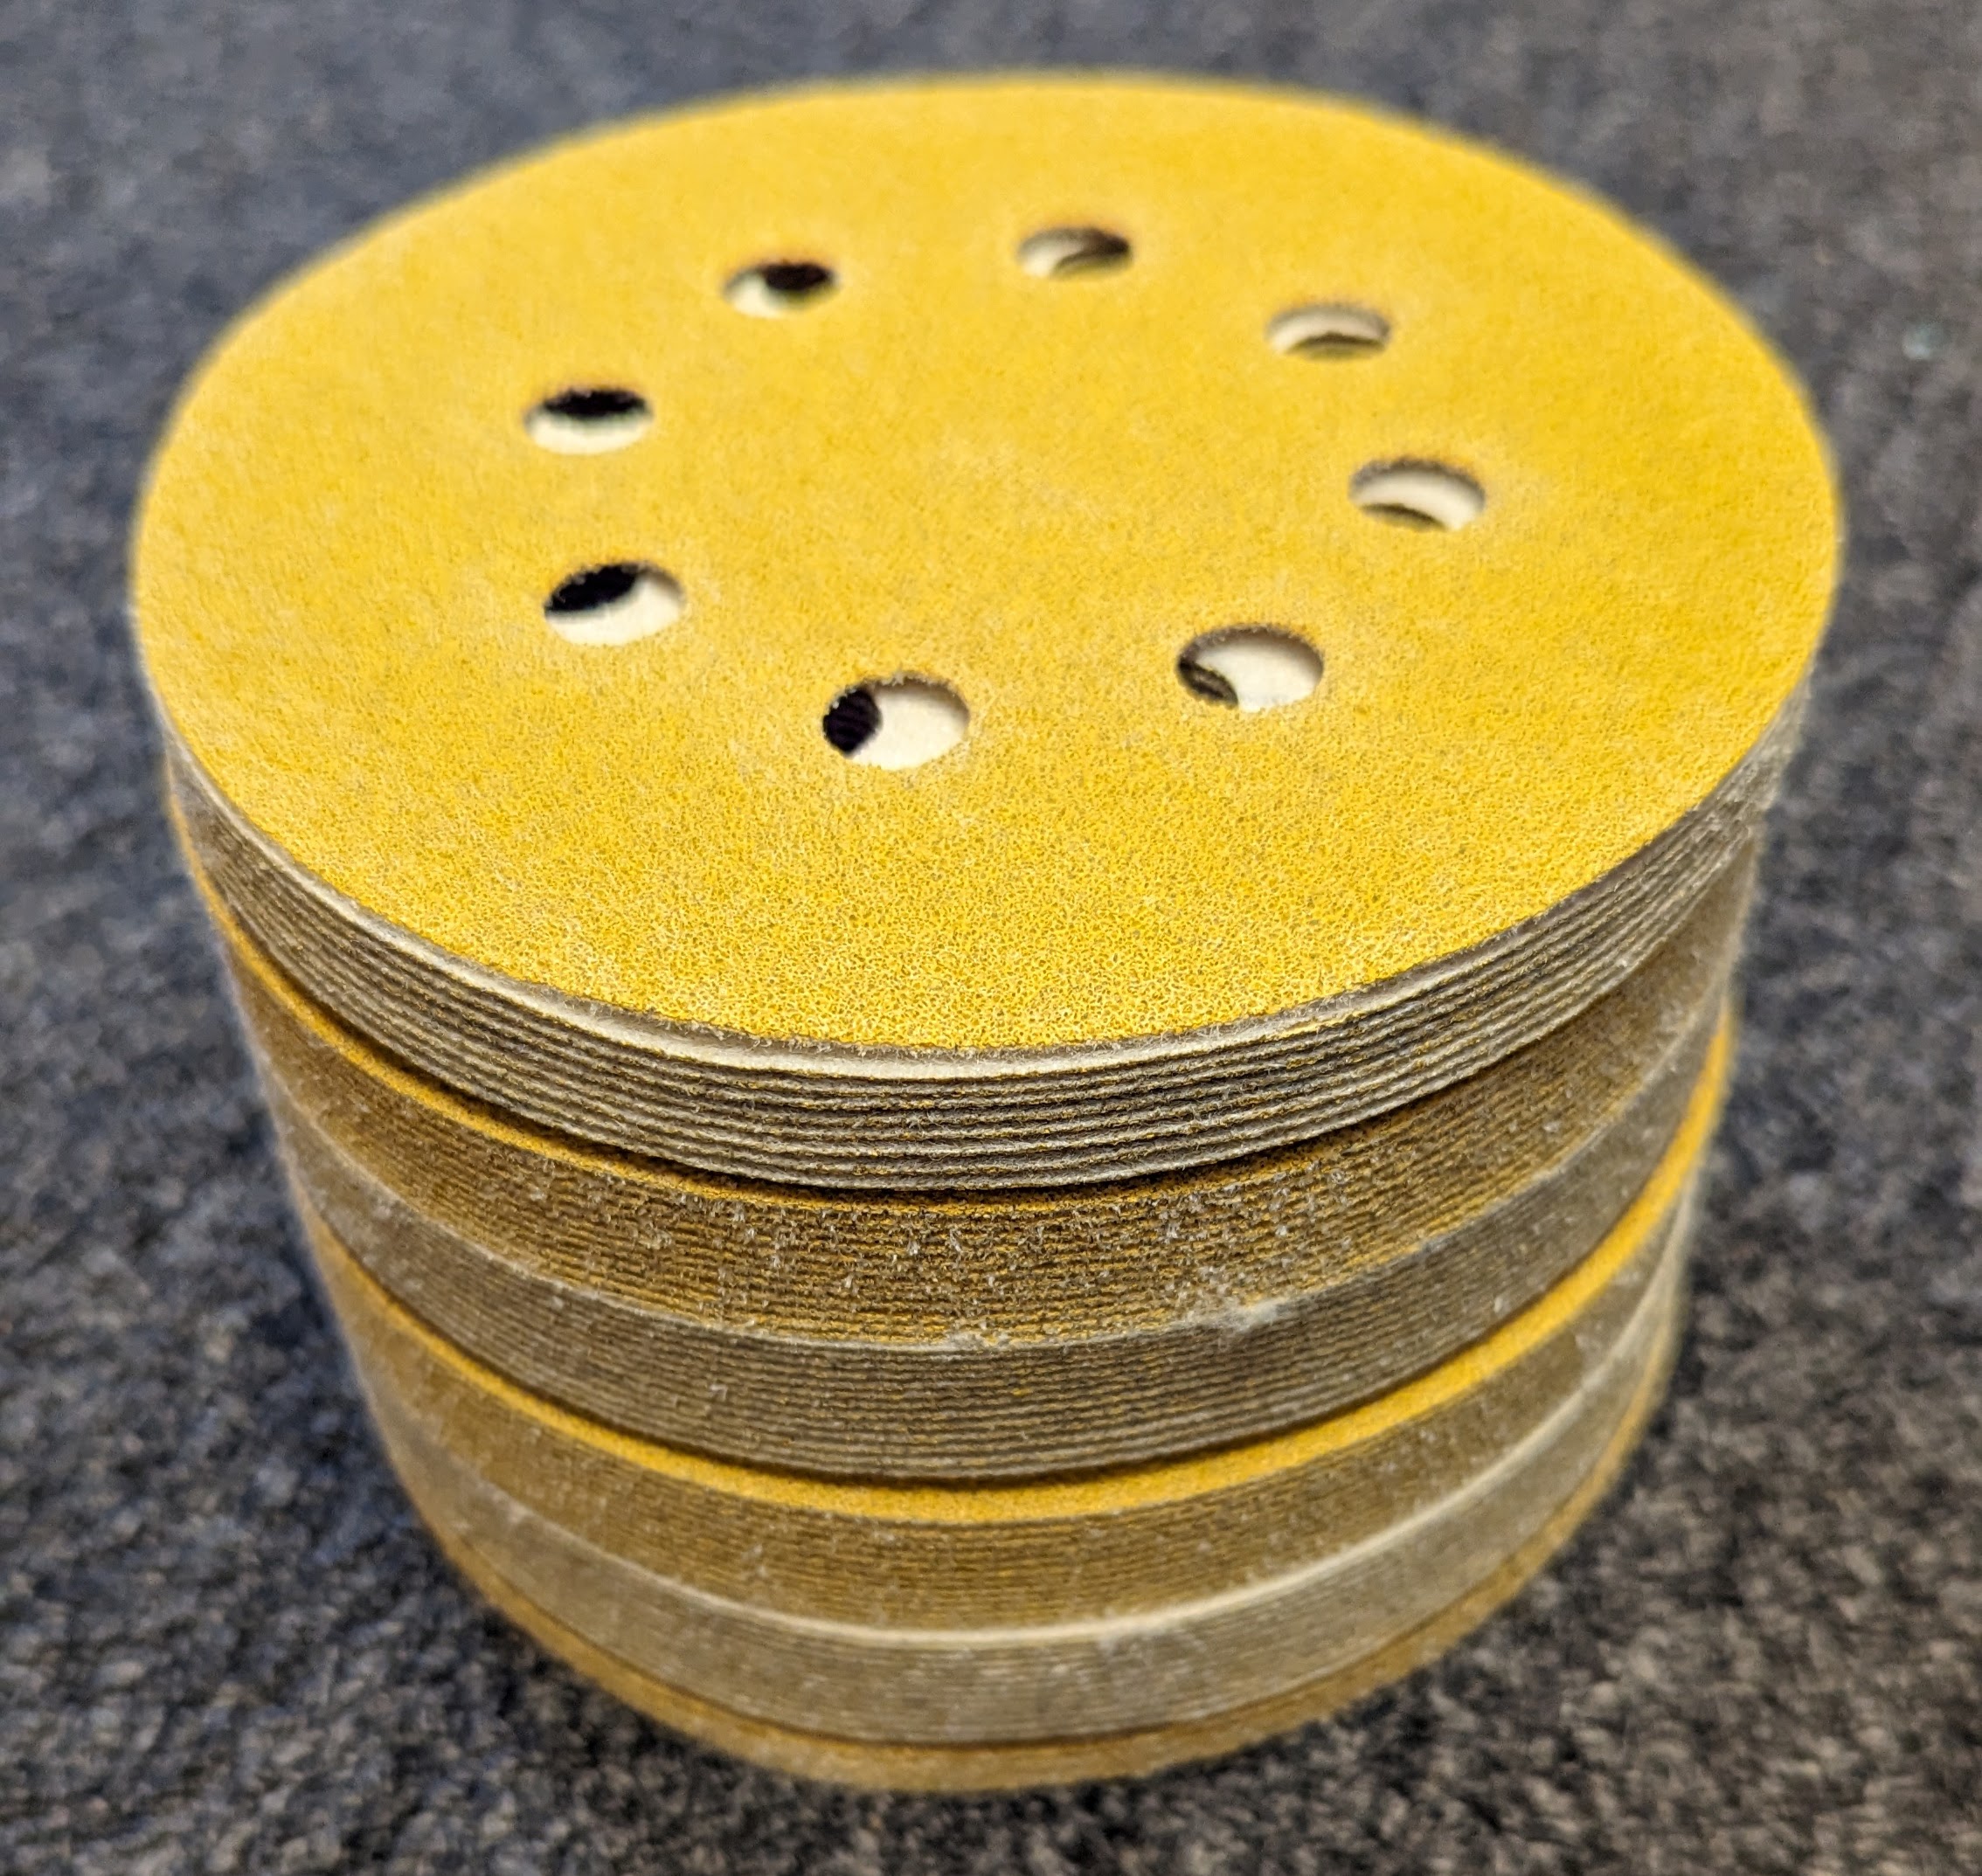
And there were many places where neither of these fit and I just had to sand holding the paper in my hands. I went through approximately 200 of these 5" sanding pads, before even touching the main decking surface.
The main deck
I started out giving the same wash, sand, and oil treatment to the stairs leading down into the yard.
I even had some help with the many, many hours of sanding. You see me using an industrial-grade sander that I hoped might be faster on the ipe, but it was no better than the battery-powered Makita.
Here’s the fully sanded stairs
And oiled
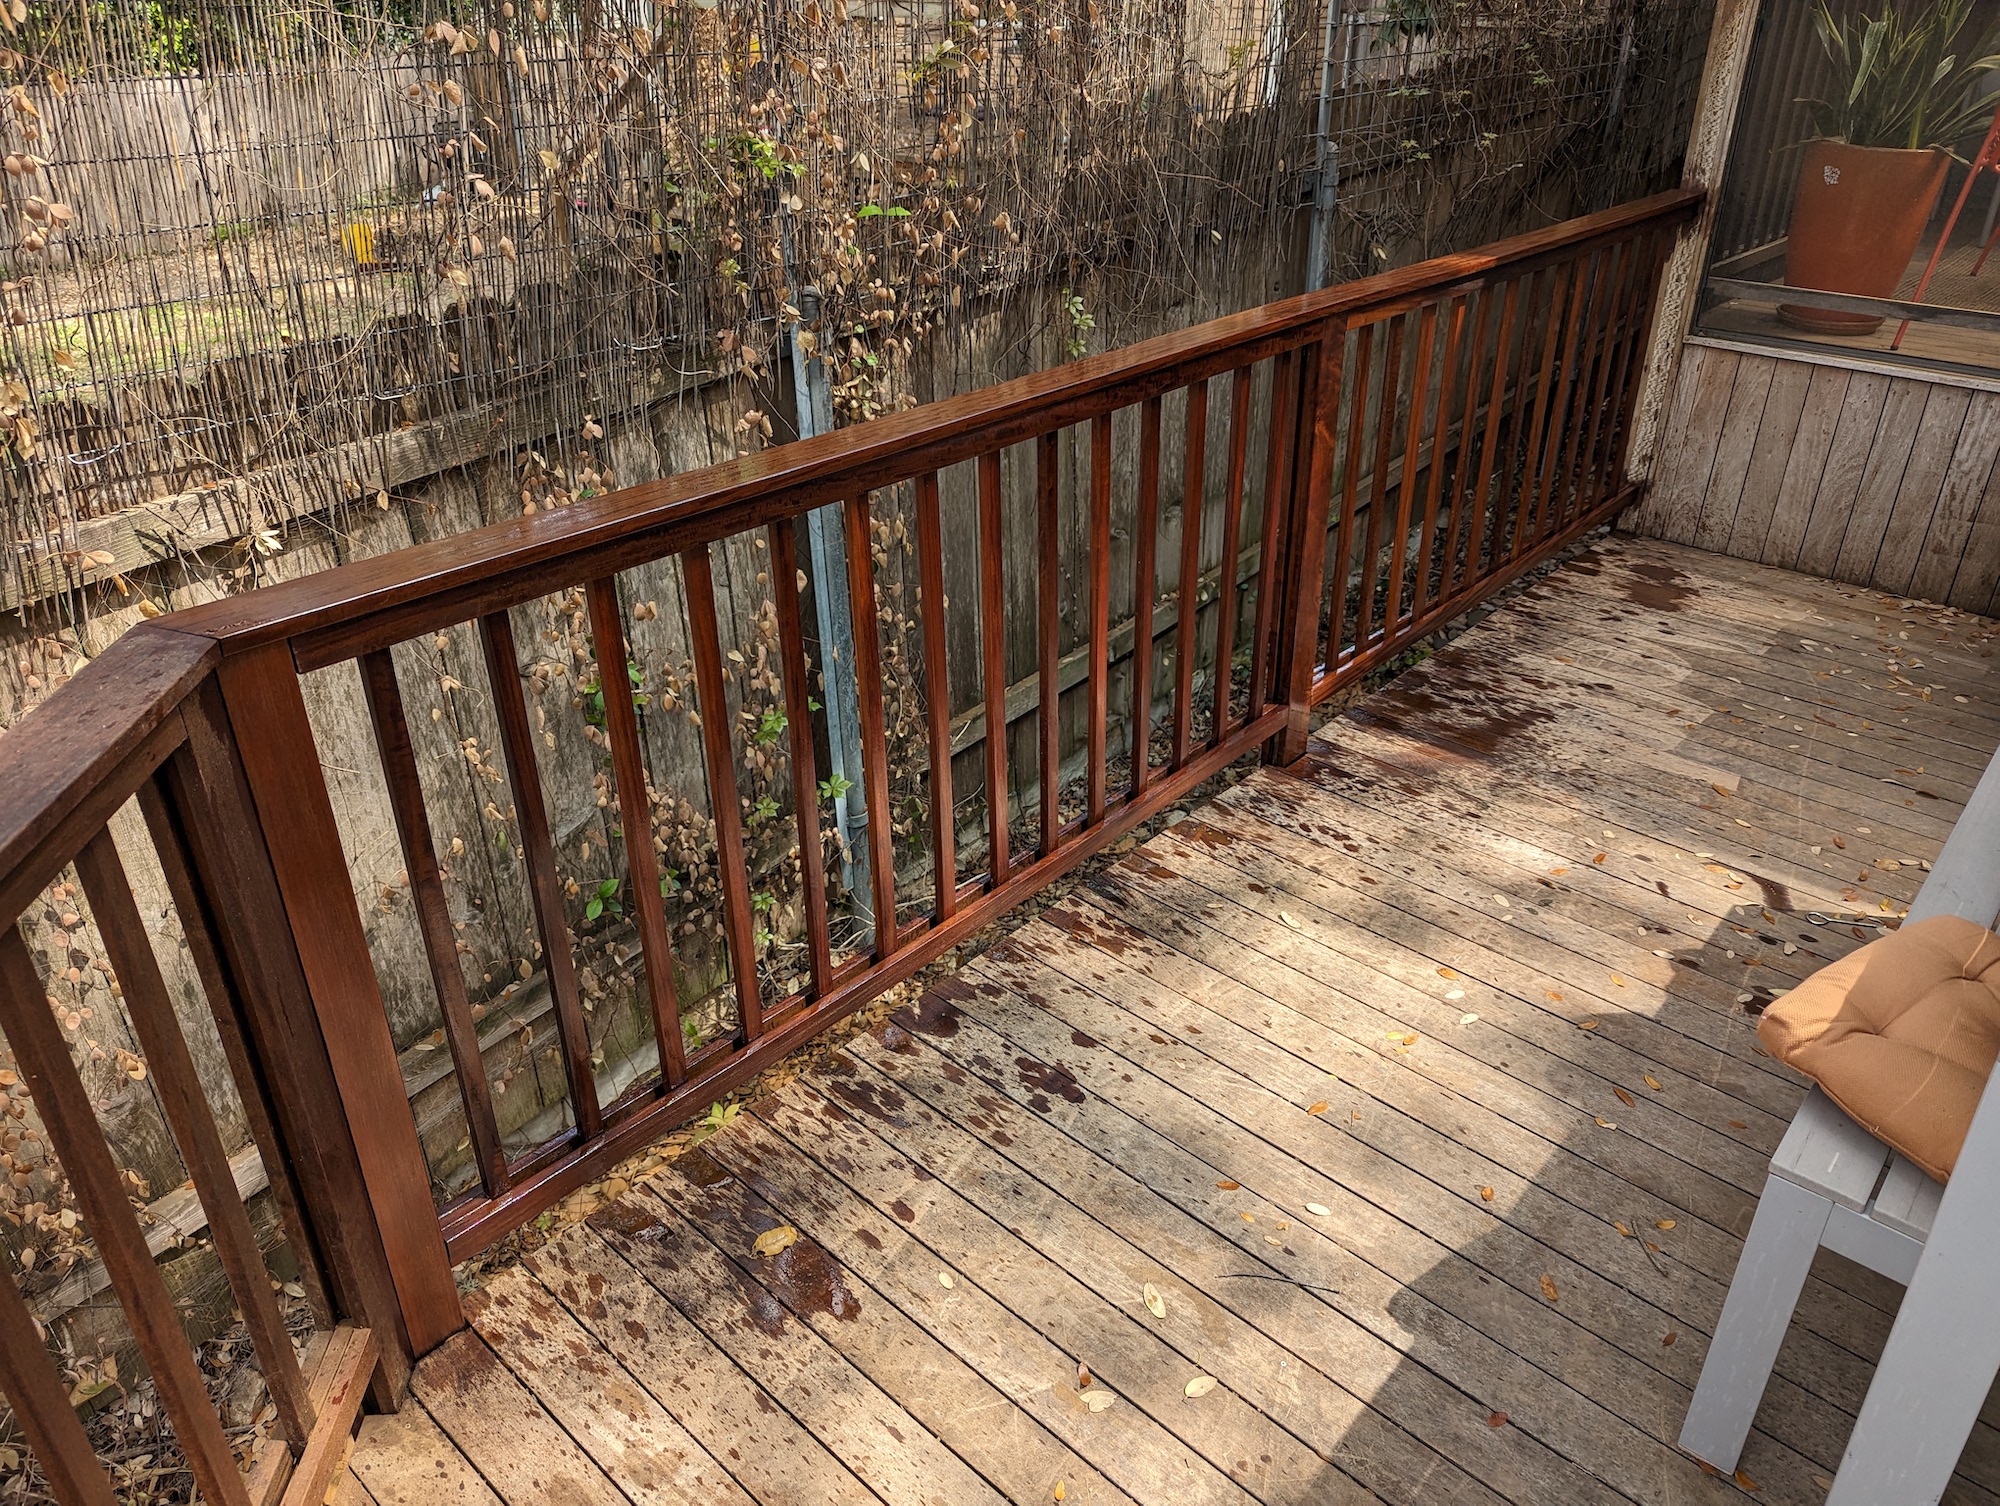
So. Many. Railings.
The railings took the bulk of the time with their vexing tight spacing and so many surfaces. But I loved the results.
The main event
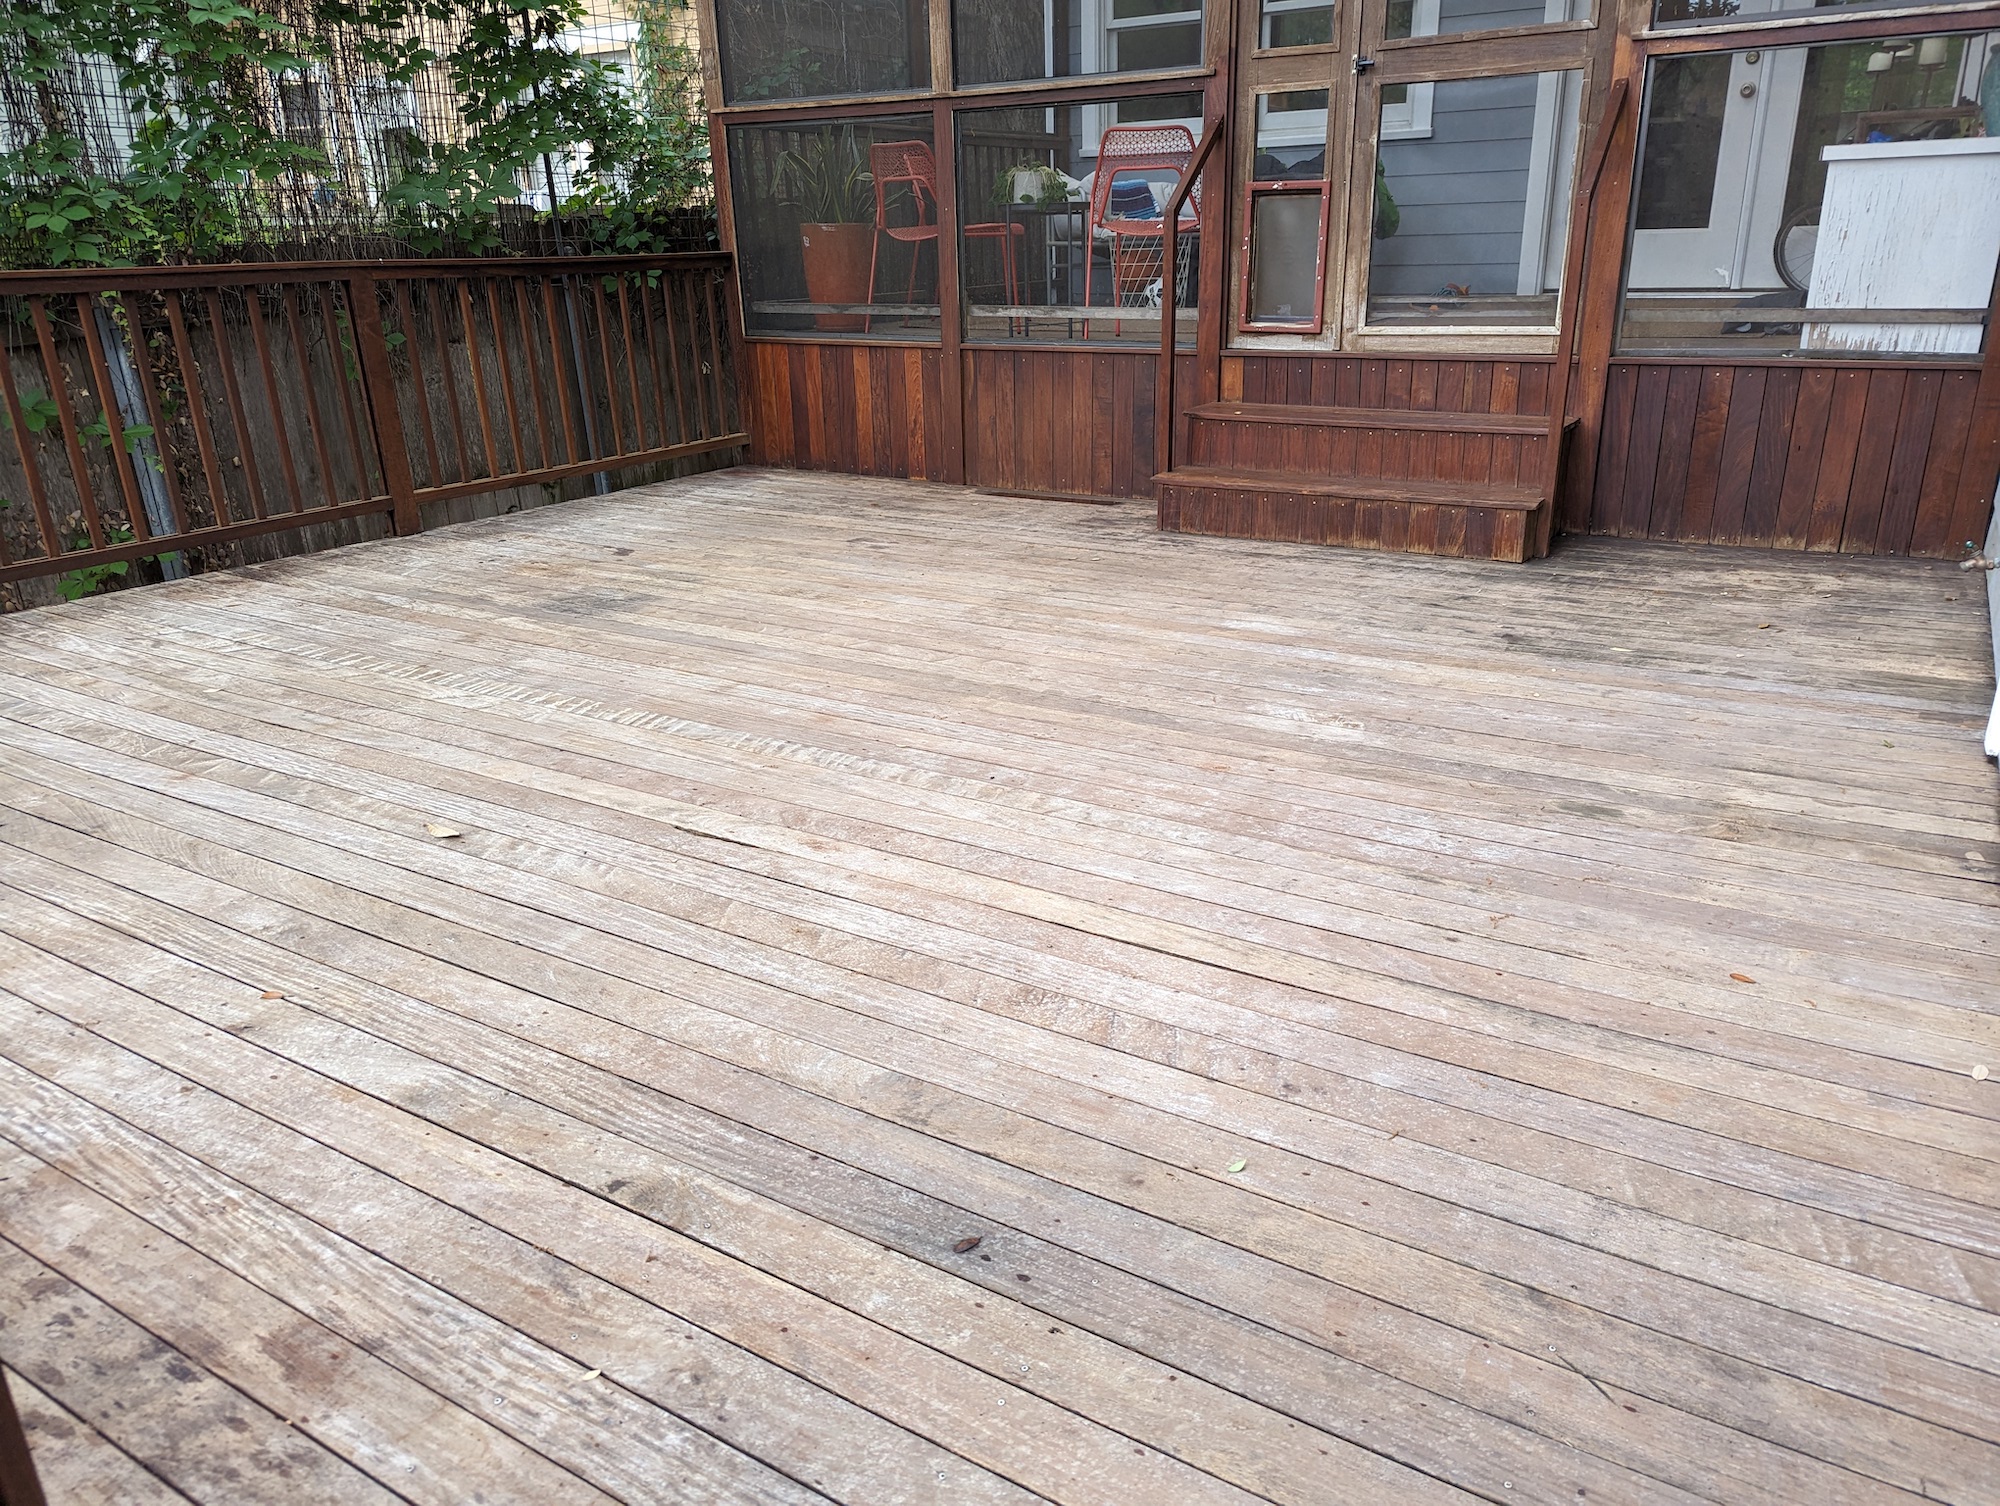
Once all the railings were done, I gave the main deck surface a final power wash, and it was ready to sand.
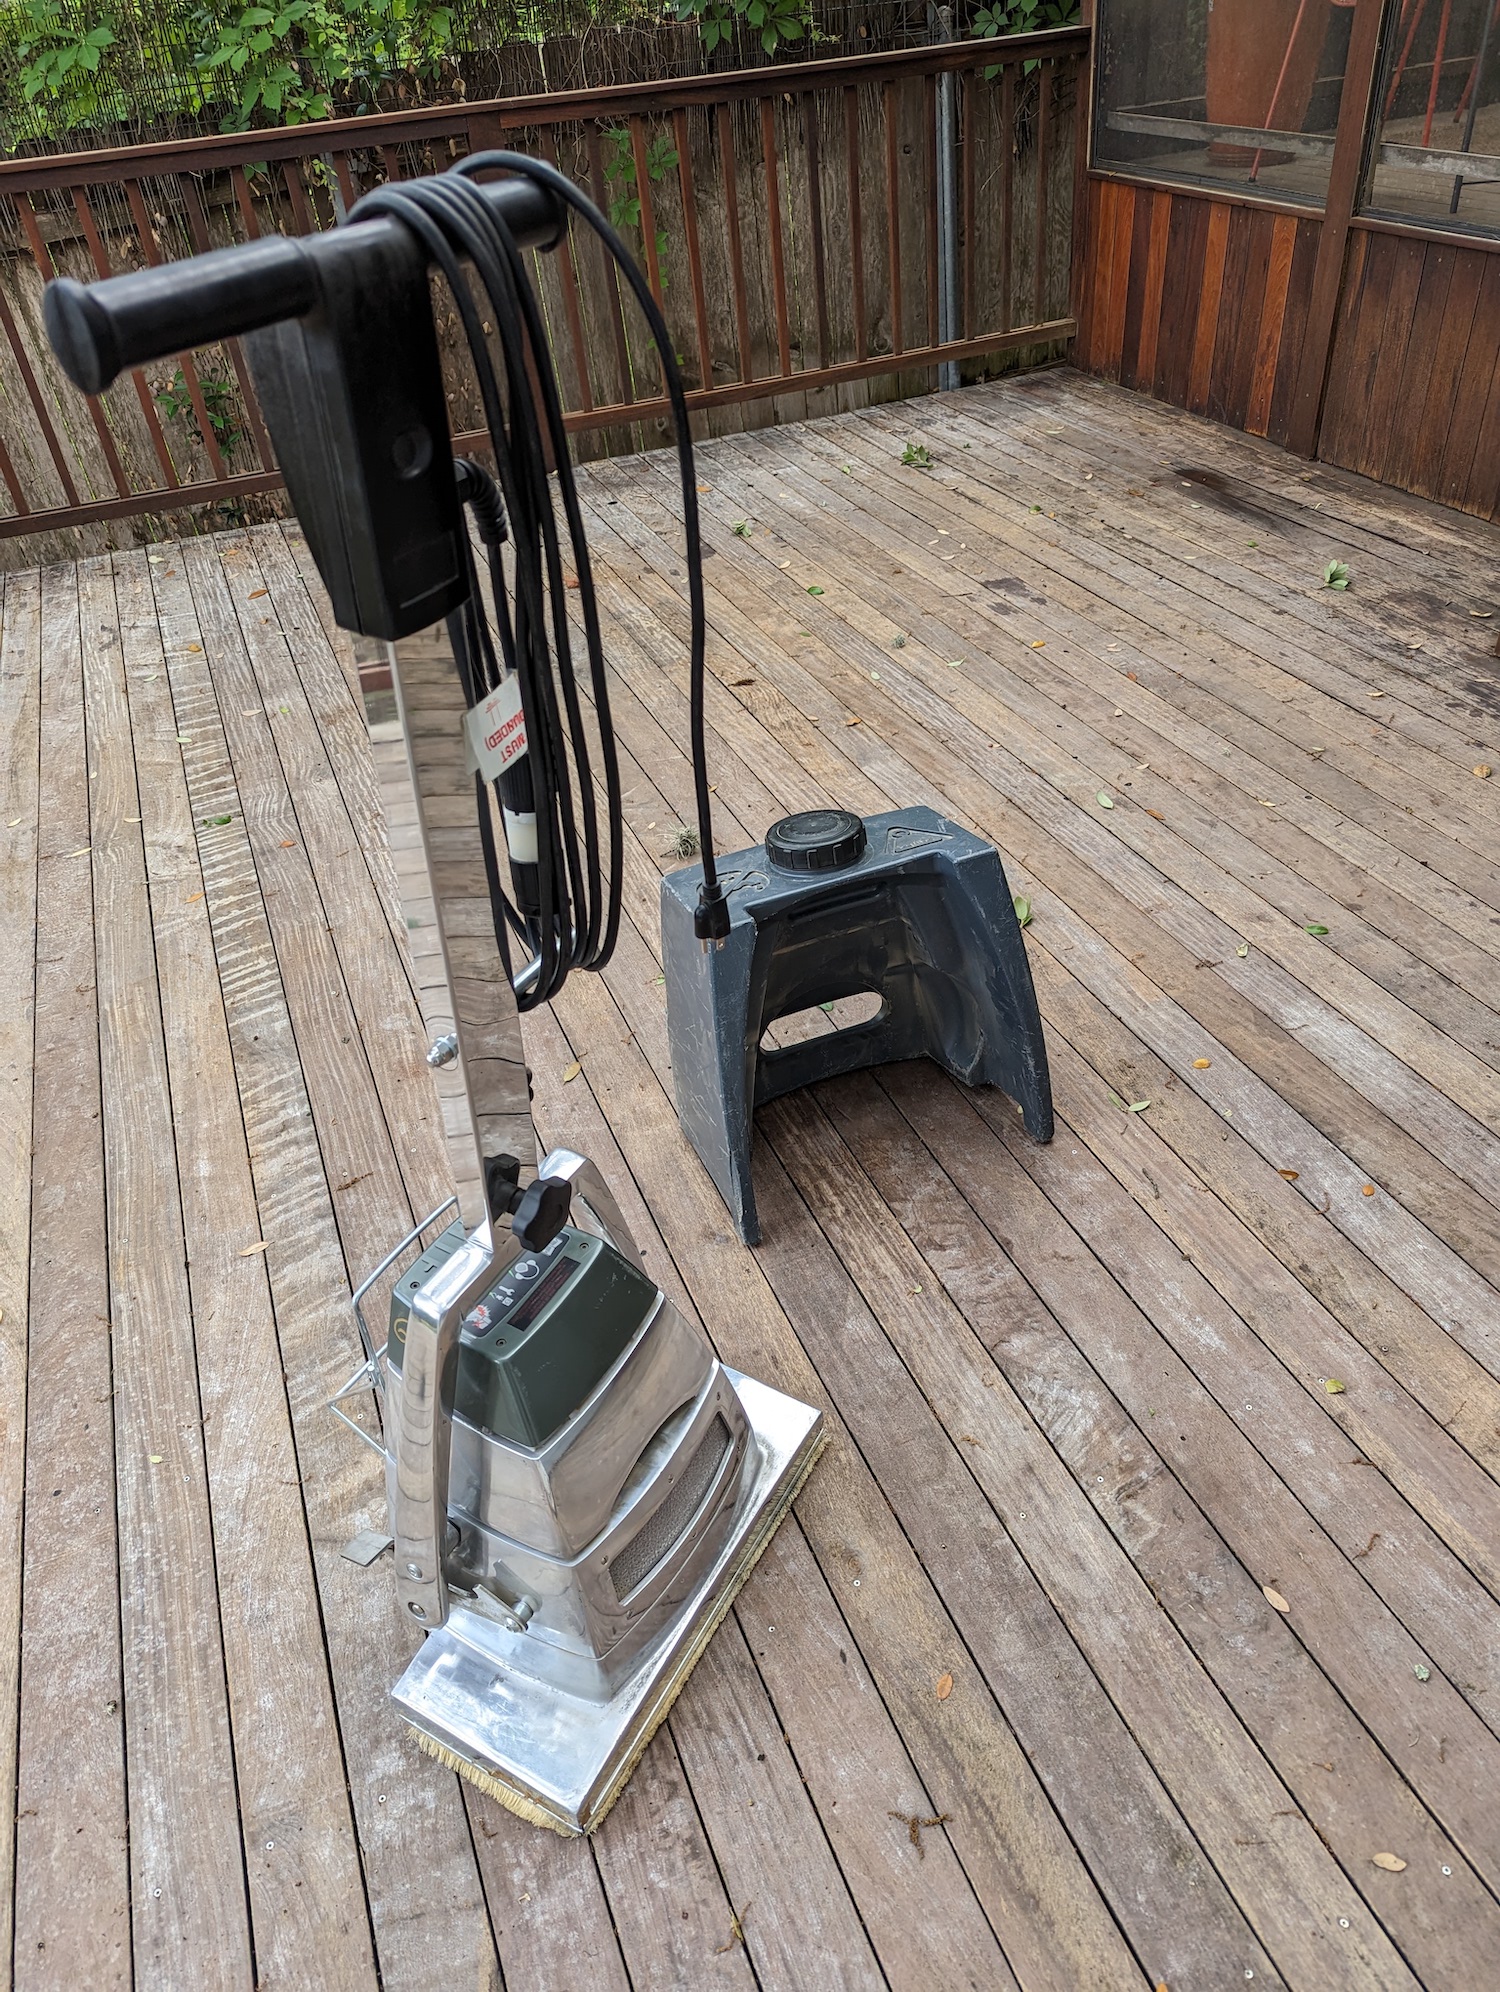
I finally, I had an area that I could use a big commercial sander on, so I rented one from Home Depot for 24 hours, and I was off to the races
I sanded until dusk, with pretty satisfying results. Not as good a finish as if I had used the hand-sander, but in 1/100th of the time, it seemed.
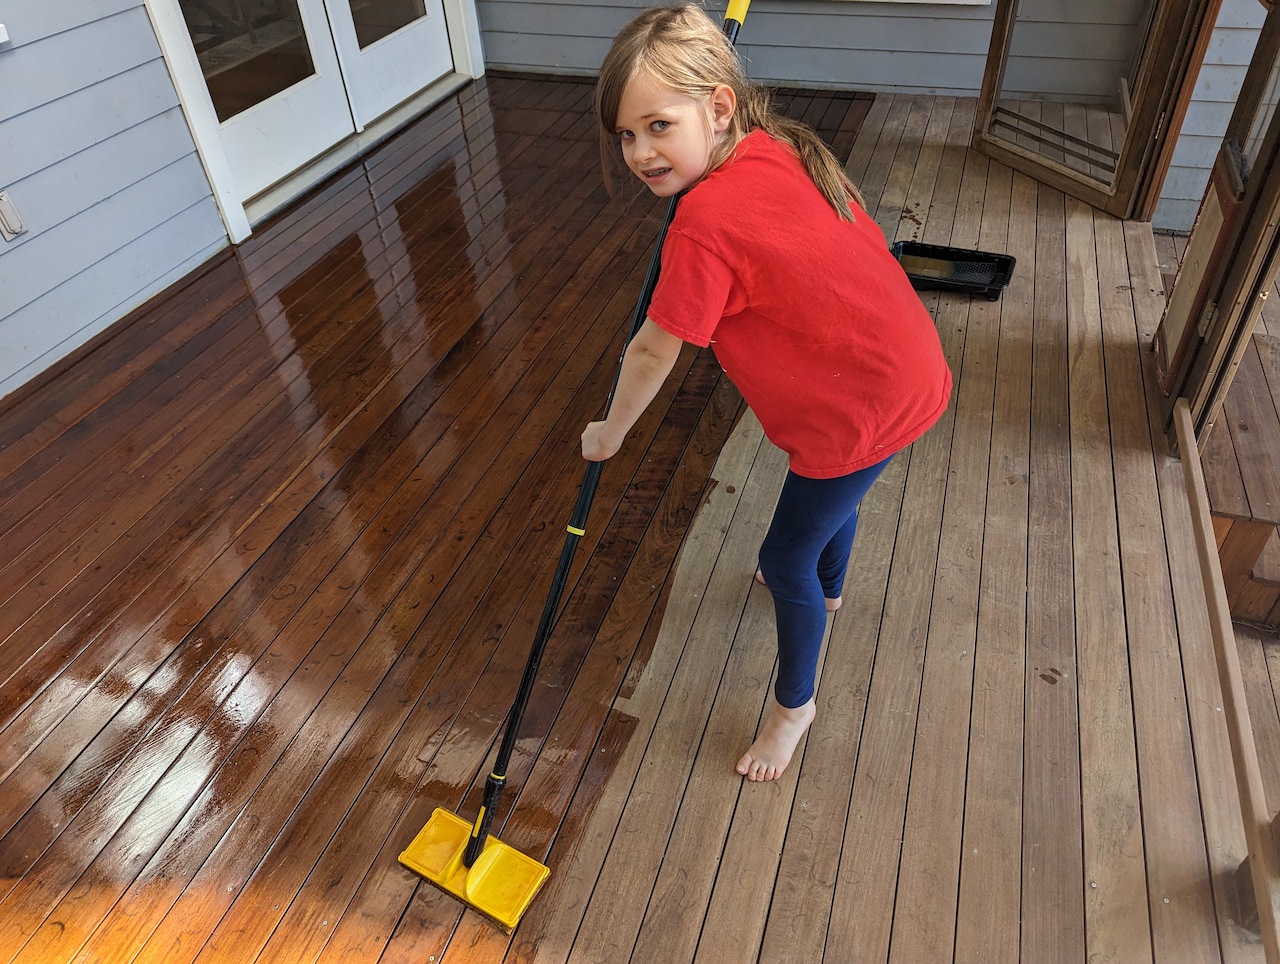
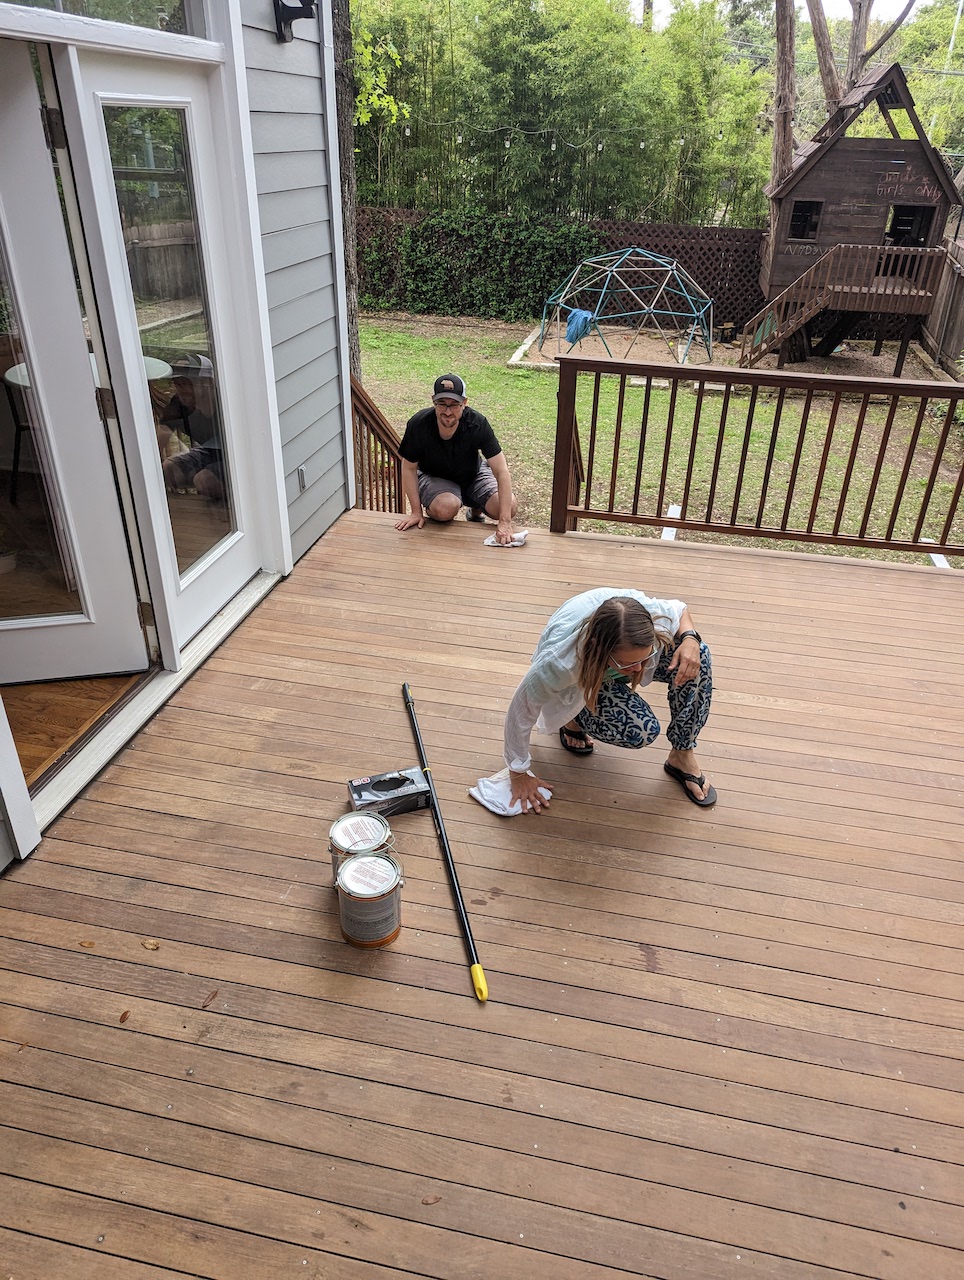
Finally, we oiled the main deck. You have to put the oil on after 2 days of no rain, and when there won’t be rain for two more. It was hard to find that magic moment with spring weather and school schedules, so the Sunday I wanted to do it we had friends coming over. To my surprise they were totally game to help with the whole process, along with Annie :)
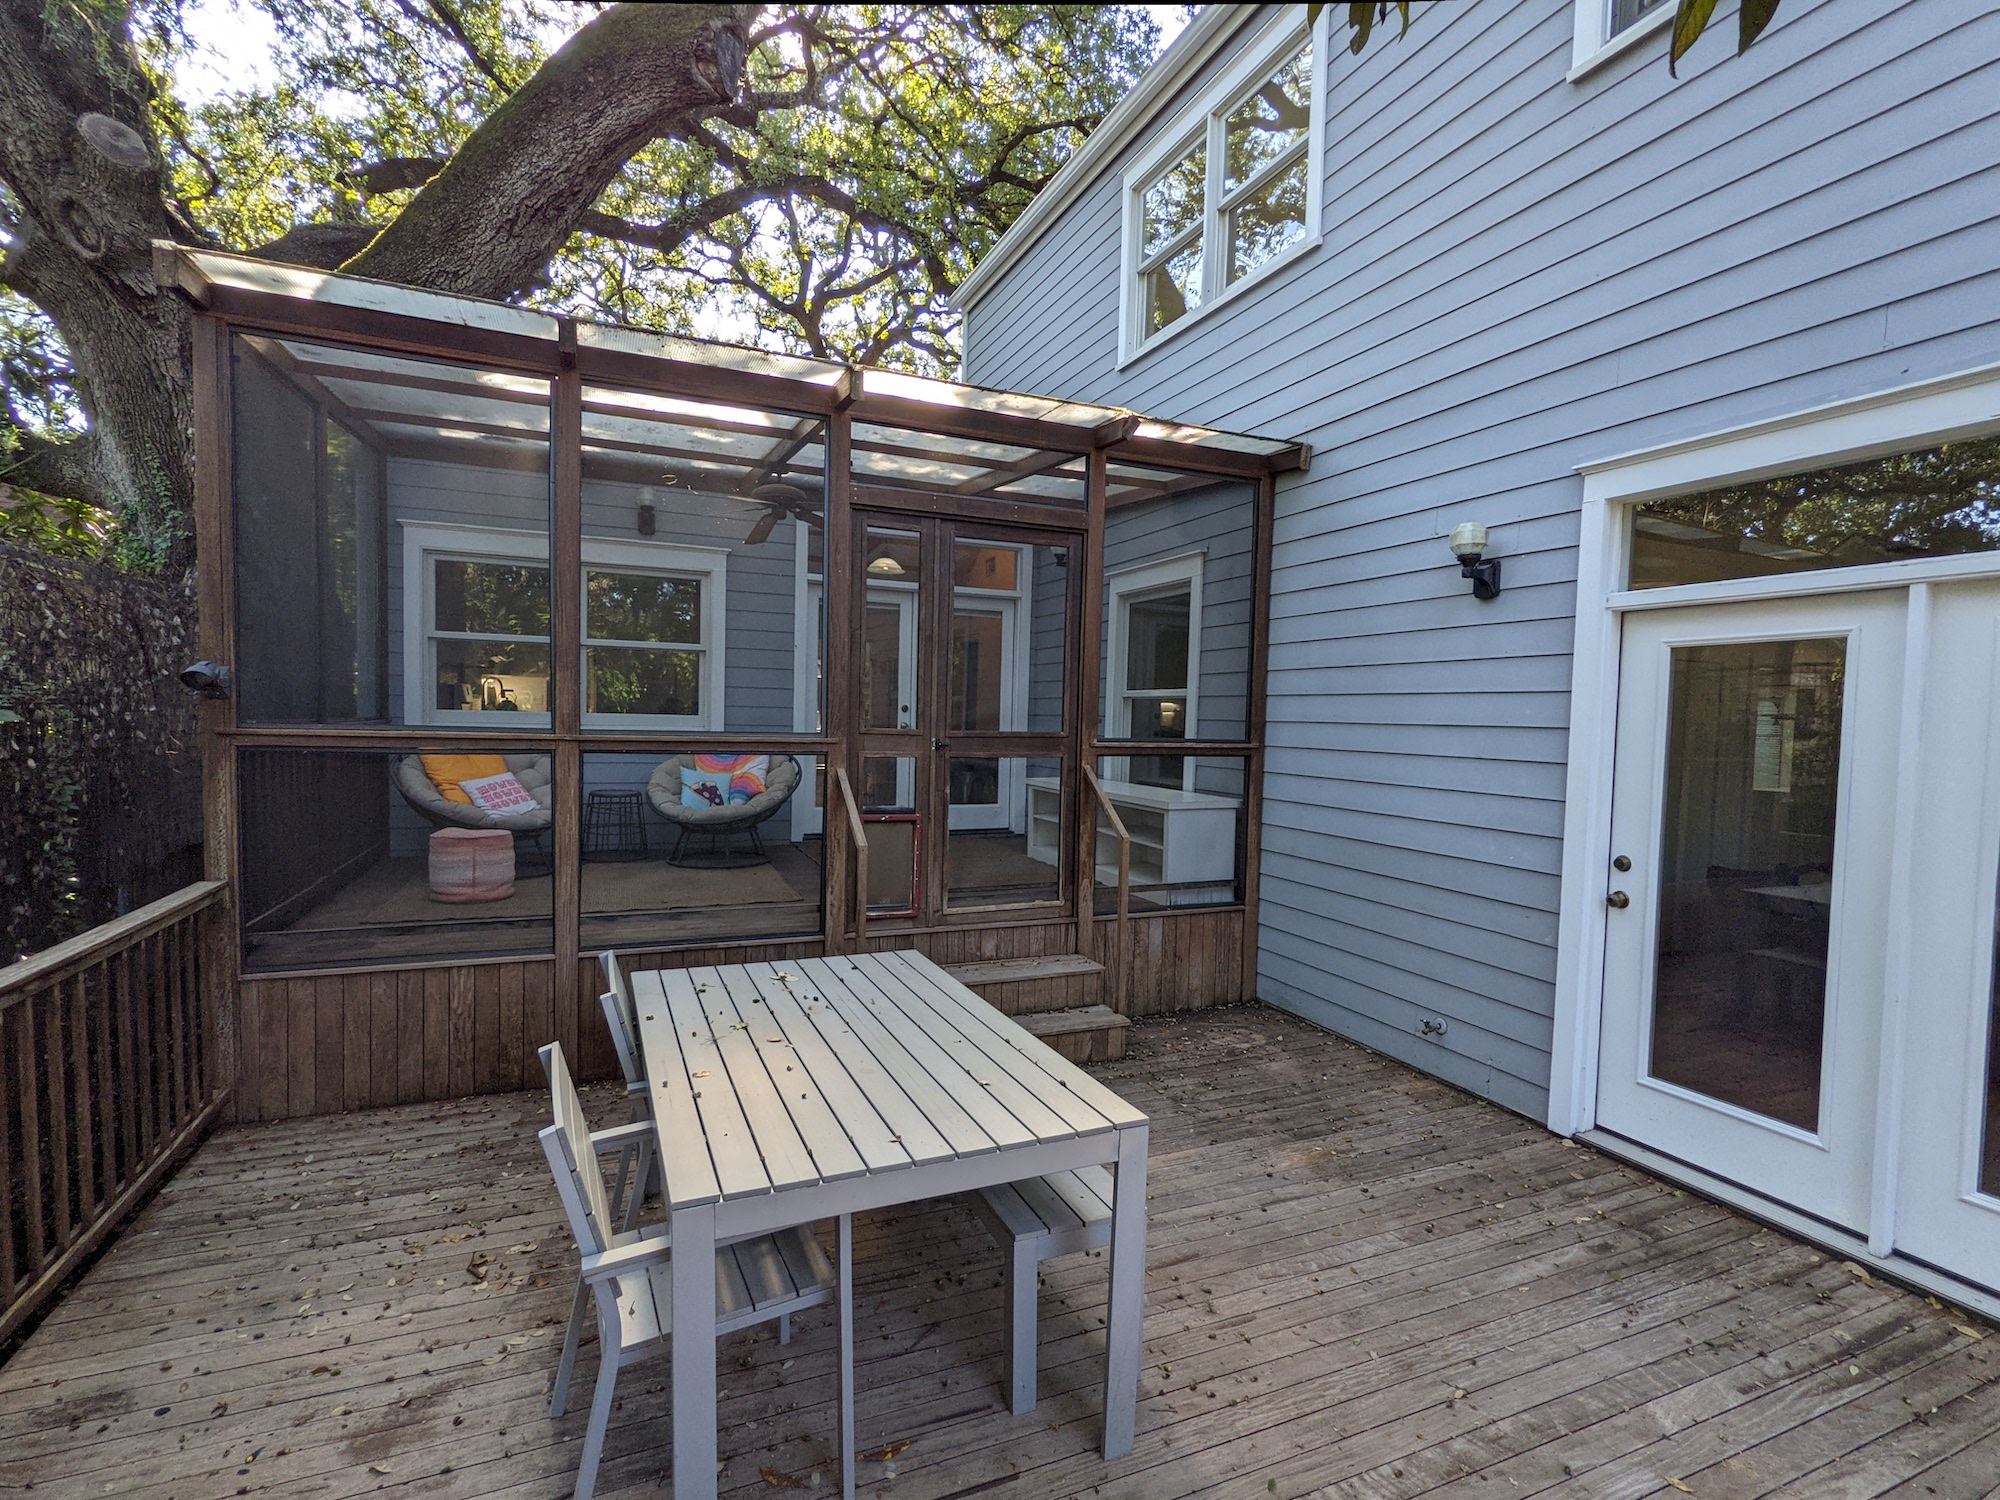
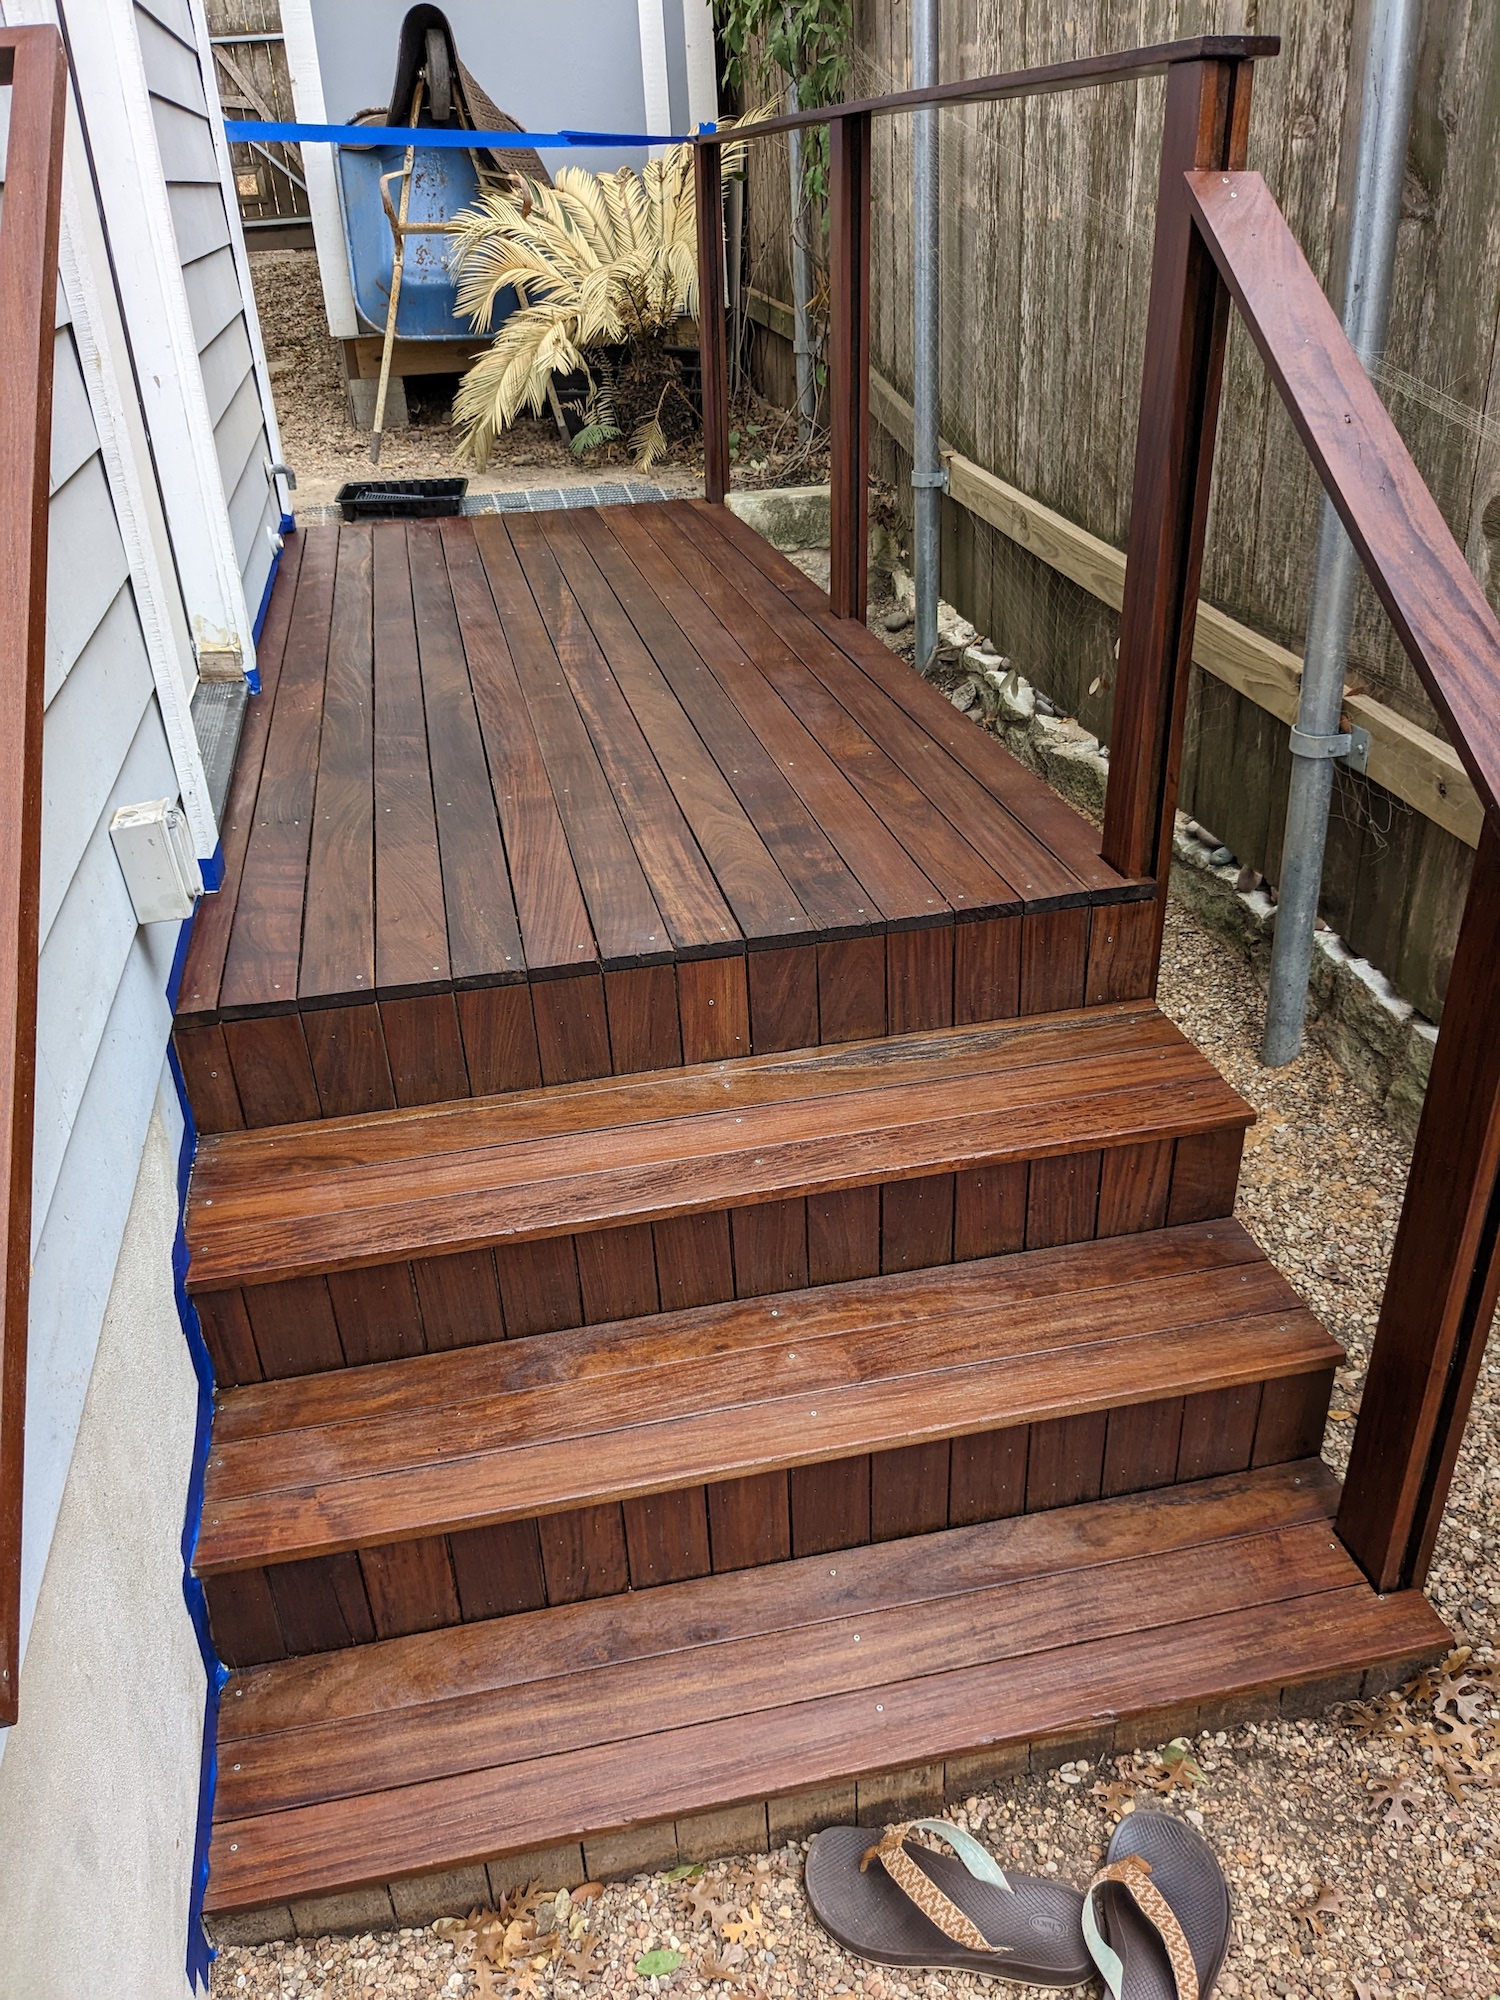
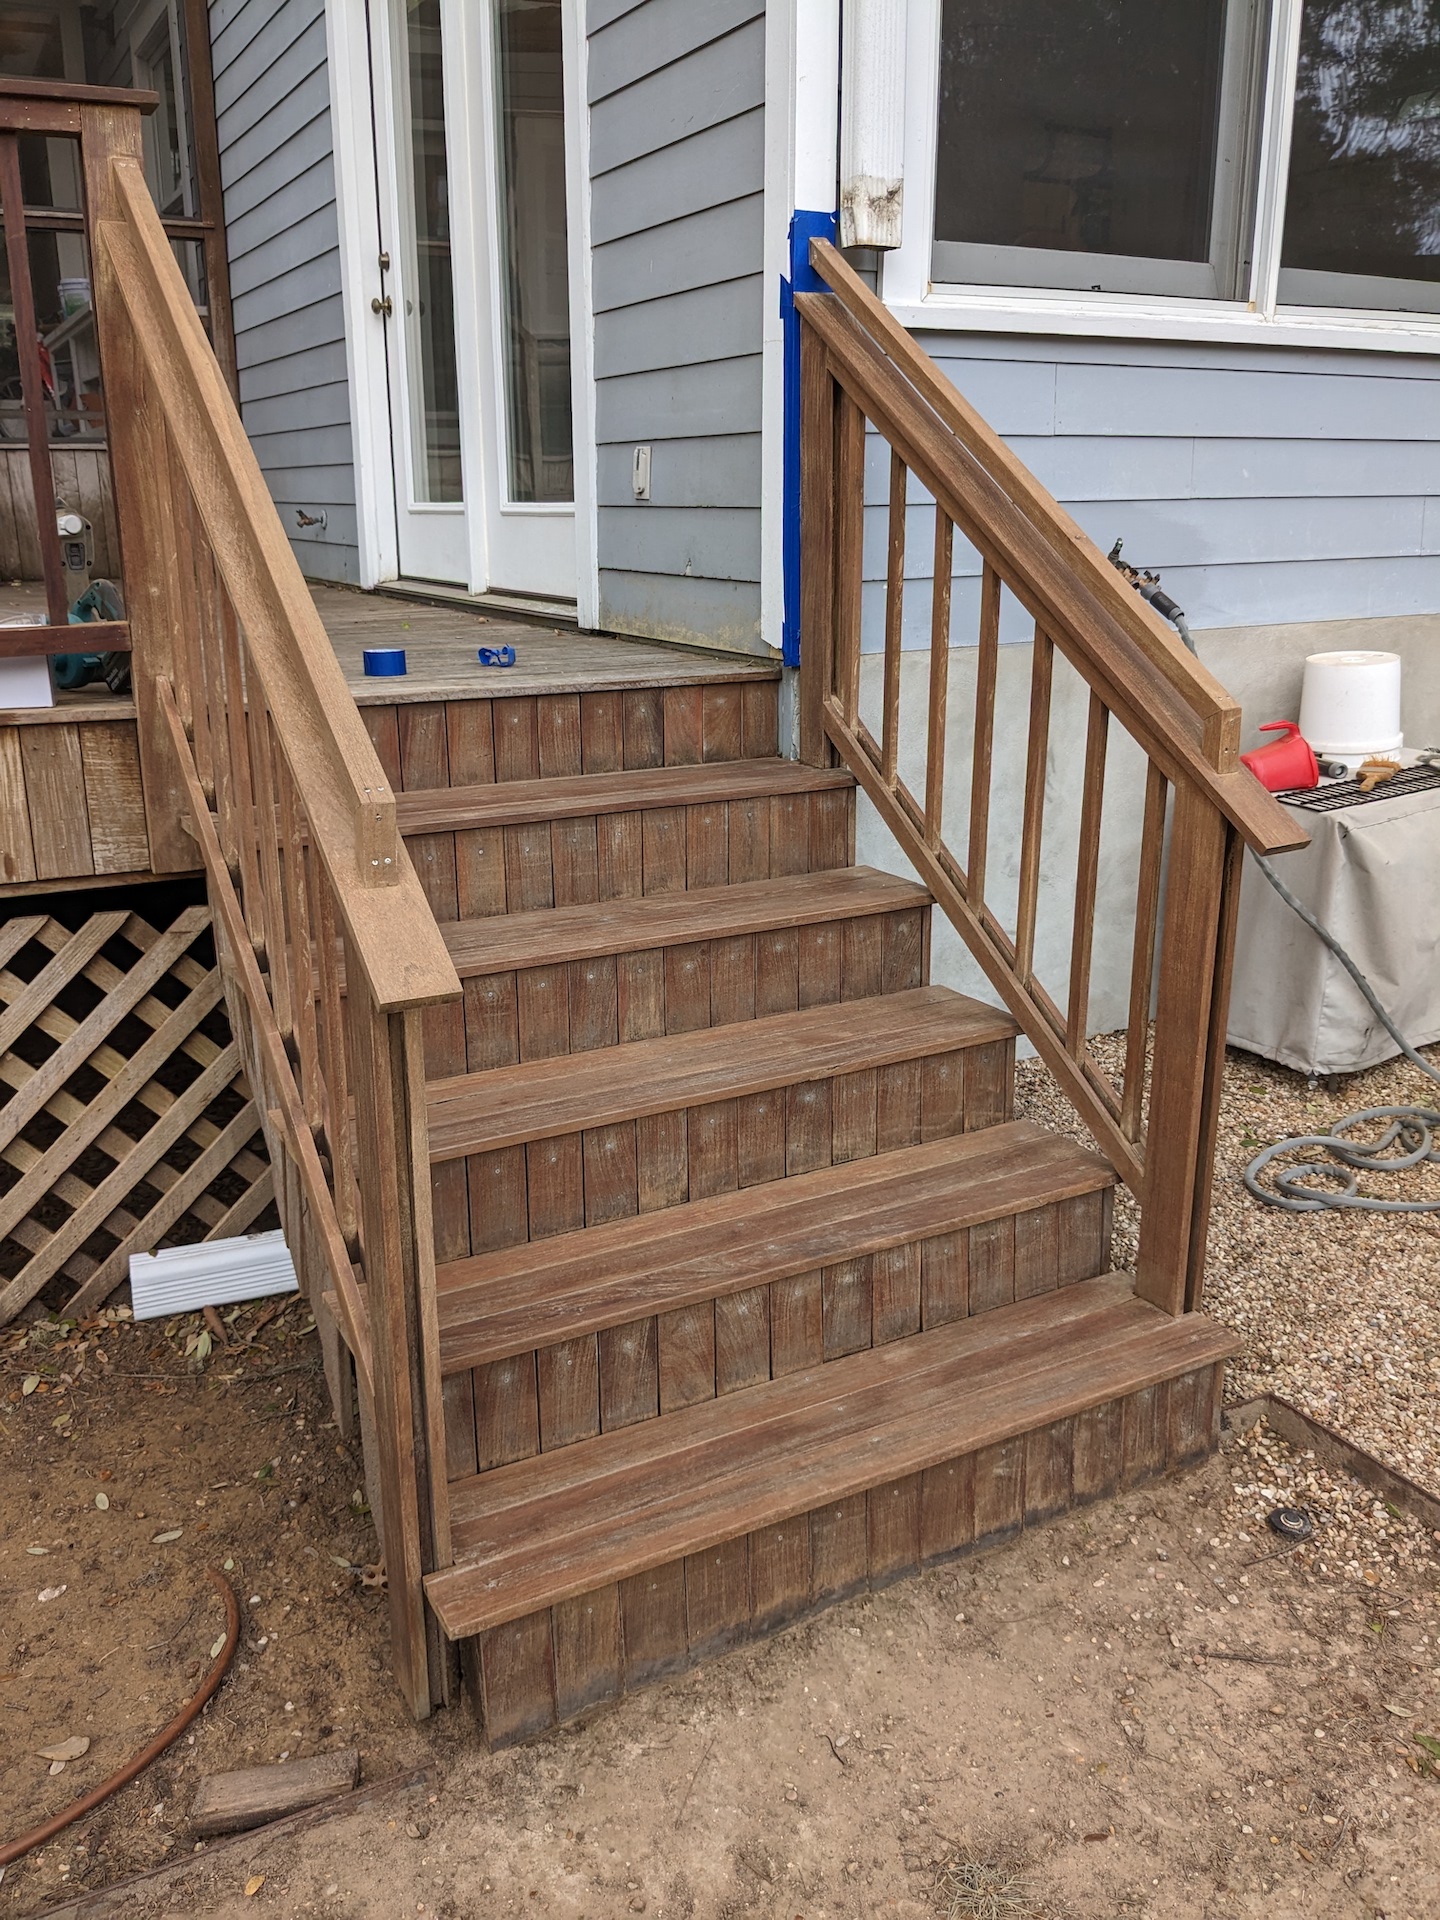
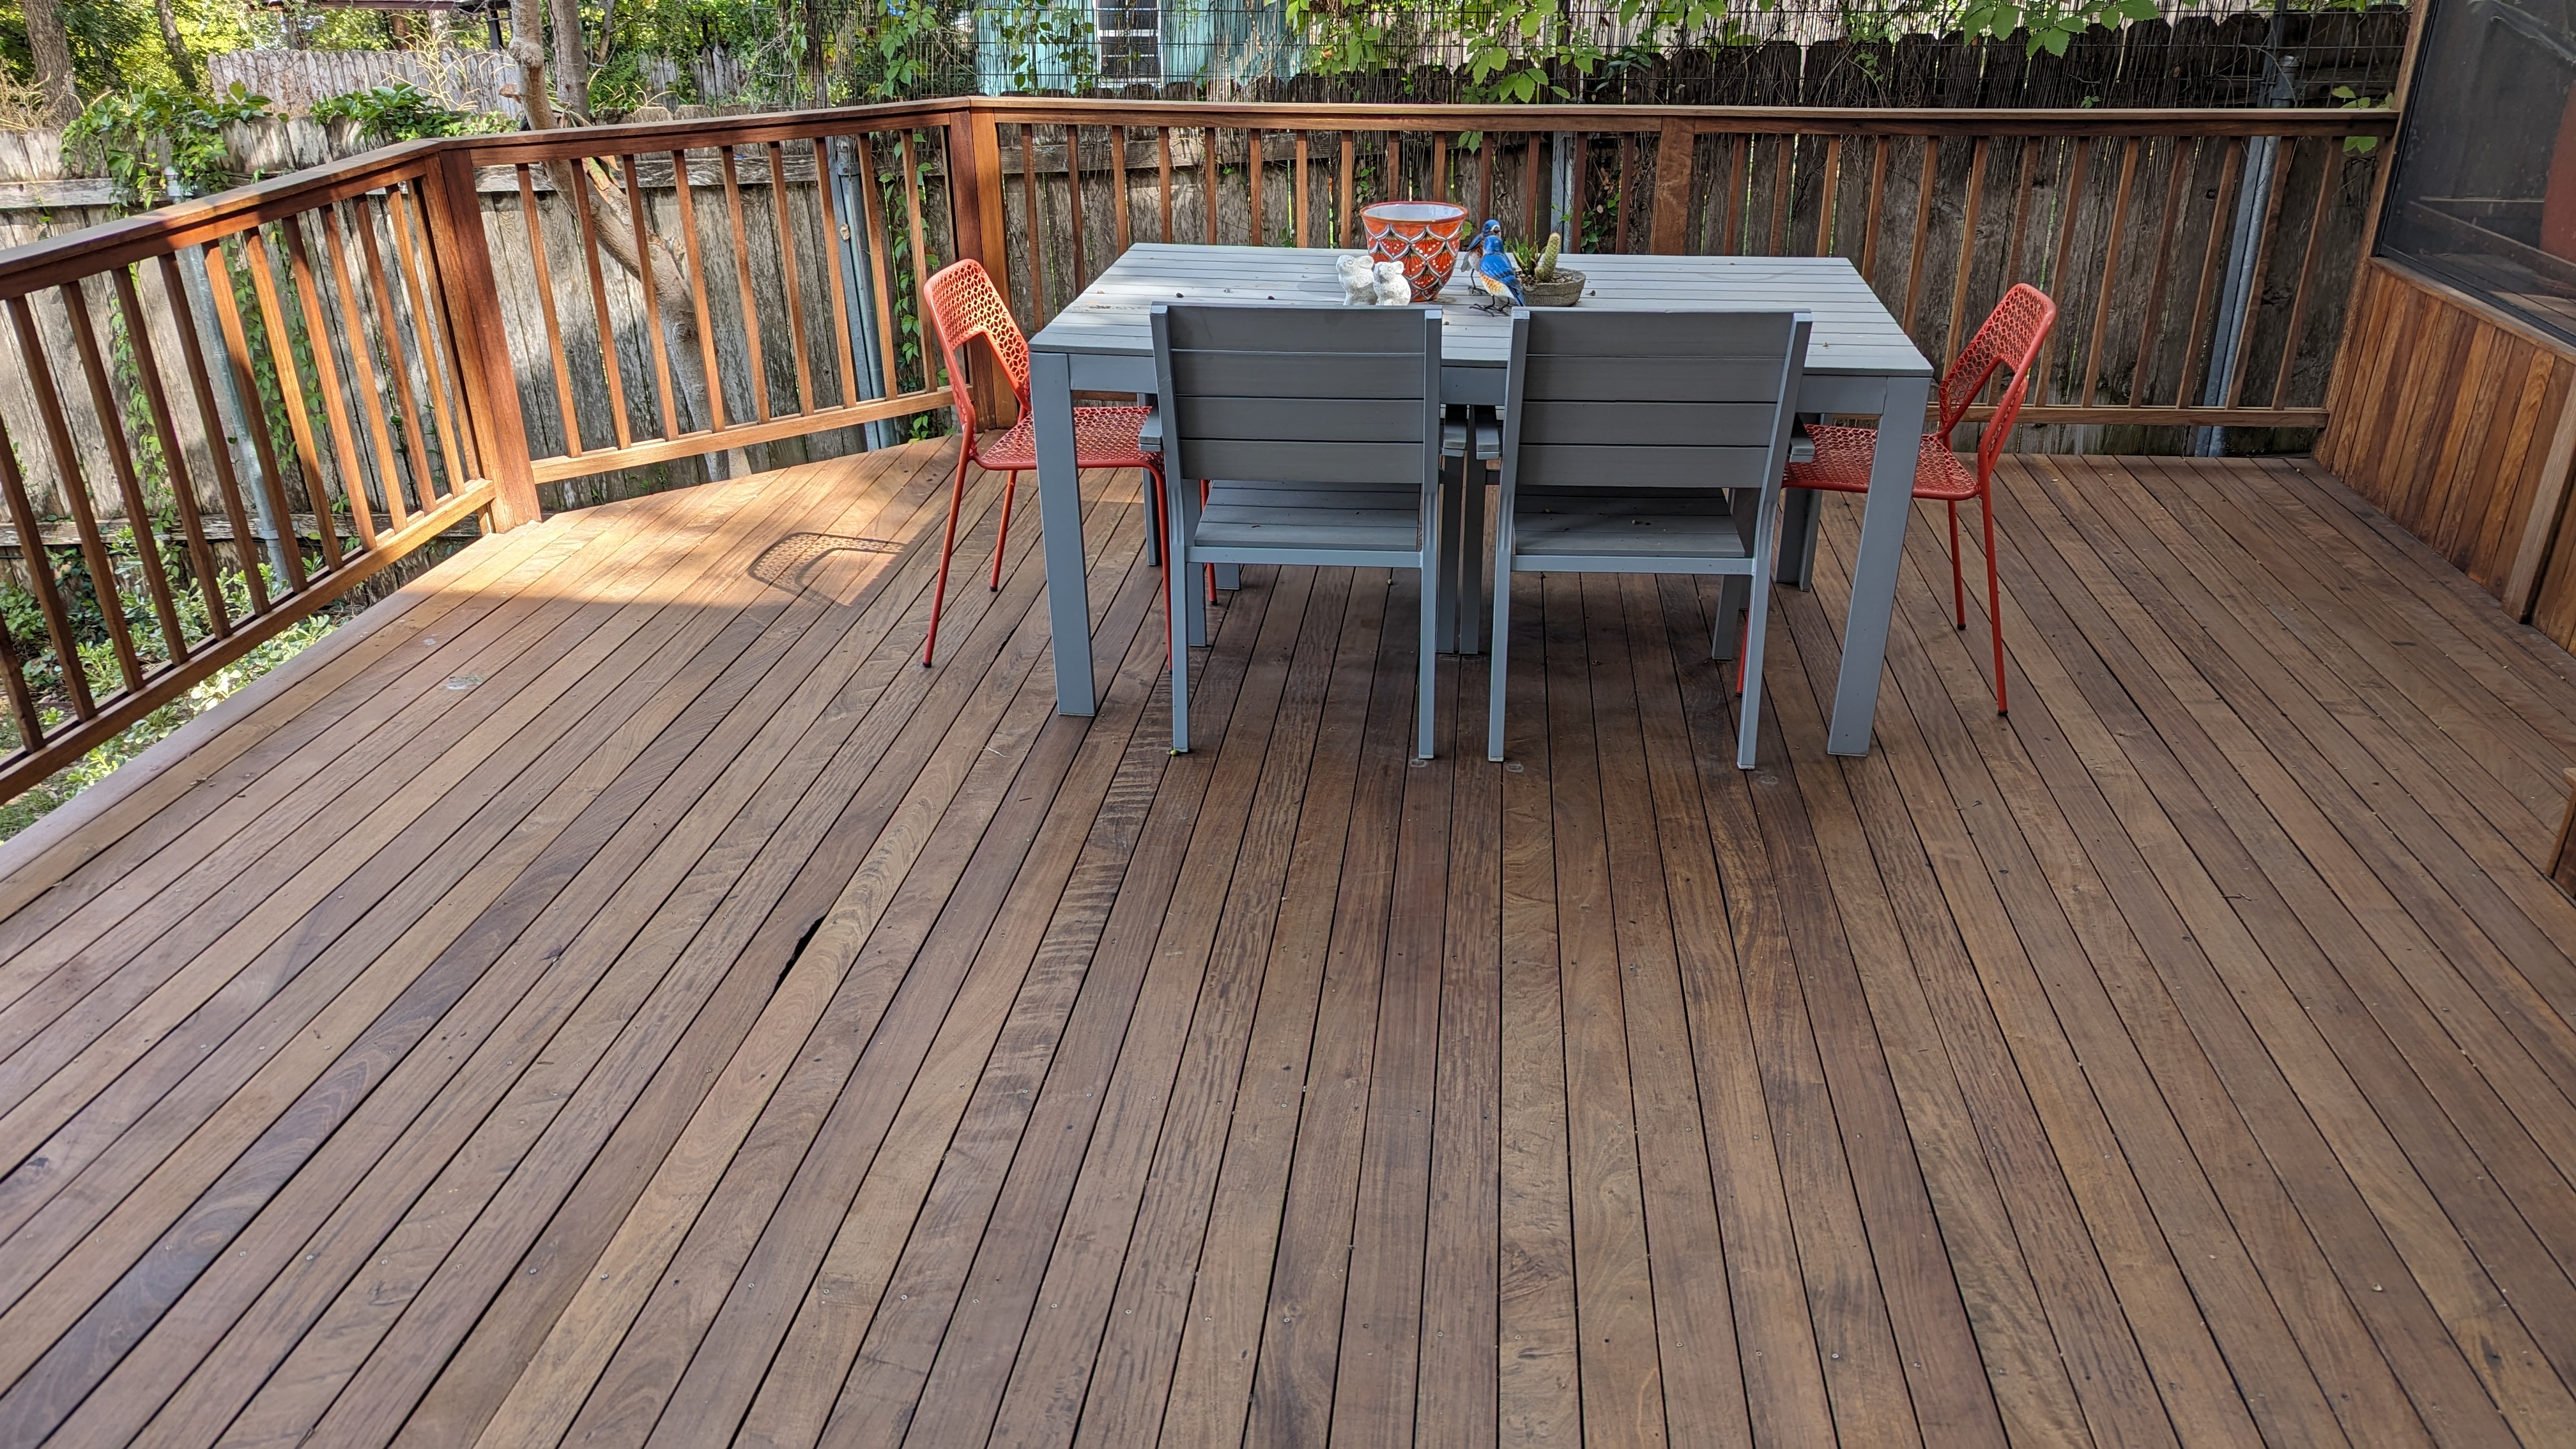
The finished product
Here’s a shot of the deck I took today, about six months after we finished the job. Ipe is some pretty amazing stuff! I also have to give credit to the original deck builders, whoever they are, for making it so sturdy in the first place.
Comments
Randy — 2025-03-07 13:41:12
Very nice article! The before and after pictures are really good.
I also have epi decks on the front and back of the house in the Florida Keys. I can say for a fact that your comments are spot on. I have rebuilt some of the stairs using the original epi wood. Yes, hard as a rock. I had to pre drill all screw holes. Had to countersink each hole as the screw heads will not penetrate flush in epi. Your article has spurred me on to use epi oil to preserve the handrails. Yes, I’ve used 40 and 60 grit sandpaper - much patience needed. This wood is really hard as a rock. It will dull saw blades and drill bits in short order.
Should you use epi wood? Comes from a Brazilian rainforest. I’ll be using a composite type wood for new decks. Leave the epi where it belongs.
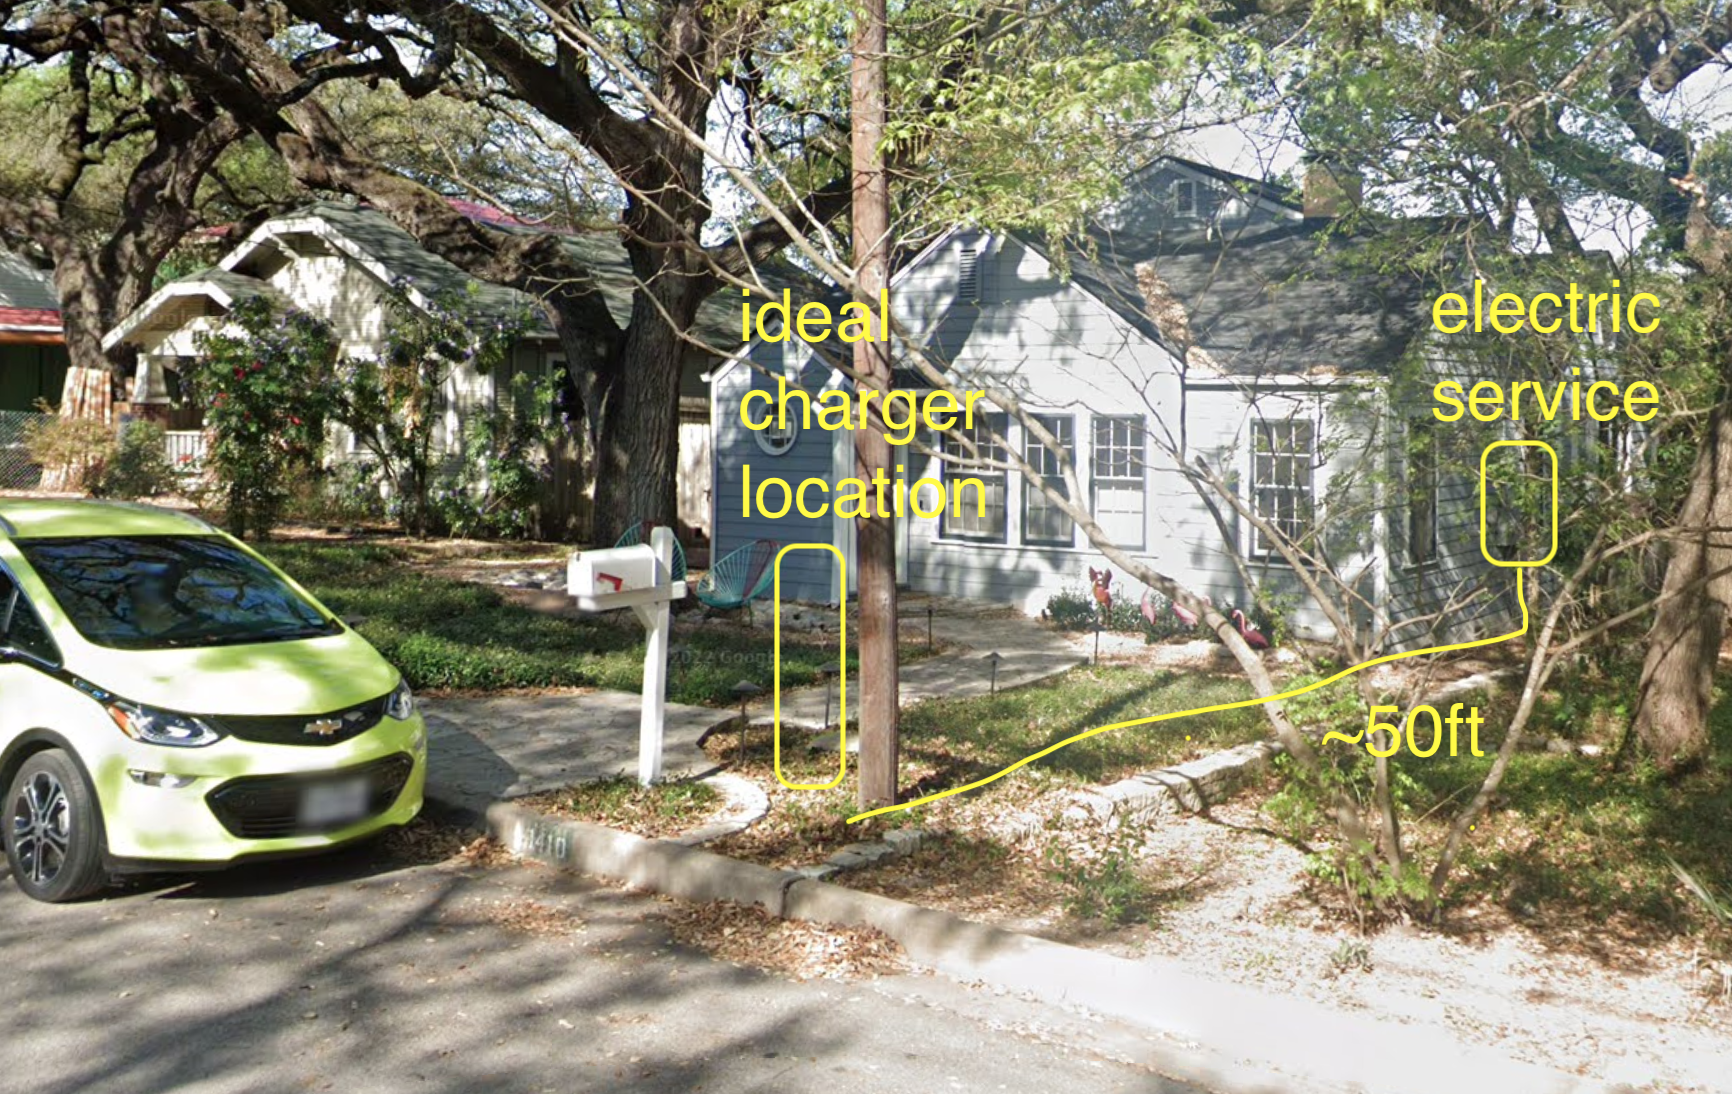
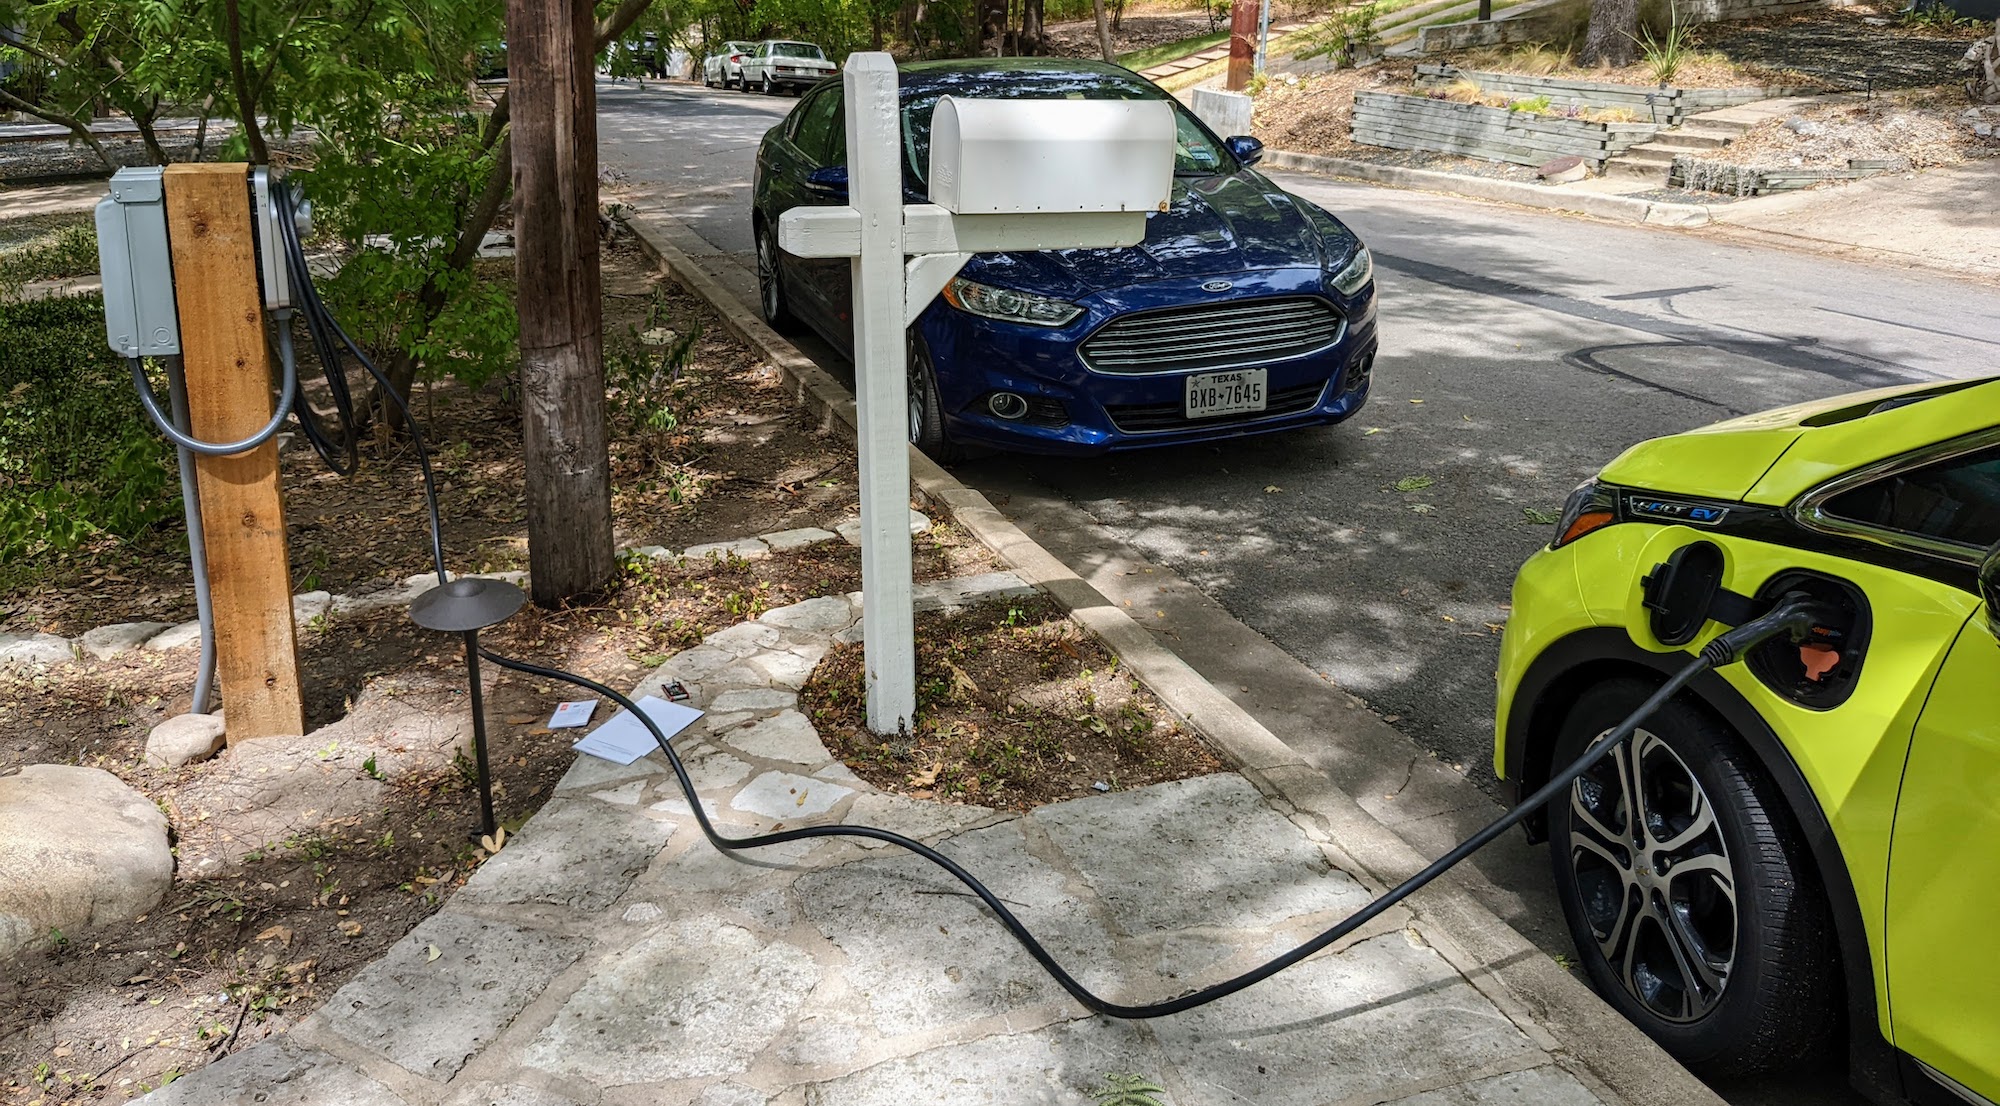
The problem: we need a street-accessible EV charger
We moved into our new house in April, and it’s been great: all the additional space we need, an office for both of us, etc. One thing it doesn’t have is any off-street parking, which is no big deal except for the problem of how to charge my car. At the old place, there was a driveway that went by the side of the house, and so we had a professional install a charger there.
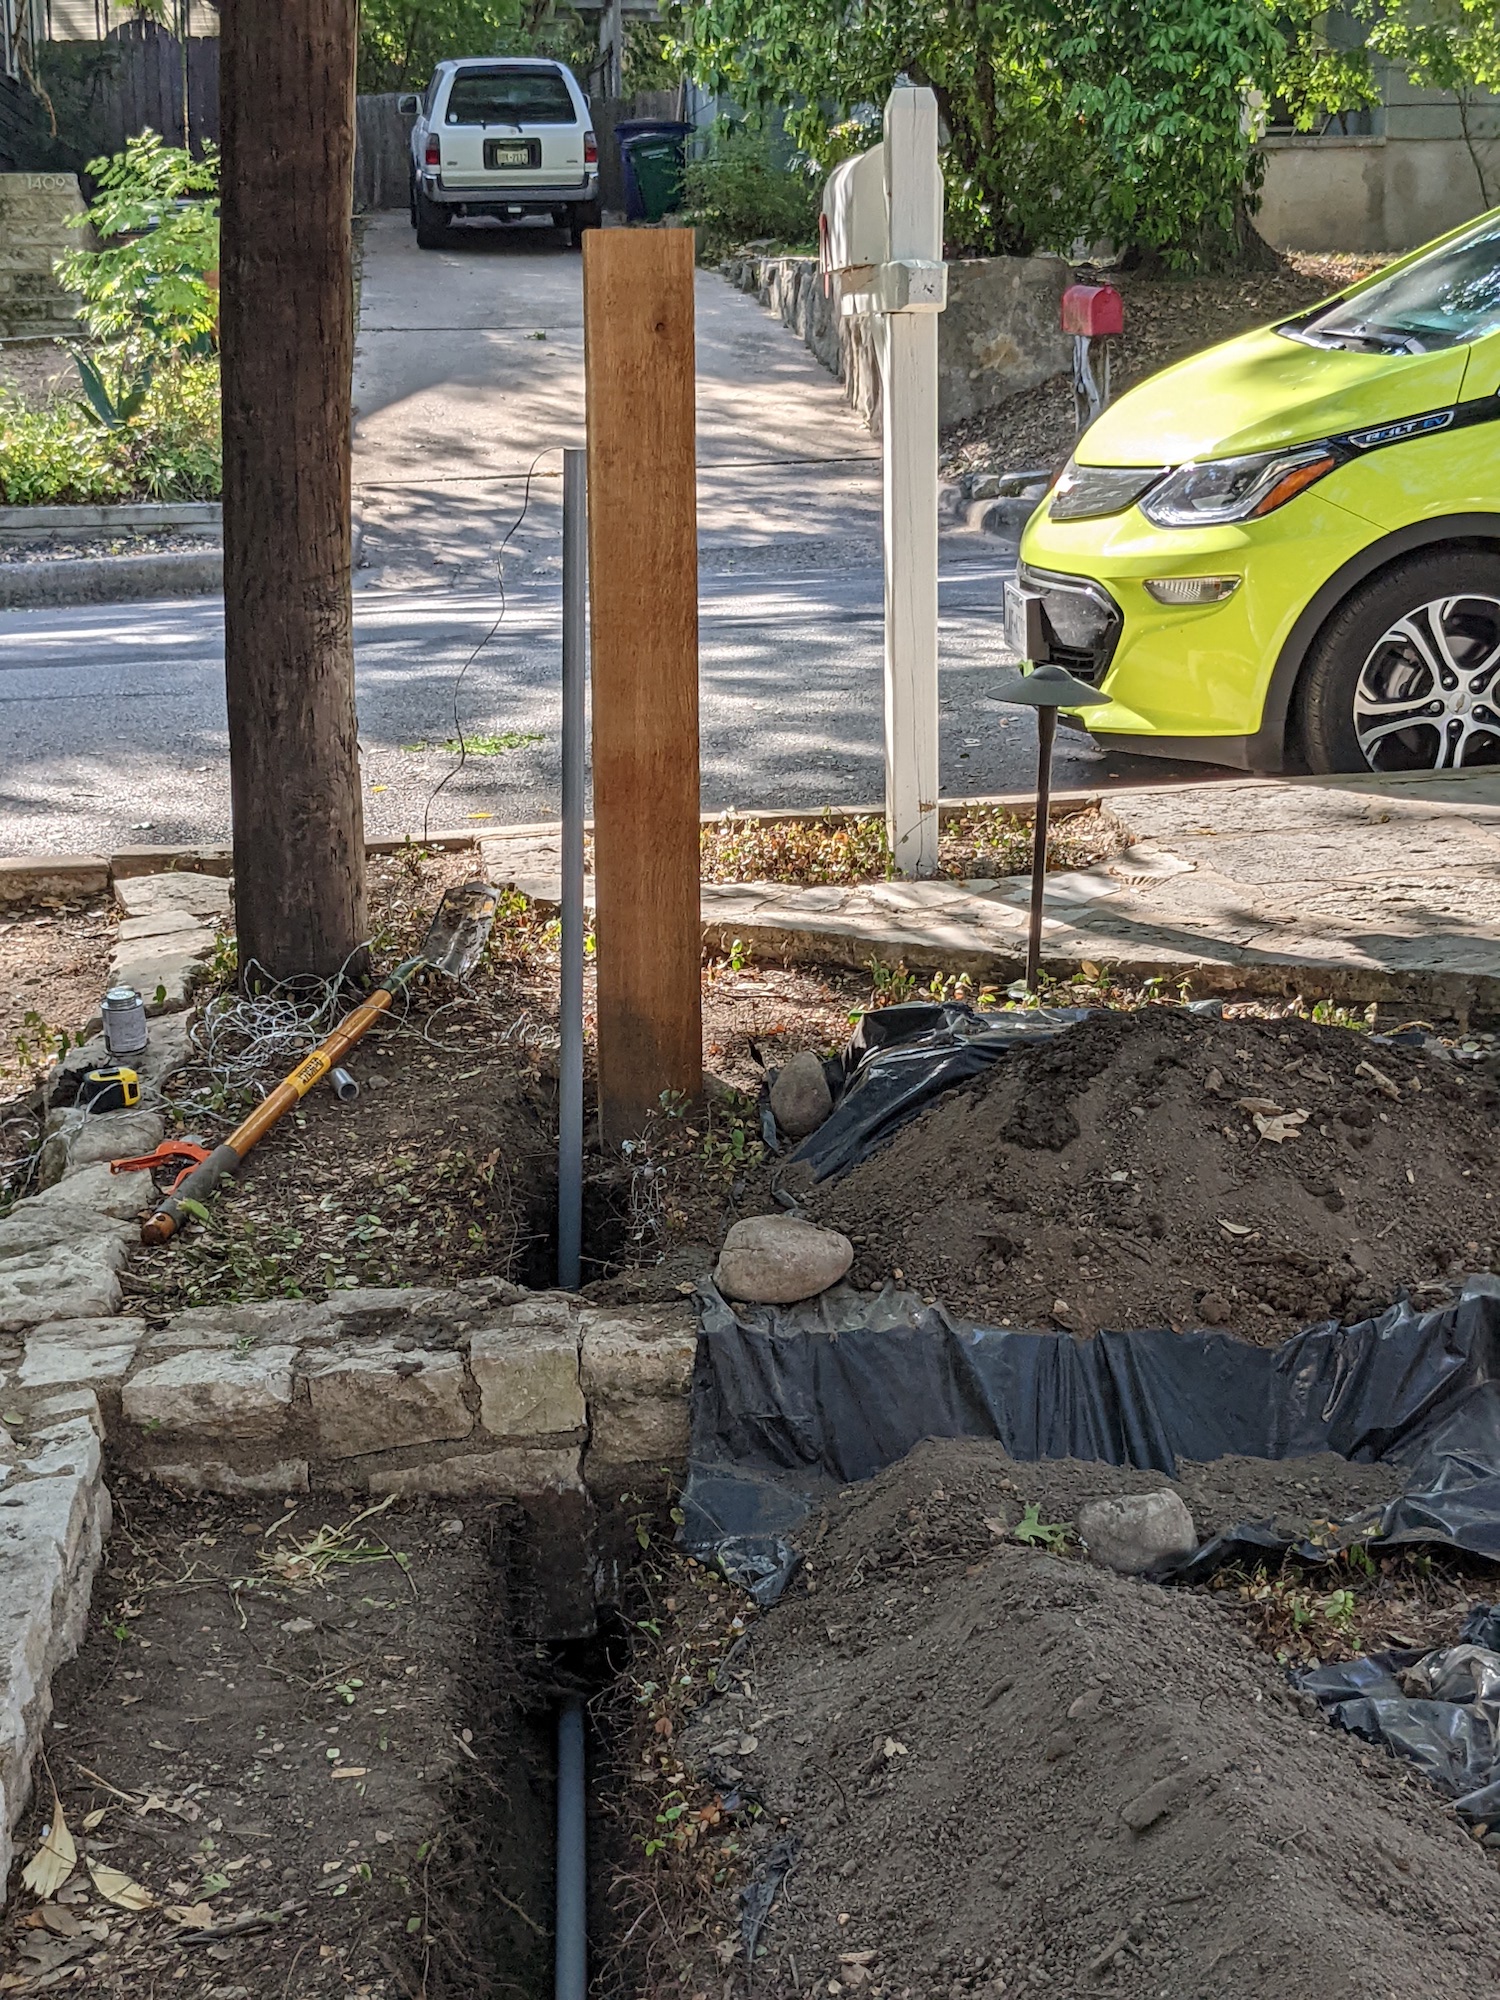
At our new place, the curb where we park the cars is about 50 feet away from the electrical service box on the side of the house:
I had a couple of bids done on installing an EV charger at the location marked. One came in at $3300, the other at $4000, both excluding the cost of trenching and the charger itself. Considering that I paid only about $1500 at the old house including the charger, and got half of that back in a rebate, this was high enough to trigger my DIY project impulse.
Electrical requirements
Obviously adding a high-amperage outdoor electrical circuit is something you should not do unless you’re a licensed electrician. Then again, this is basically the same thing as adding a circuit for a hot tub in your backyard, and that’s definitely something I’d be willing to DIY. So off I went learning enough about electrical code, conductors, and conduit to understand what the physical parameters of the project.
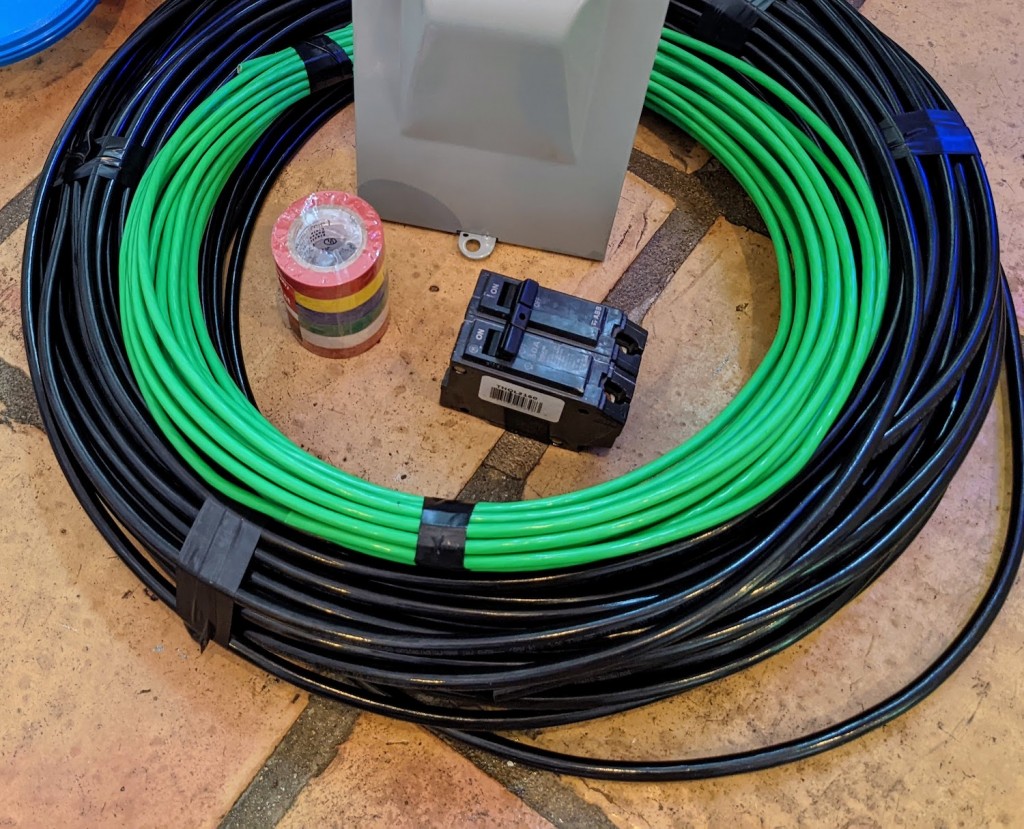
Distance: the ground distance from the electric service to my intended location was 45ft. I figured I should get 60ft worth of conductors to be safe–it turns out this was barely enough. I would measure more carefully for bends and rise heights next time.
Circuit amperage: 60A (48A useable). My Chevy Bolt can only use 32A, but this gives me headroom for the next EV. Our house has 200A service with plenty of headroom–there was a 40A circuit previously dedicated to a jacuzzi bath that’s now unused.
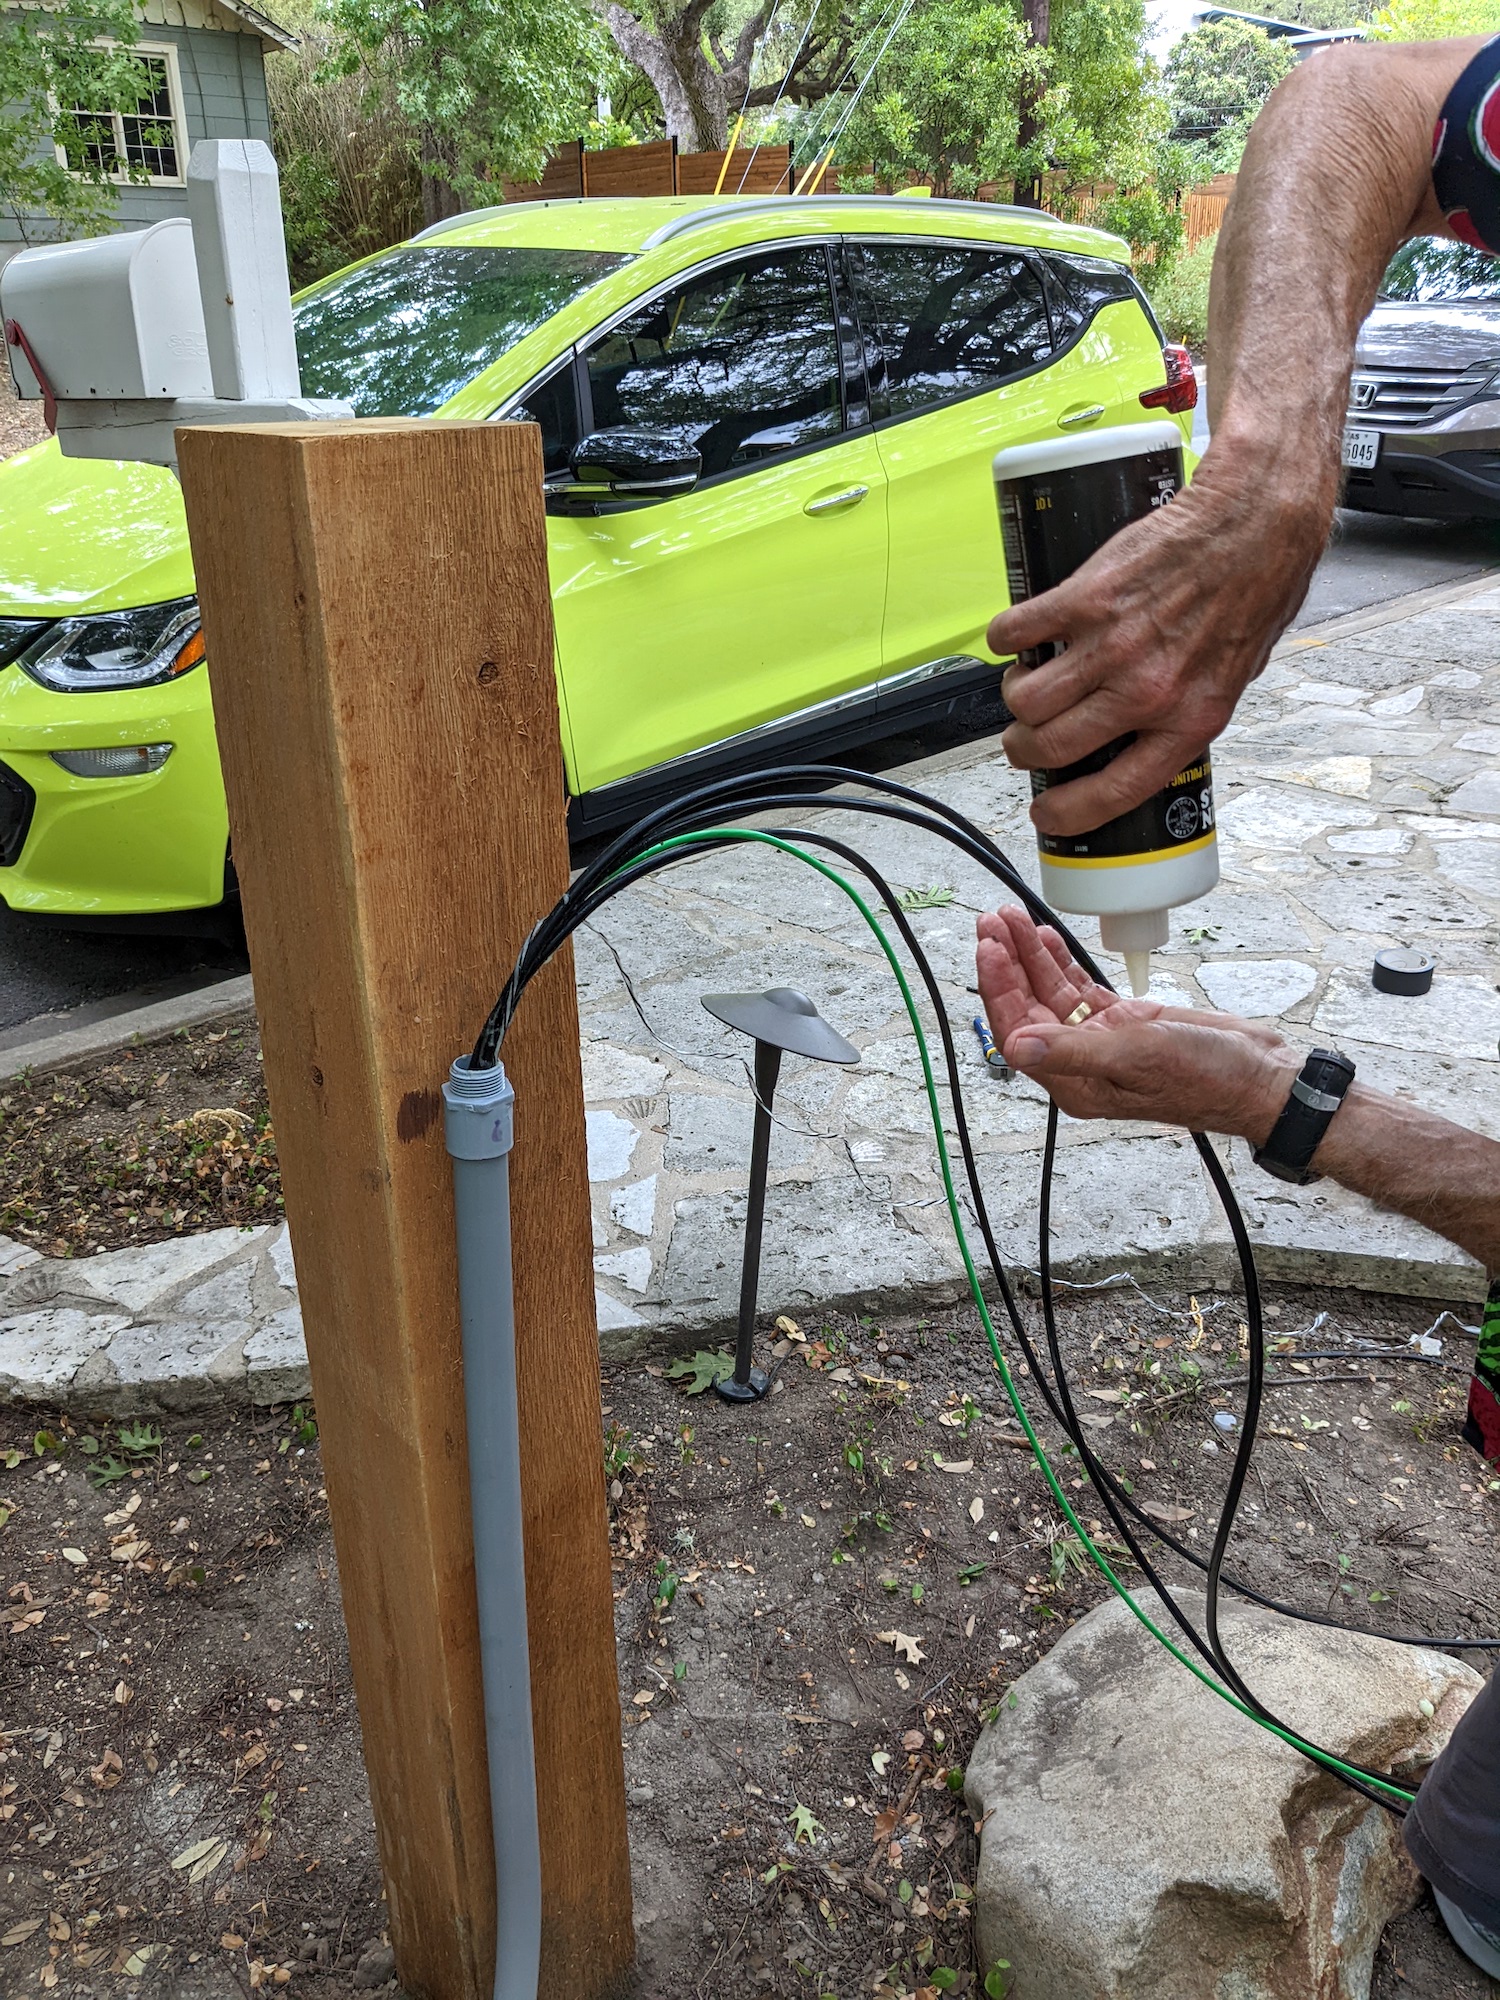
Conductors: Three 60-ft 4-gauge THHN for two hots and a neutral plus one 60-ft 8-gauge THHN for ground. This gauge/jacket/length is actually good for at least 80A and probably more. Although the neutral isn’t required for charging, it allowed me to put a 115V outlet on the post as well as the charger, which I can use to plug in a vacuum for cleaning.
Conduit: to accommodate the super-fat 4-gauge conductors, I selected 1.5 inch PVC (schedule 80/thick-walled) conduit. The use of PVC meant I needed to bury the conduit 18 inches below grade, as opposed only 6" required for metal. Although this had big implications for how much digging I needed to do, it felt safer to have the conduit far below the surface. Even though according to a conduit fill calculator I had plenty of space, it turned out to be pretty tough to get all the conductors through even with lubricant. Because the hole I dug would have been the same size, if I did it again I would have selected 2" conduit instead.
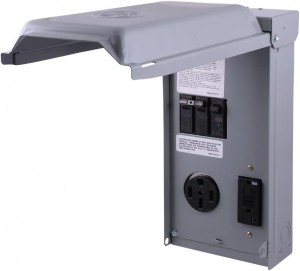
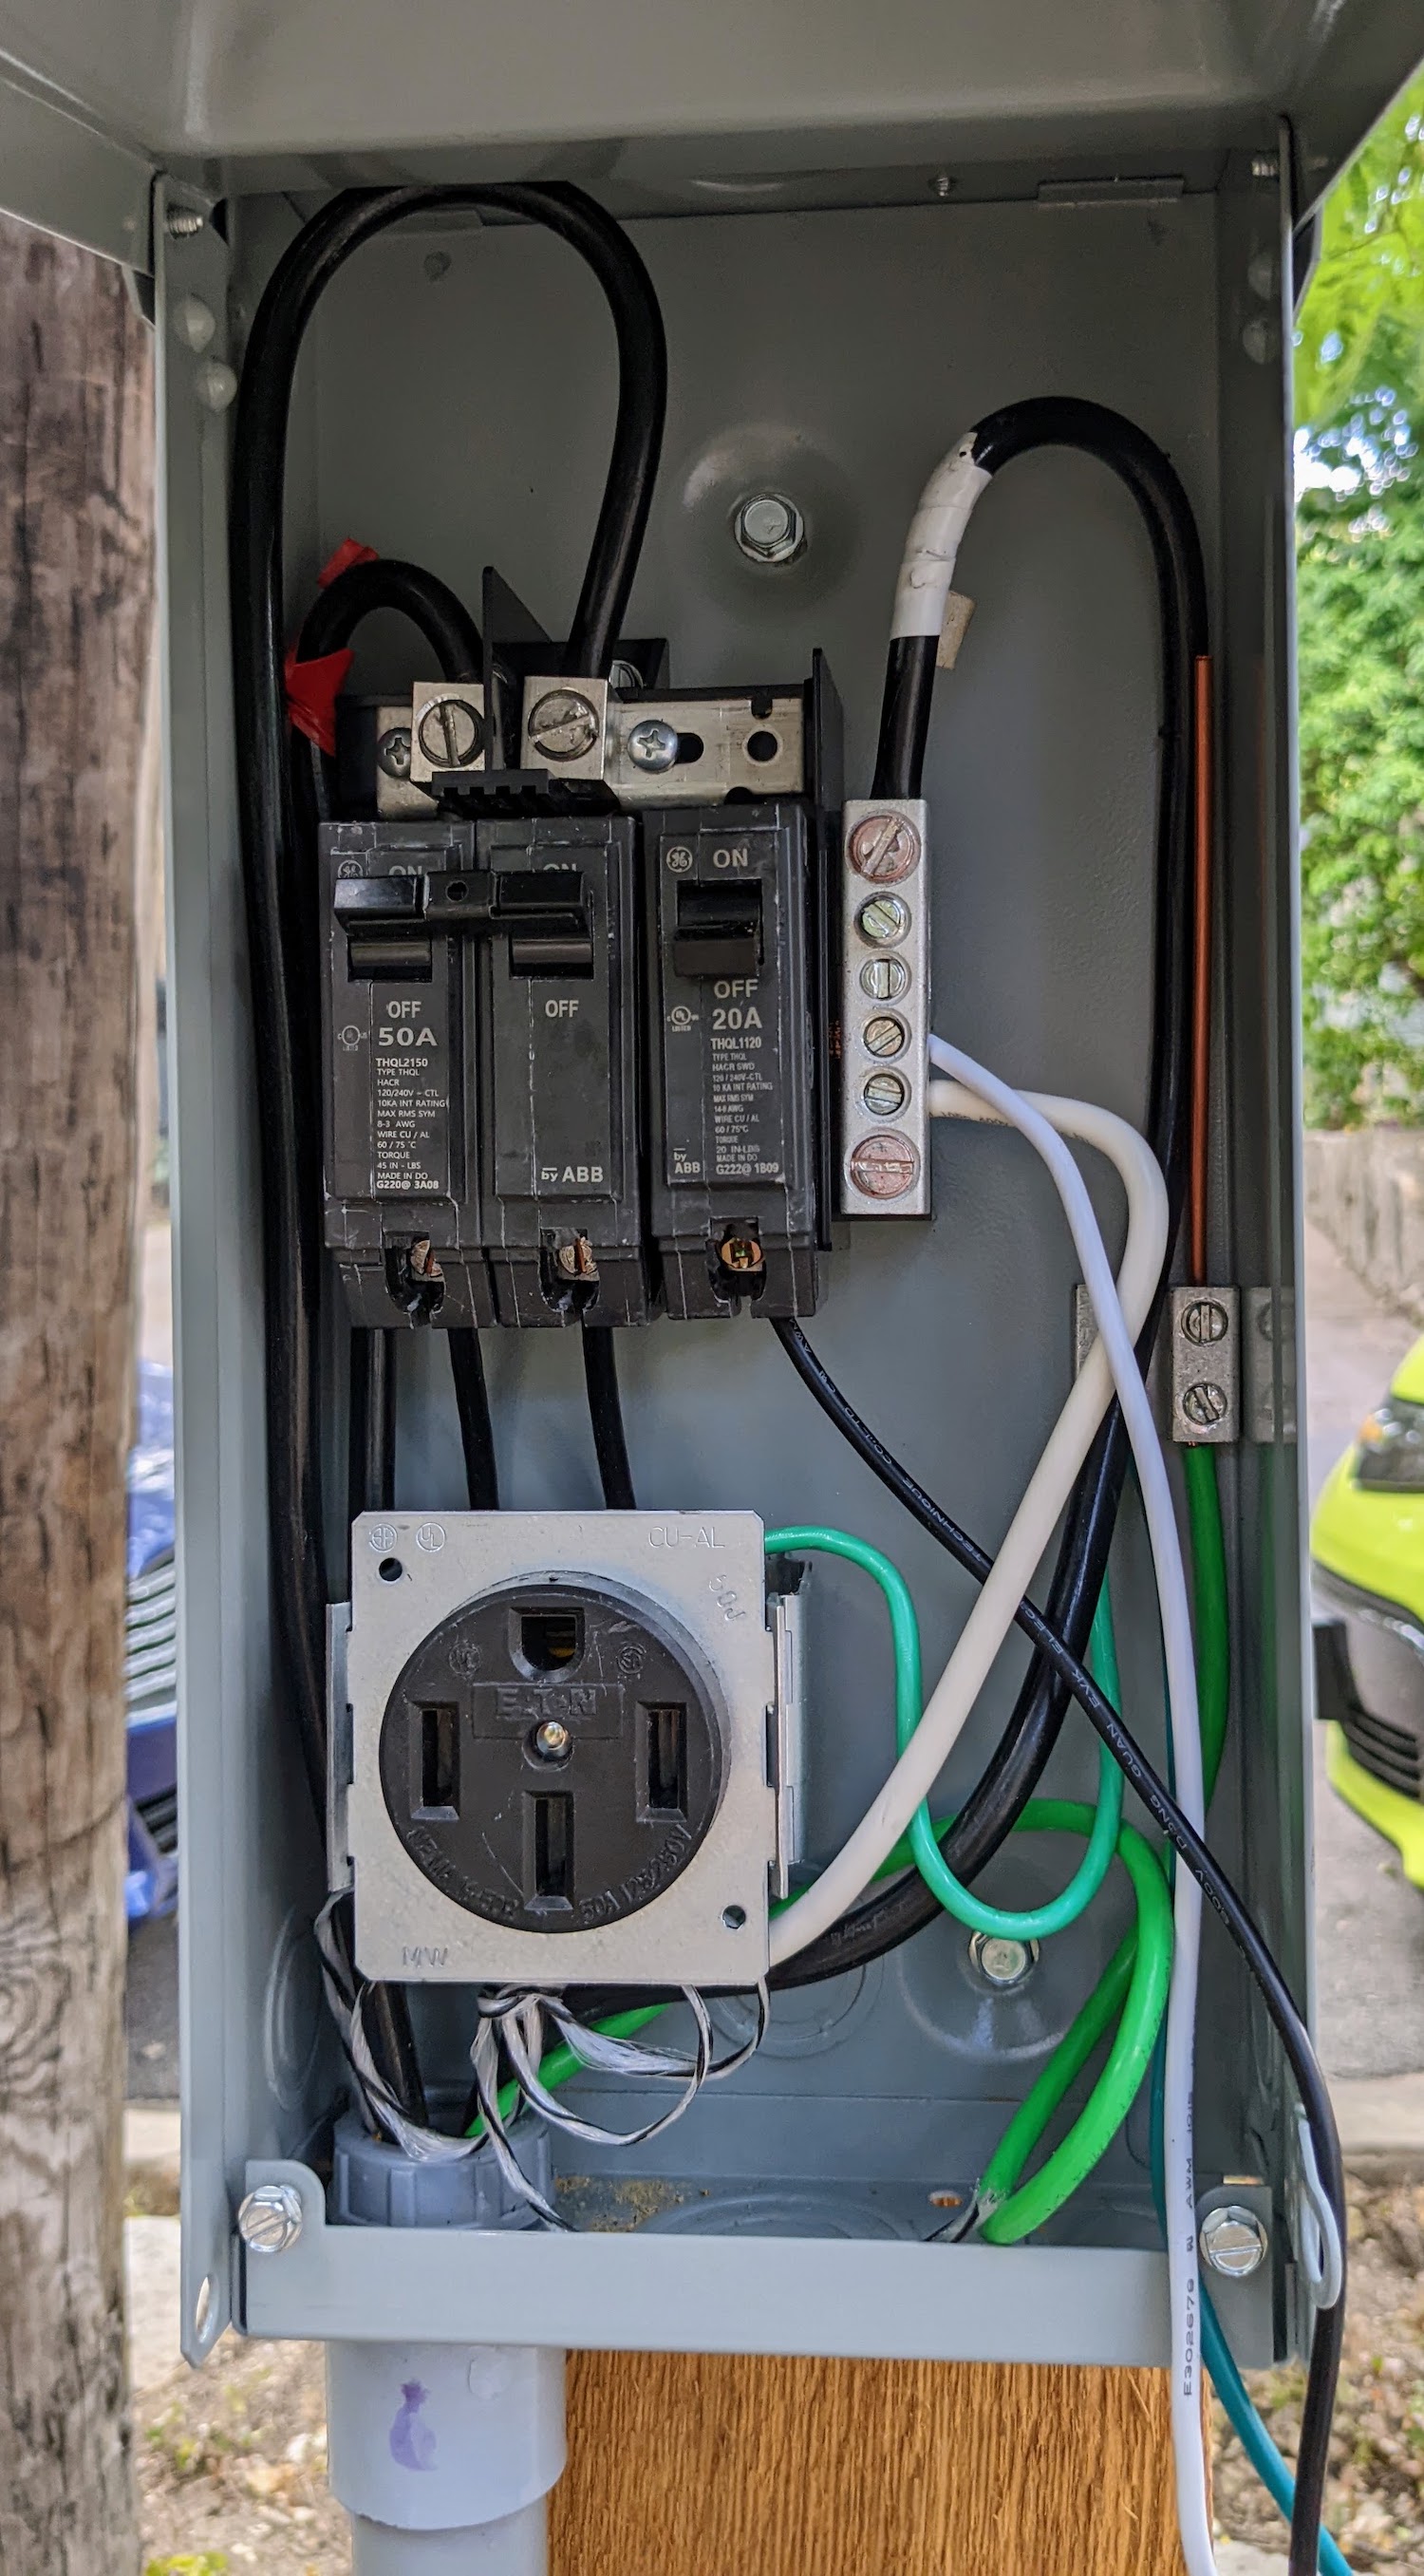
Subpanel: I decided to install a subpanel on the charger post. It’s not necessary. For safety, you’d at least want an A/C disconnect on the post to quickly cut off the live circuit. What the subpanel buys is another circuit breaker (that also provides disconnect functionality) as well as receptacles. I chose the GE1LU502SS, with both a NEMA 14-50 (50A) and traditional 115V, 20A receptacle. This allows me to connect the charger as well as an appliance at the curb if I want.
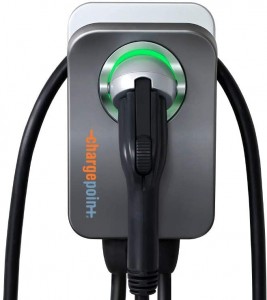
EV Charger: I went with the Chargepoint Home Flex because it can support up to 50A, I like their app, and I had a good experience with a similar model installed outdoors at my old house.
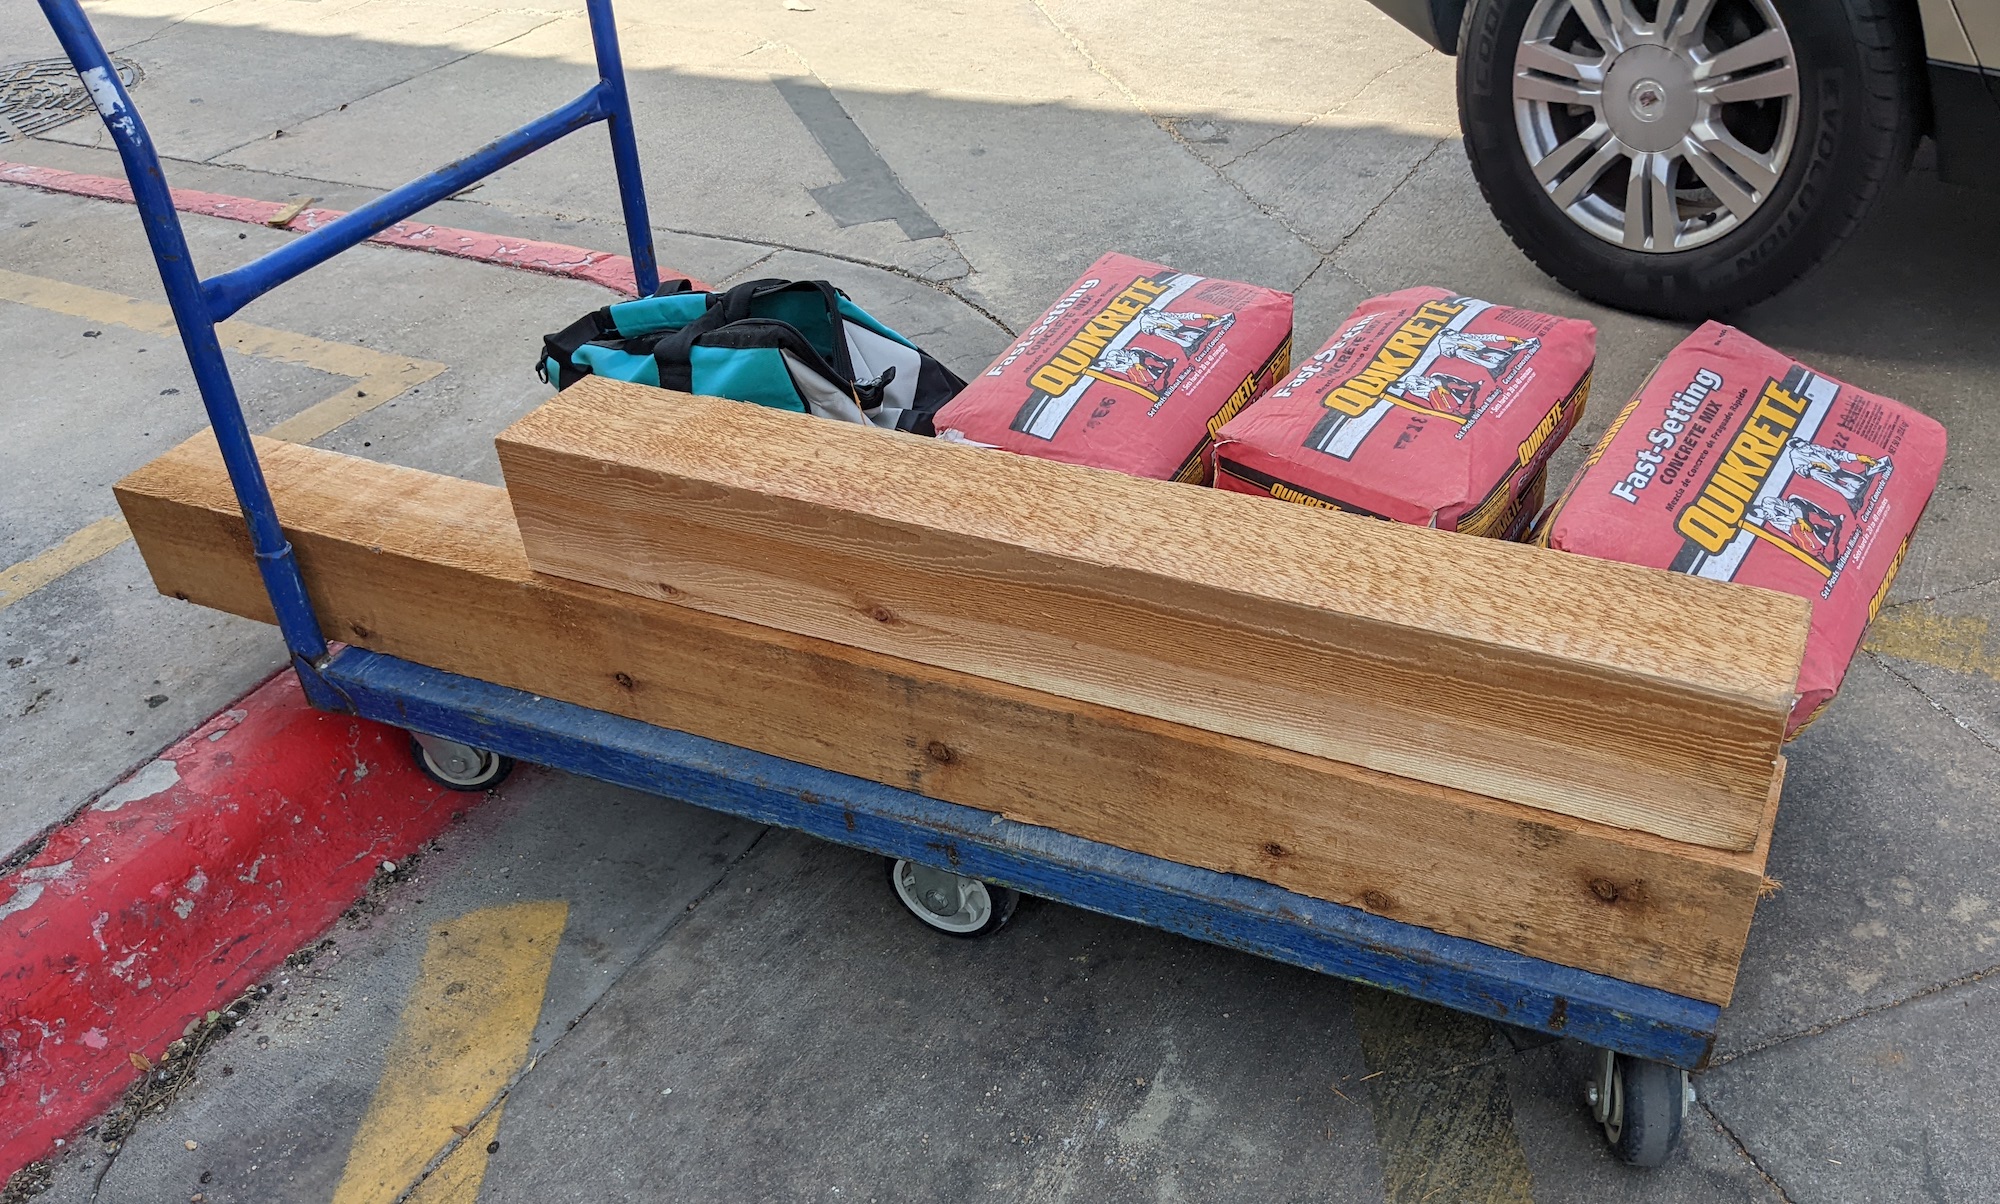
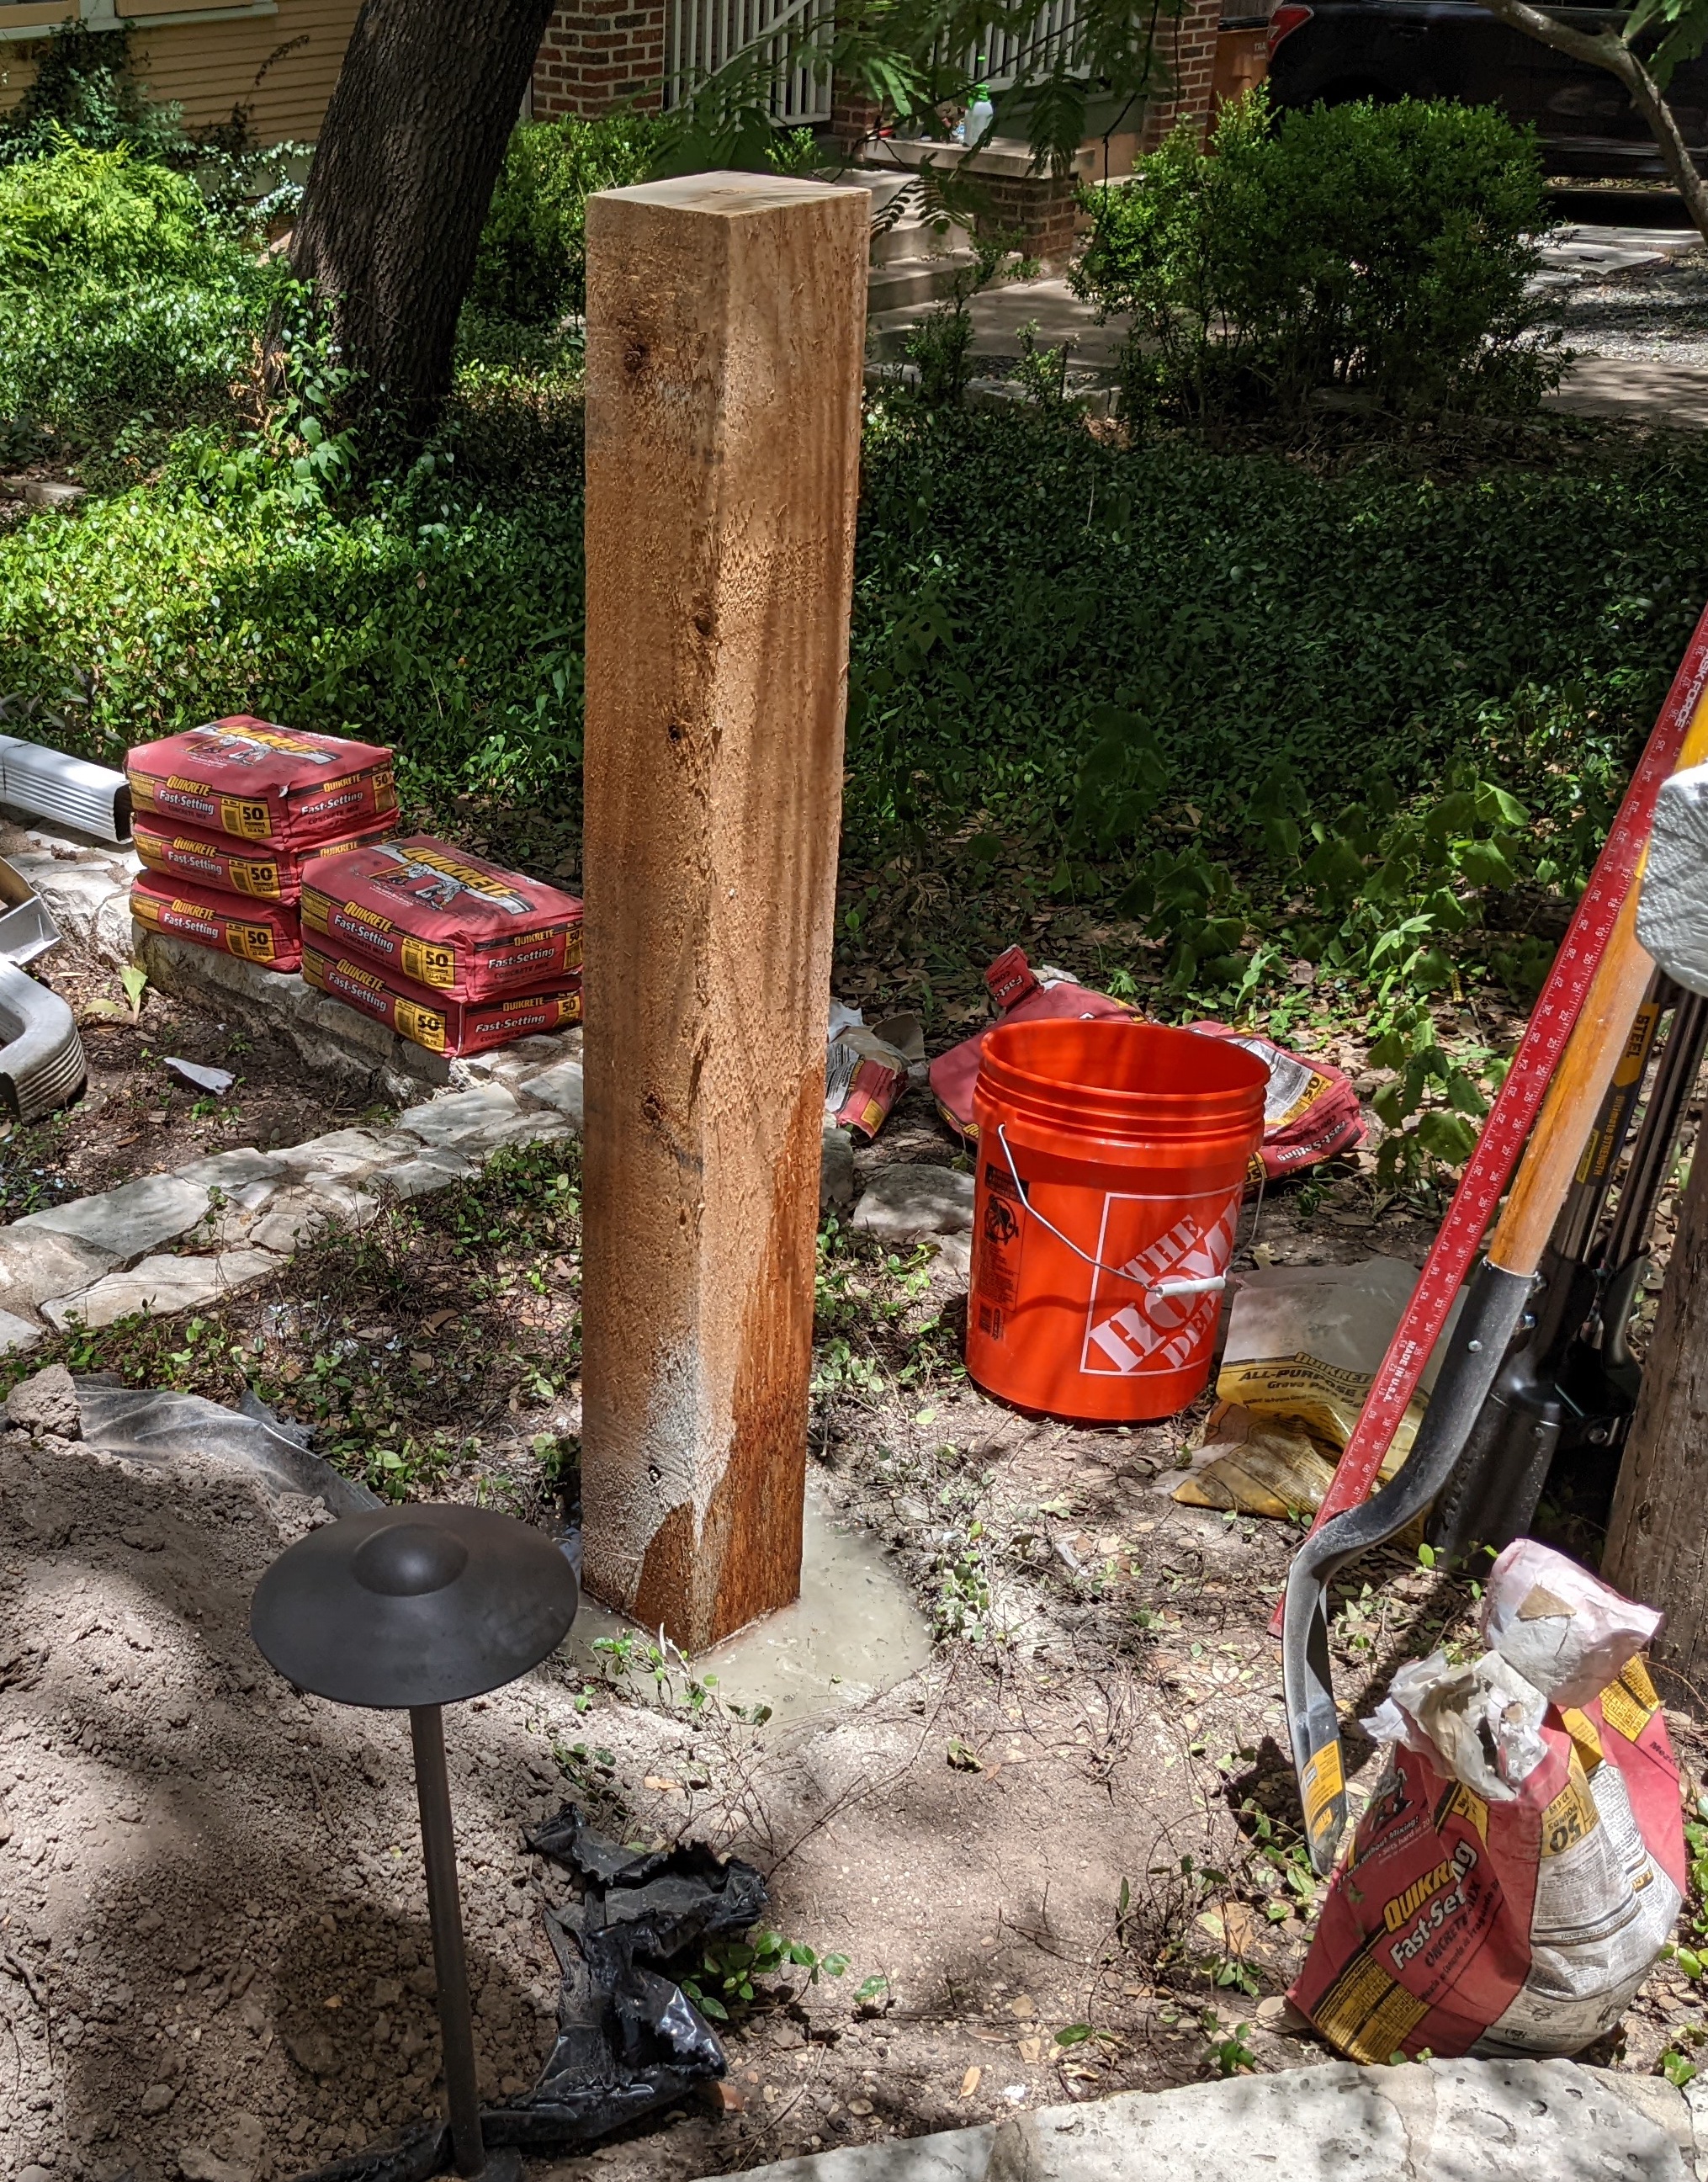
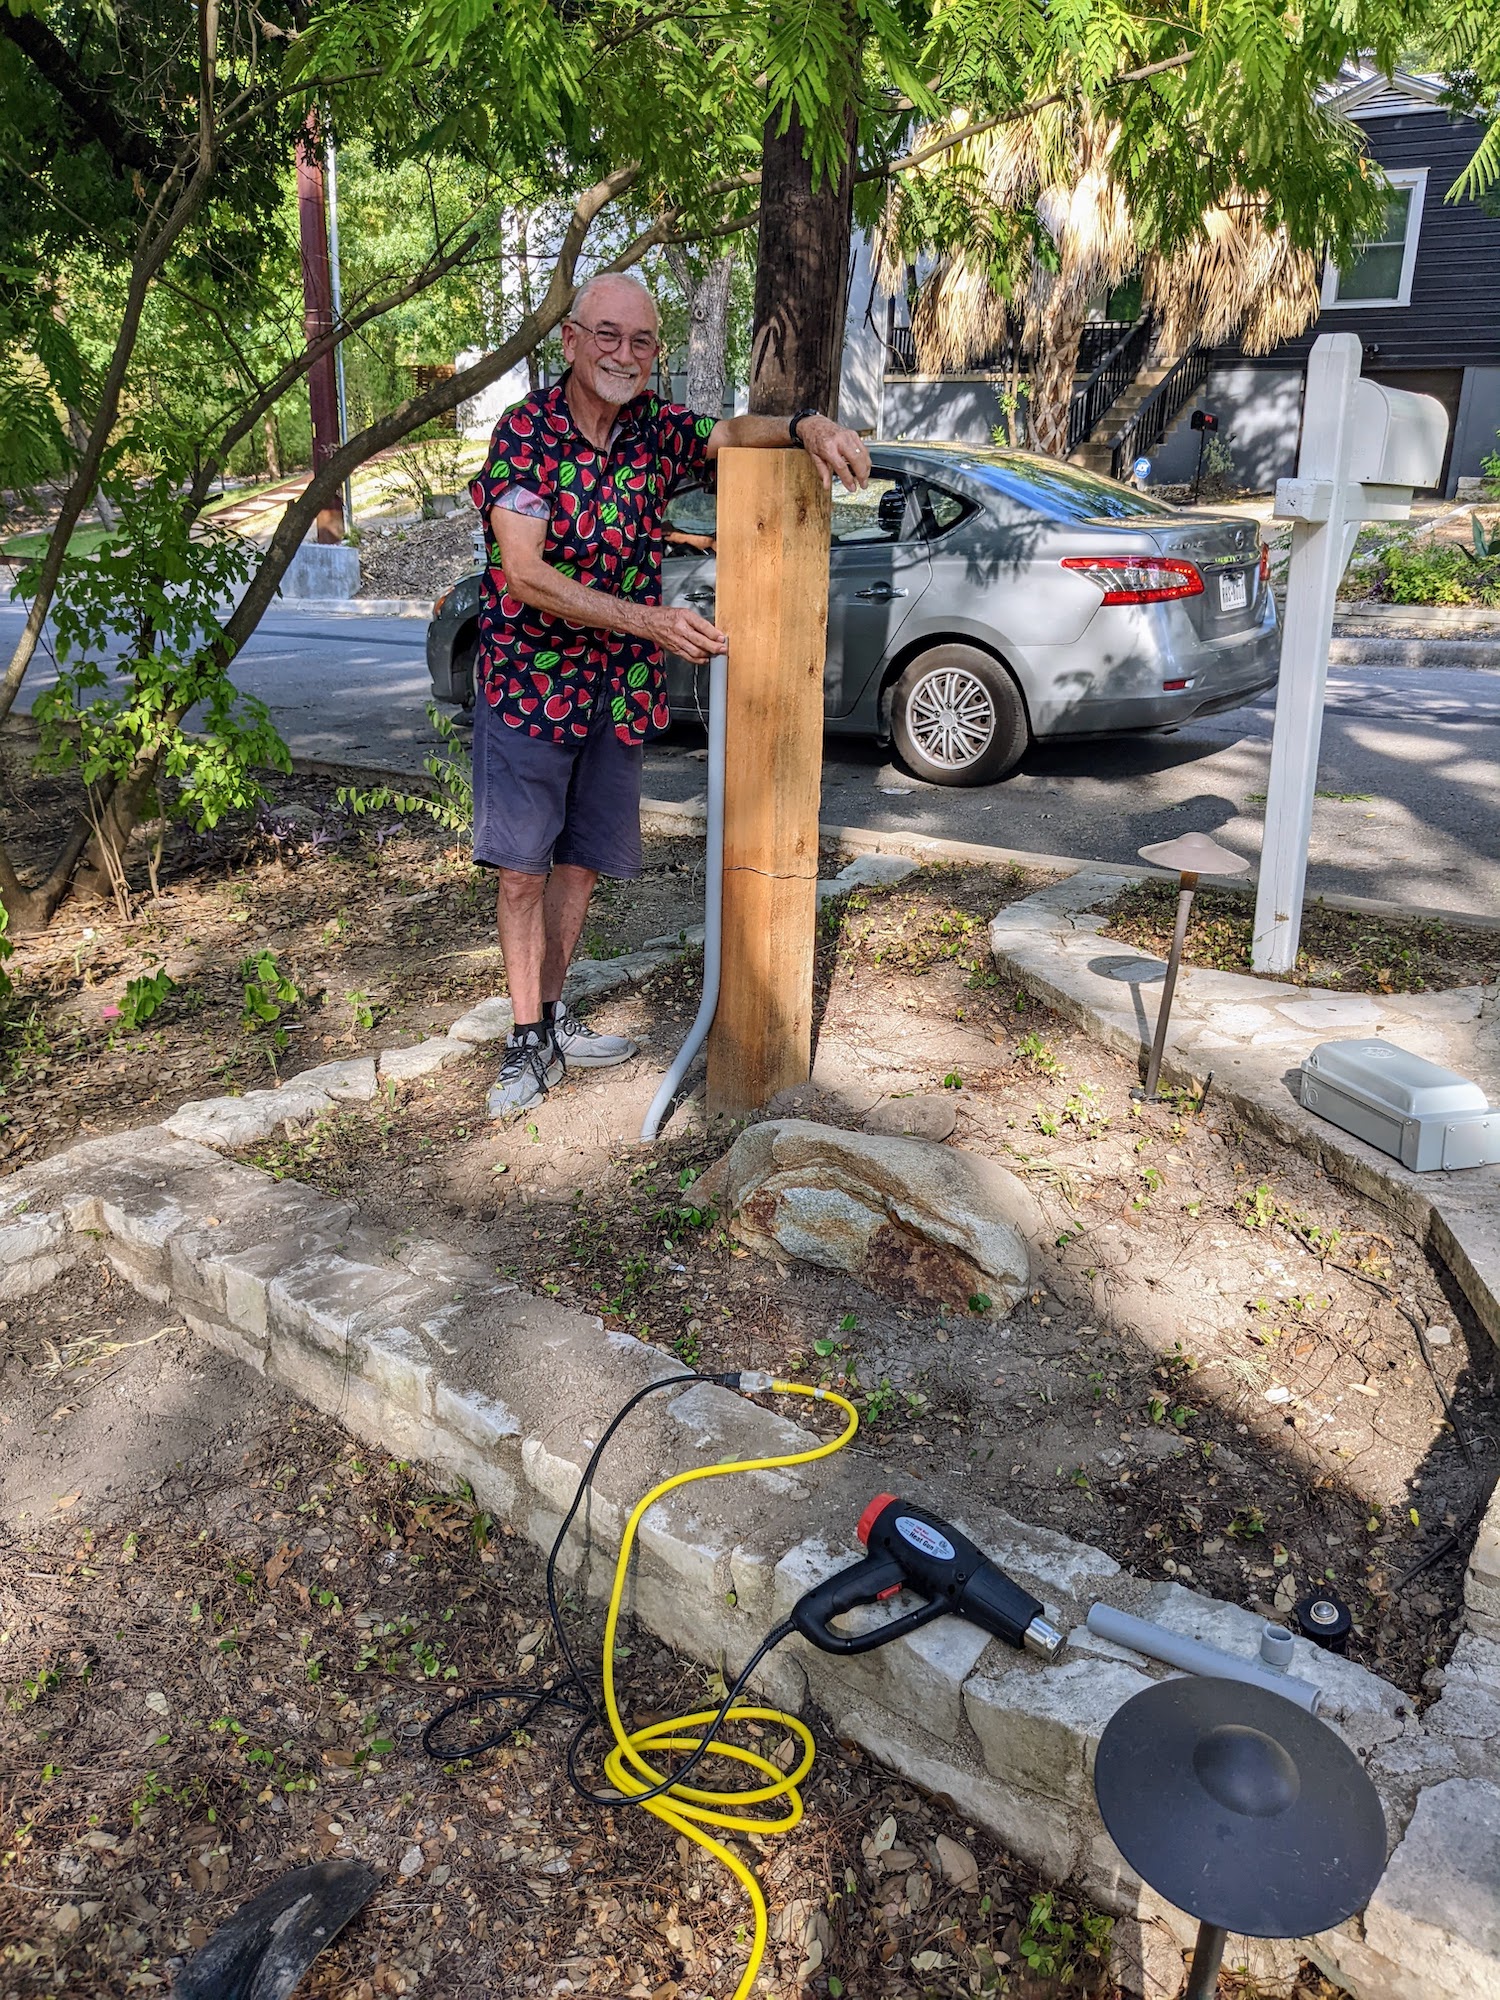
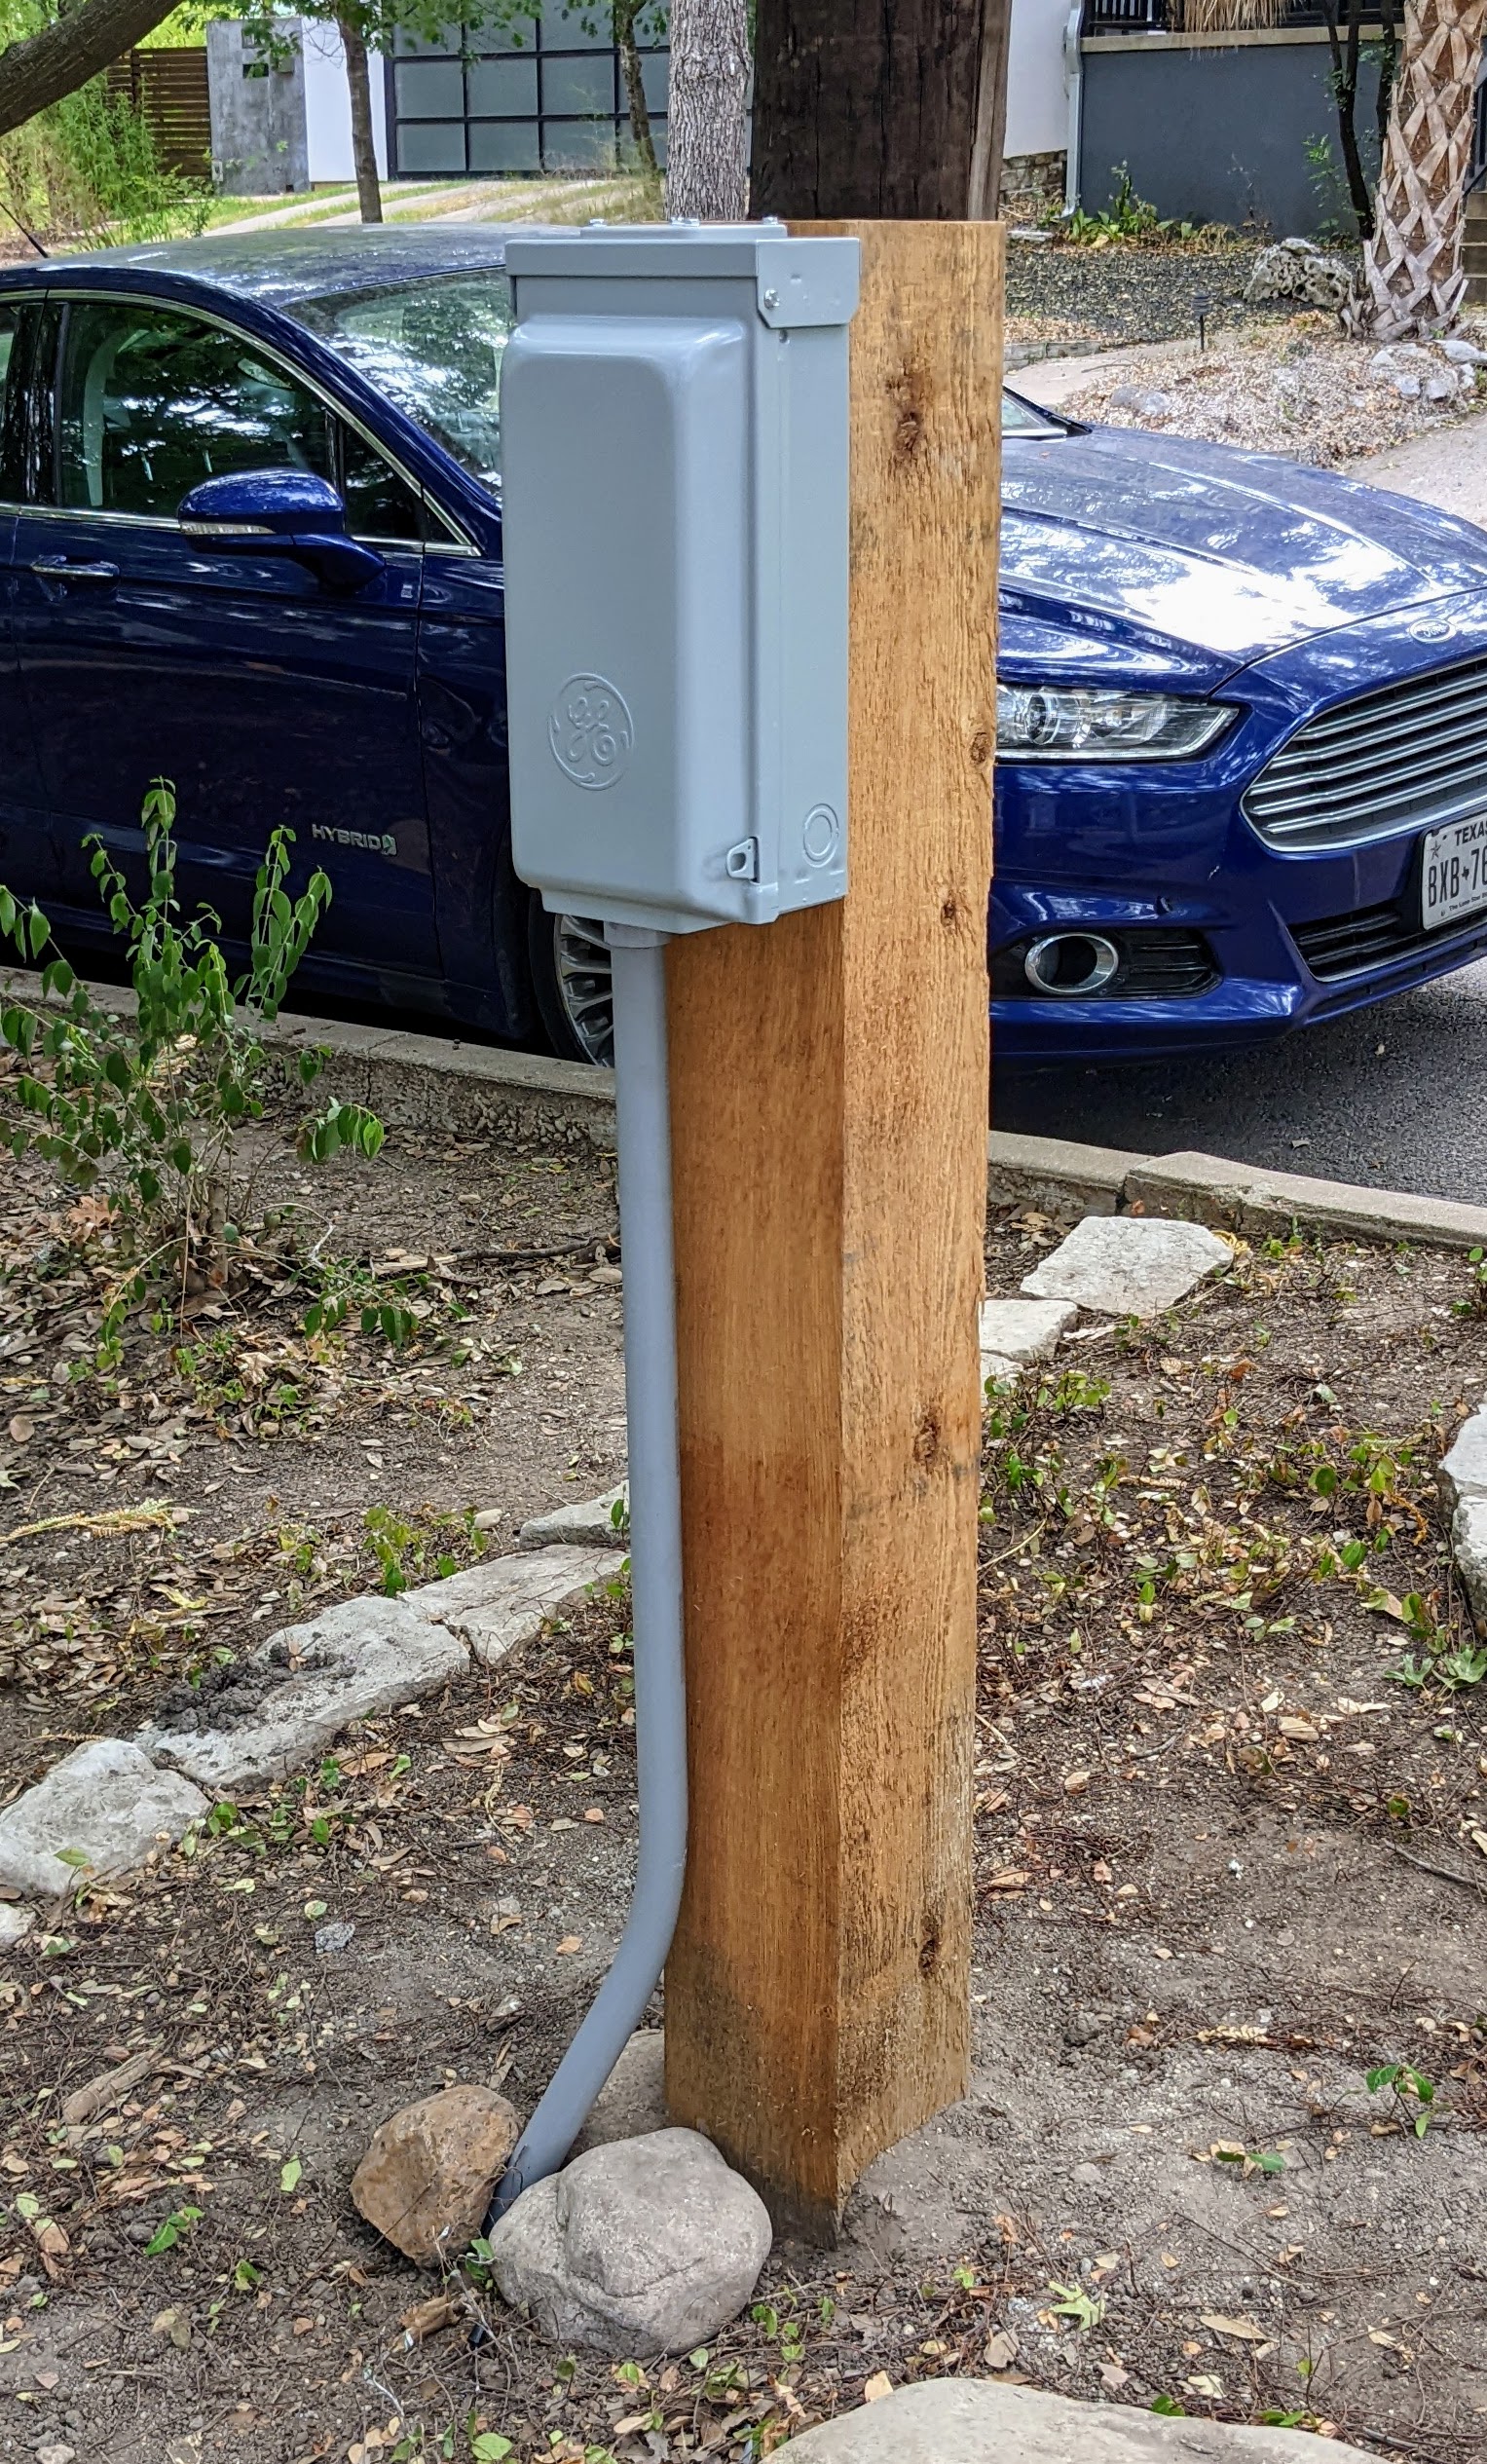
Setting the post
I selected a 6x6 rough-milled cedar post to mount the charger on for aesthetics and durability. Unfortunately, I could only find 10ft lengths of 6x6 so I had to go back and fetch my handheld circular saw to cut the post in the Lowe’s parking lot.
I massively overbought concrete but still ended up with 2ft+ of the post underground–it’s not going anywhere.
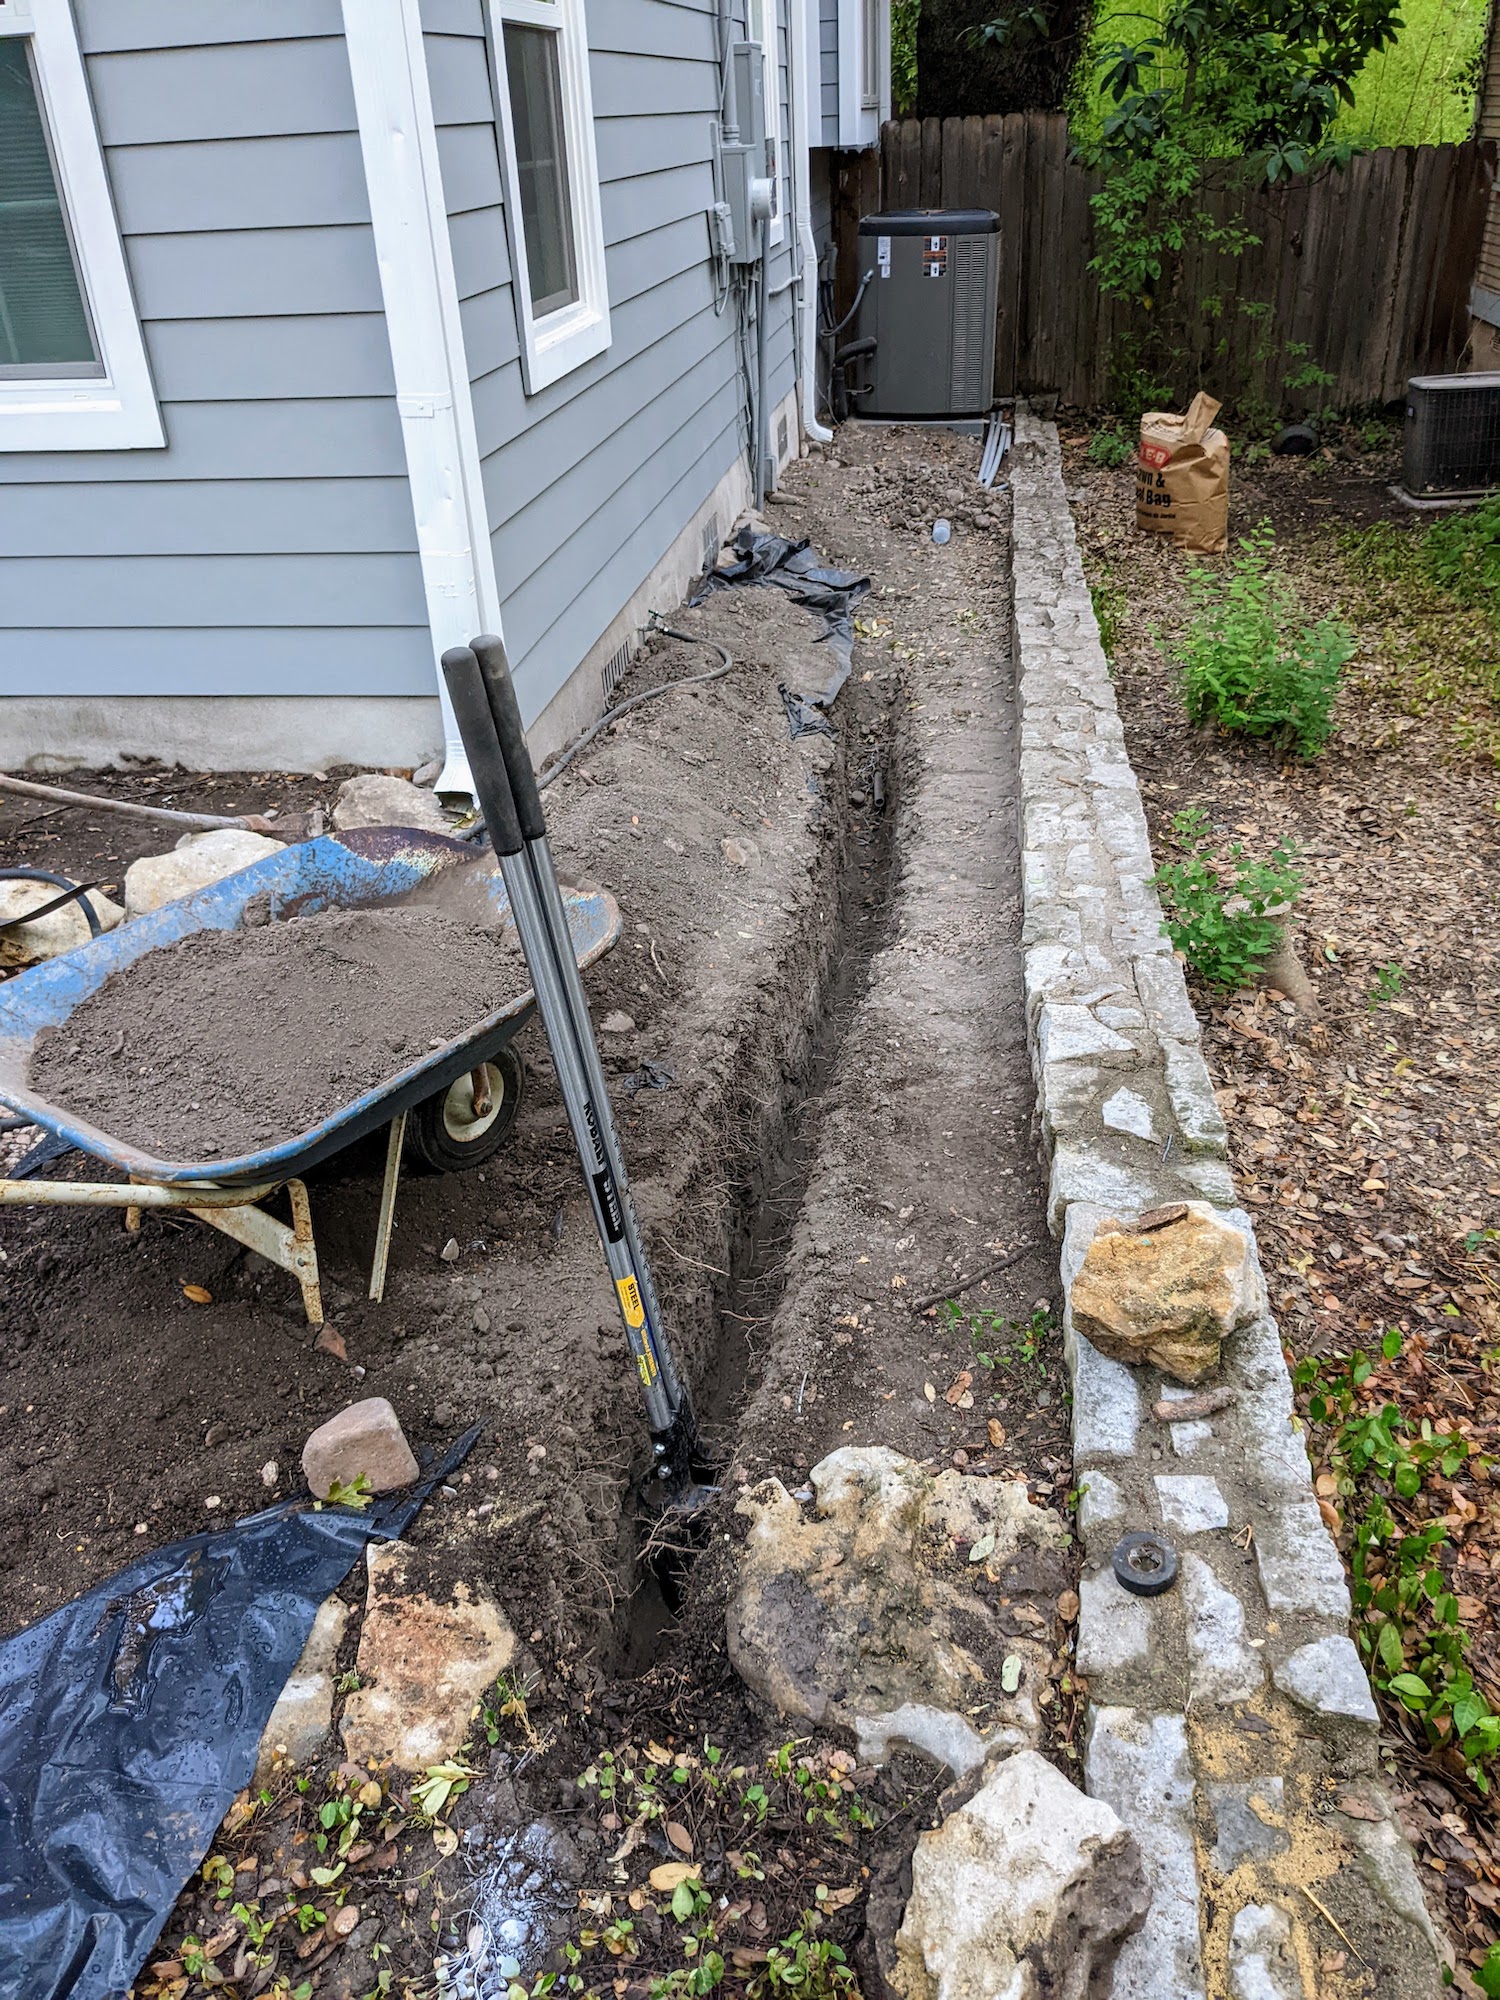
Digging the trench and laying conduit
The biggest challenge by far with this project was trenching from the electrical service on the house to the post where I installed the charger. This was about 45ft up a gentle grade, and to meet code I needed to bury the conduit at least 18 inches below grade. The trench only needed to be wide enough to fit the 1.5" wide conduit, but it’s hard to make such a narrow hole.
CALL BEFORE YOU DIG! You never know what underground water, electrical, or gas lines might run through your property. Luckily with just a couple of days notice to 811, you can have all of them marked for free. I used this service to have my gas line marked (it was on the other side of the yard) and to confirm there were no other underground lines in my planned path.
You can buy a power trencher for this kind of work, which is basically a chainsaw that cuts dirt. I considered this, but without any experience using one I was worried about safety and tearing up my yard. So, I decided to hand dig. This was really hard work, and it took me about 10 hours spread across two weeks to finish the job. I used a post hole digger to cut down through dirt and roots and a trenching spade to remove spoil.
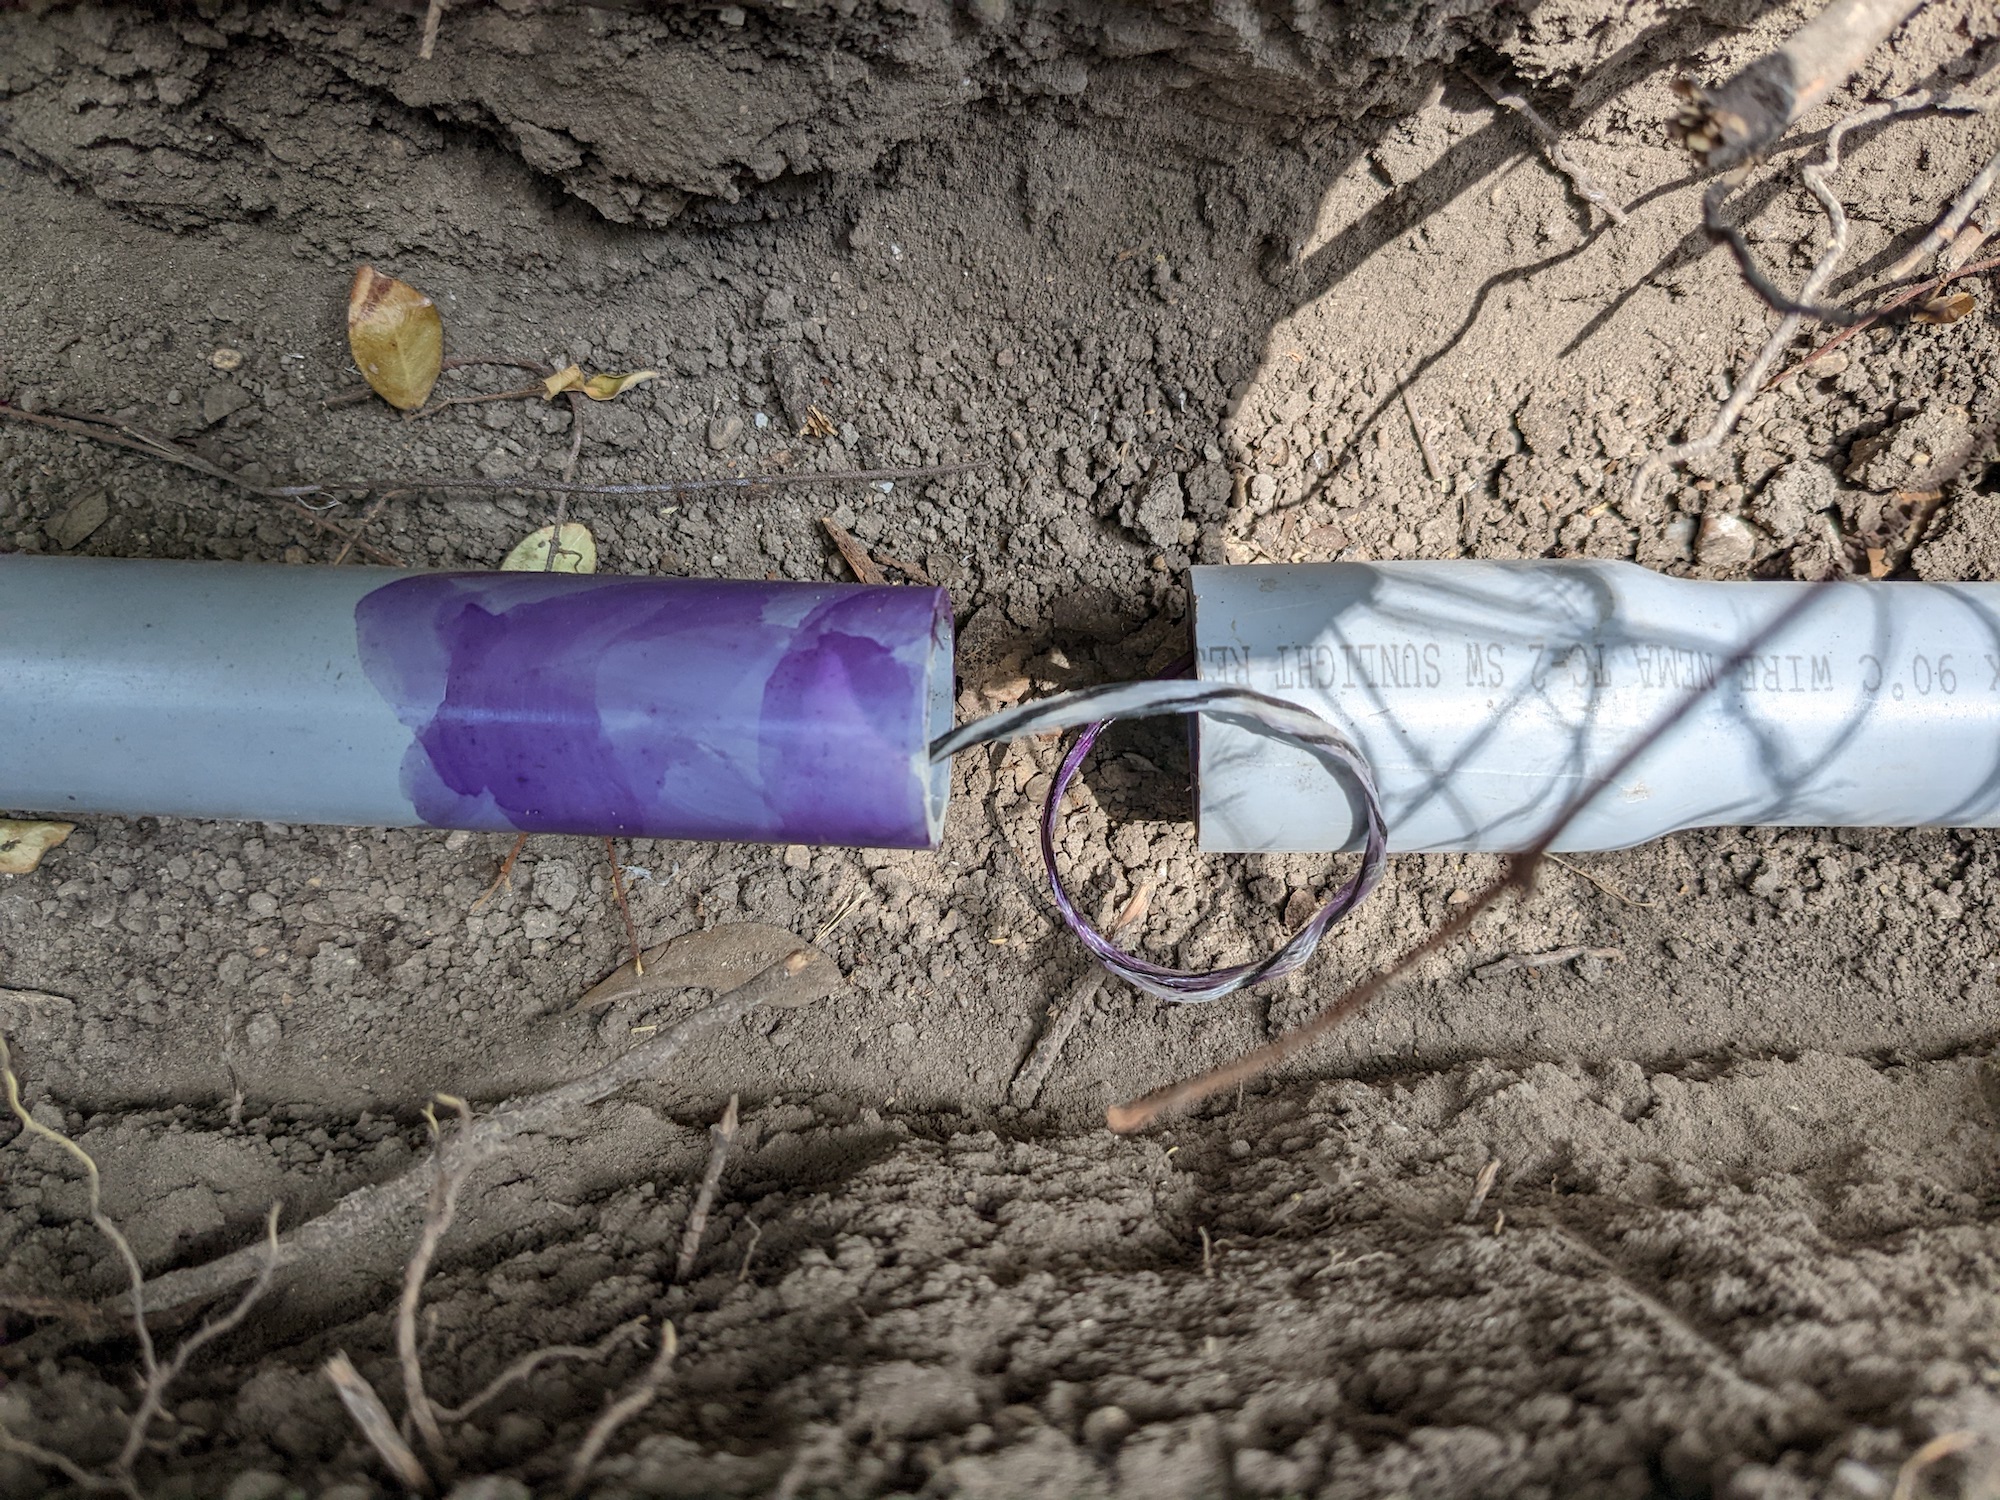
I dug in about 15 foot sections, laying down 10 foot sections of bell-end conduit with nylon string already threaded through. I used standard PVC primer and cement to weld the sections together, then backfilled the section with dirt and kept digging.
The trickiest part was getting the conduit under a small retaining wall an then through a 90-degree bend to meet the post.
Finally, Marc and I used a heat gun to put two gentle bends in the conduit so it would rise as close as possible to the post while giving room for the concrete footing.
Pulling the wire
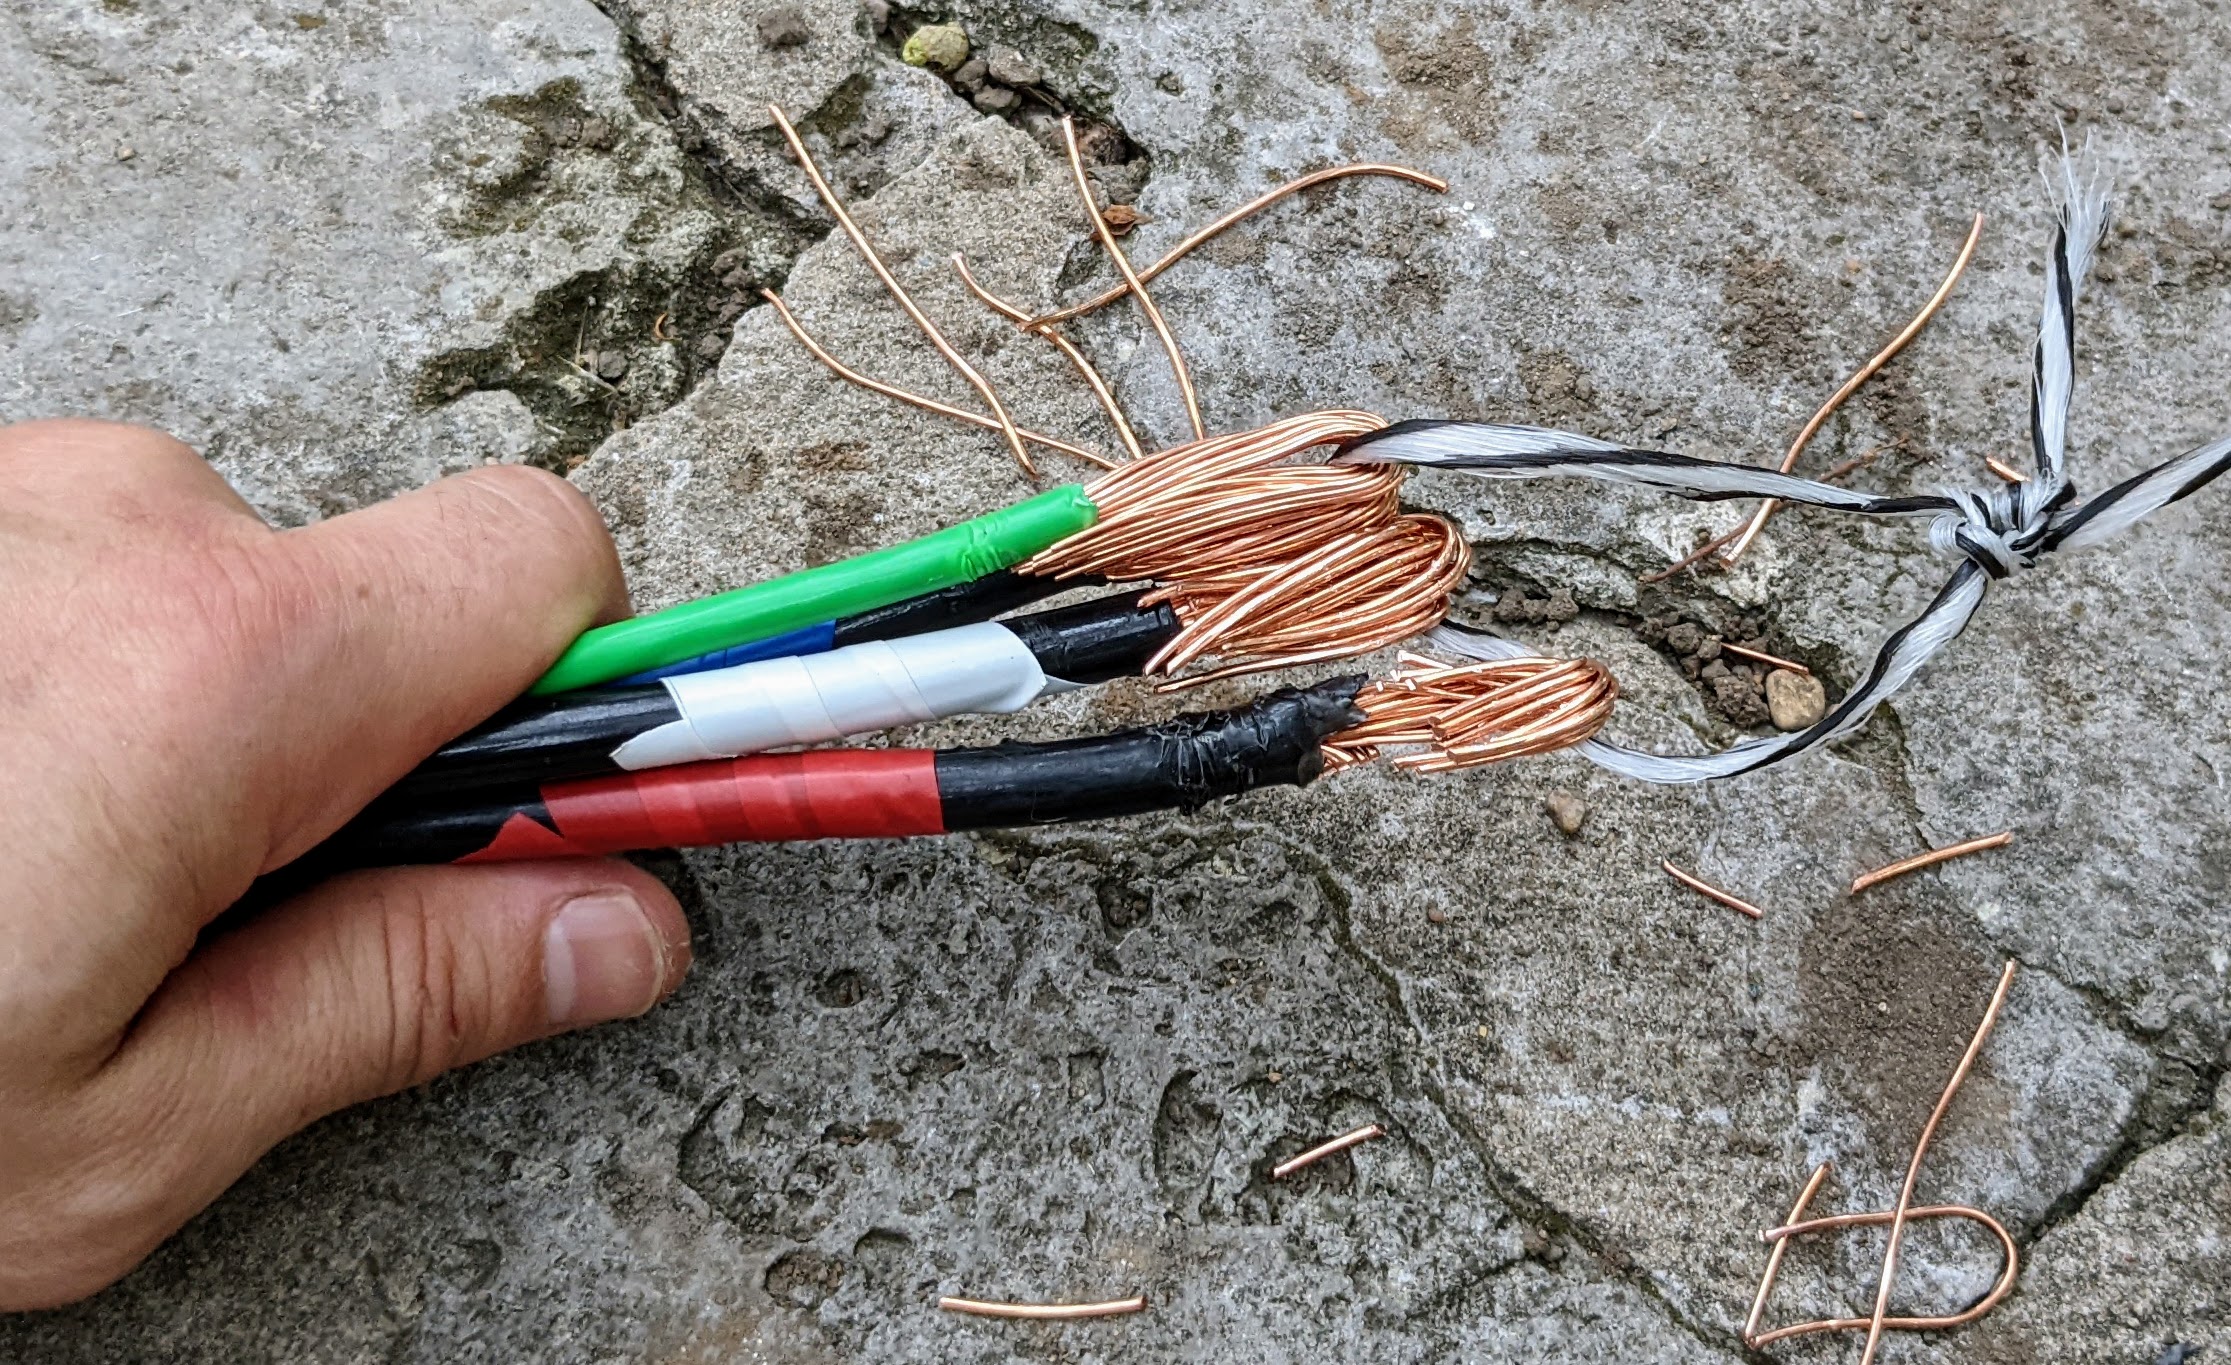
The next step was to pull the four conductors (two poles of 220V, neutral, and ground) through the conduit. I had fed 250-lb test nylon string through it as I buried it, so the next task was to attach the conductors to the string as securely and smoothly as possible. This is called making the ‘head’ in electrician lingo. Not pictured: I wrapped this all in gaffer’s tape.
Marc then fed this head down through the conduit at the post while I pulled on the nylon string from the electrical service box. To ease the way, we liberally smeared the wires with wax-based pulling lubricant.
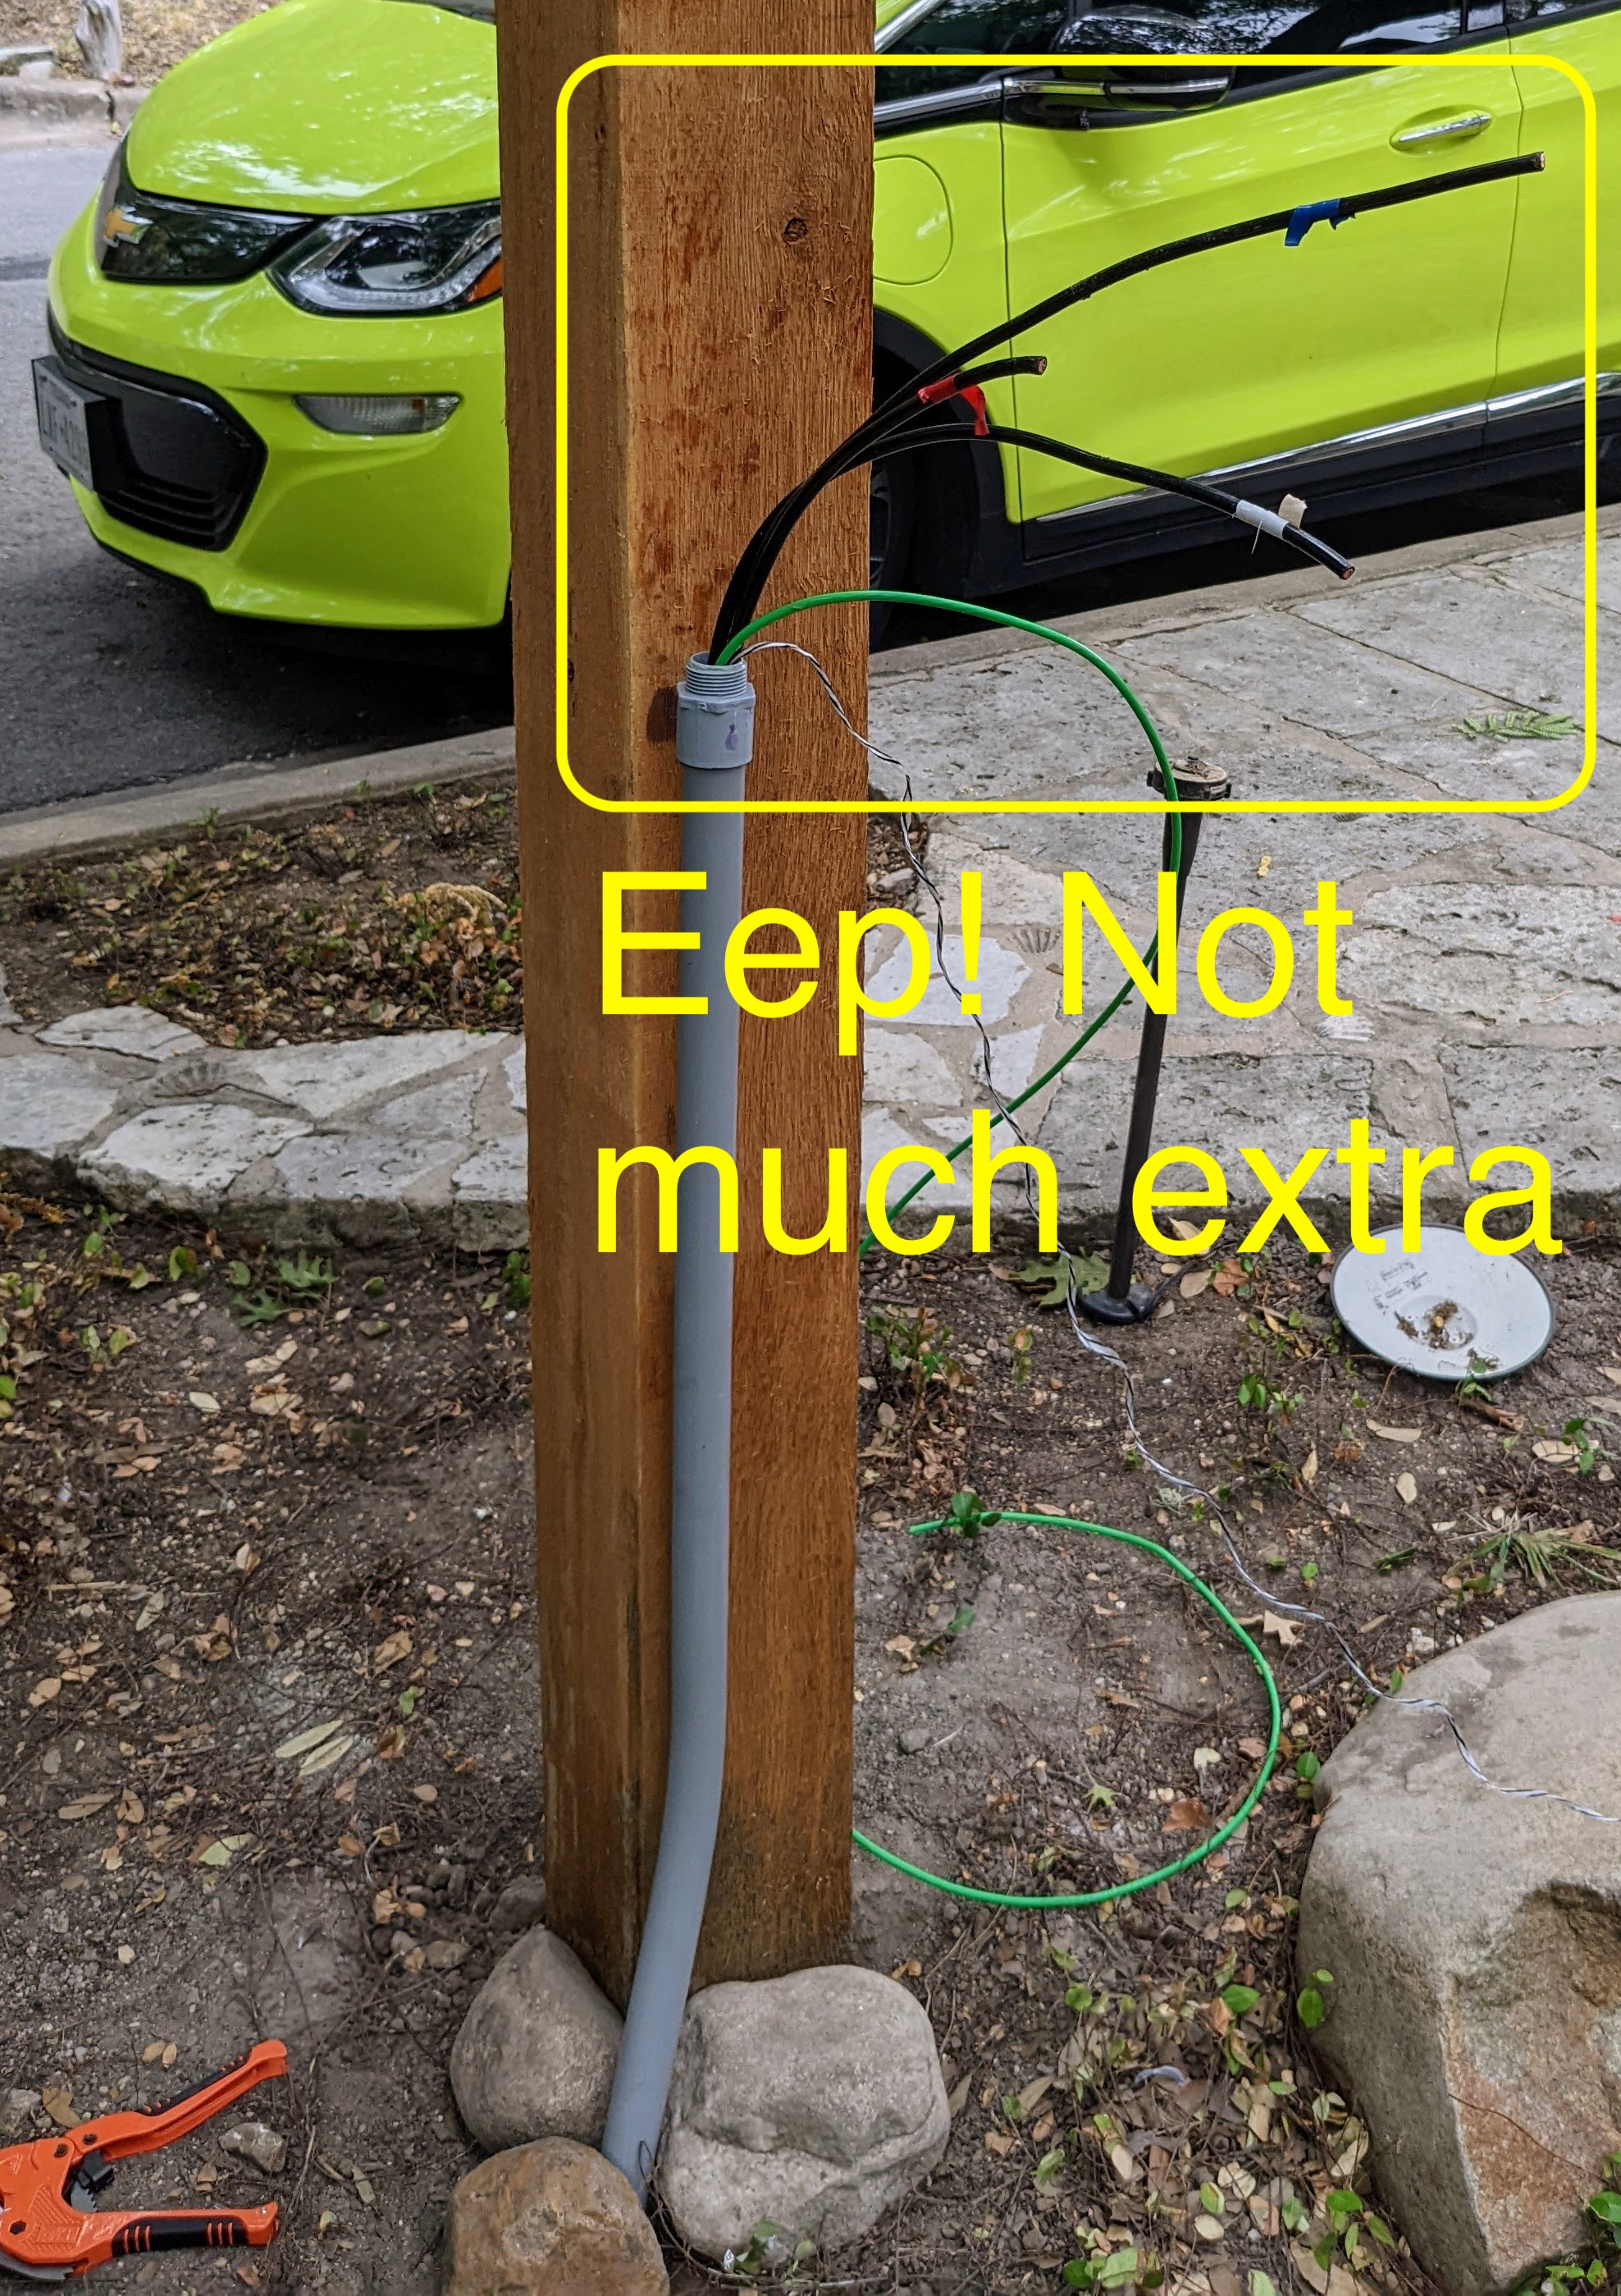
Pulling was much harder than I expected. The conduit wasn’t that full, but we had two 90-degree turns plus a couple of gentle bends. I also think there was a significant amount of dirt in the conduit that ended up getting caught up against the ‘head.’ In retrospect I wish I had used 2" conduit, but in the end we got the head to pop out at the service box.
Although I thought I budgeted for about 10 spare feet of conductor, we barely squeaked by, with less than two feet left to pull on the post side. Phew! I would definitely overbuy on length here and/or do a more careful estimation of how much length there really was to cover including the rises at both ends.
Wiring up the charger
Before even connecting the circuit to the house service, I installed the charger subpanel. The red-marked conductor had only a few inches to spare, but we got lucky. The 50A NEMA 14-50 receptacle includes a neutral, but it is not used by the EV charger, which just uses the two poles of the 220V circuit.
The finished subpanel mounted to the post:
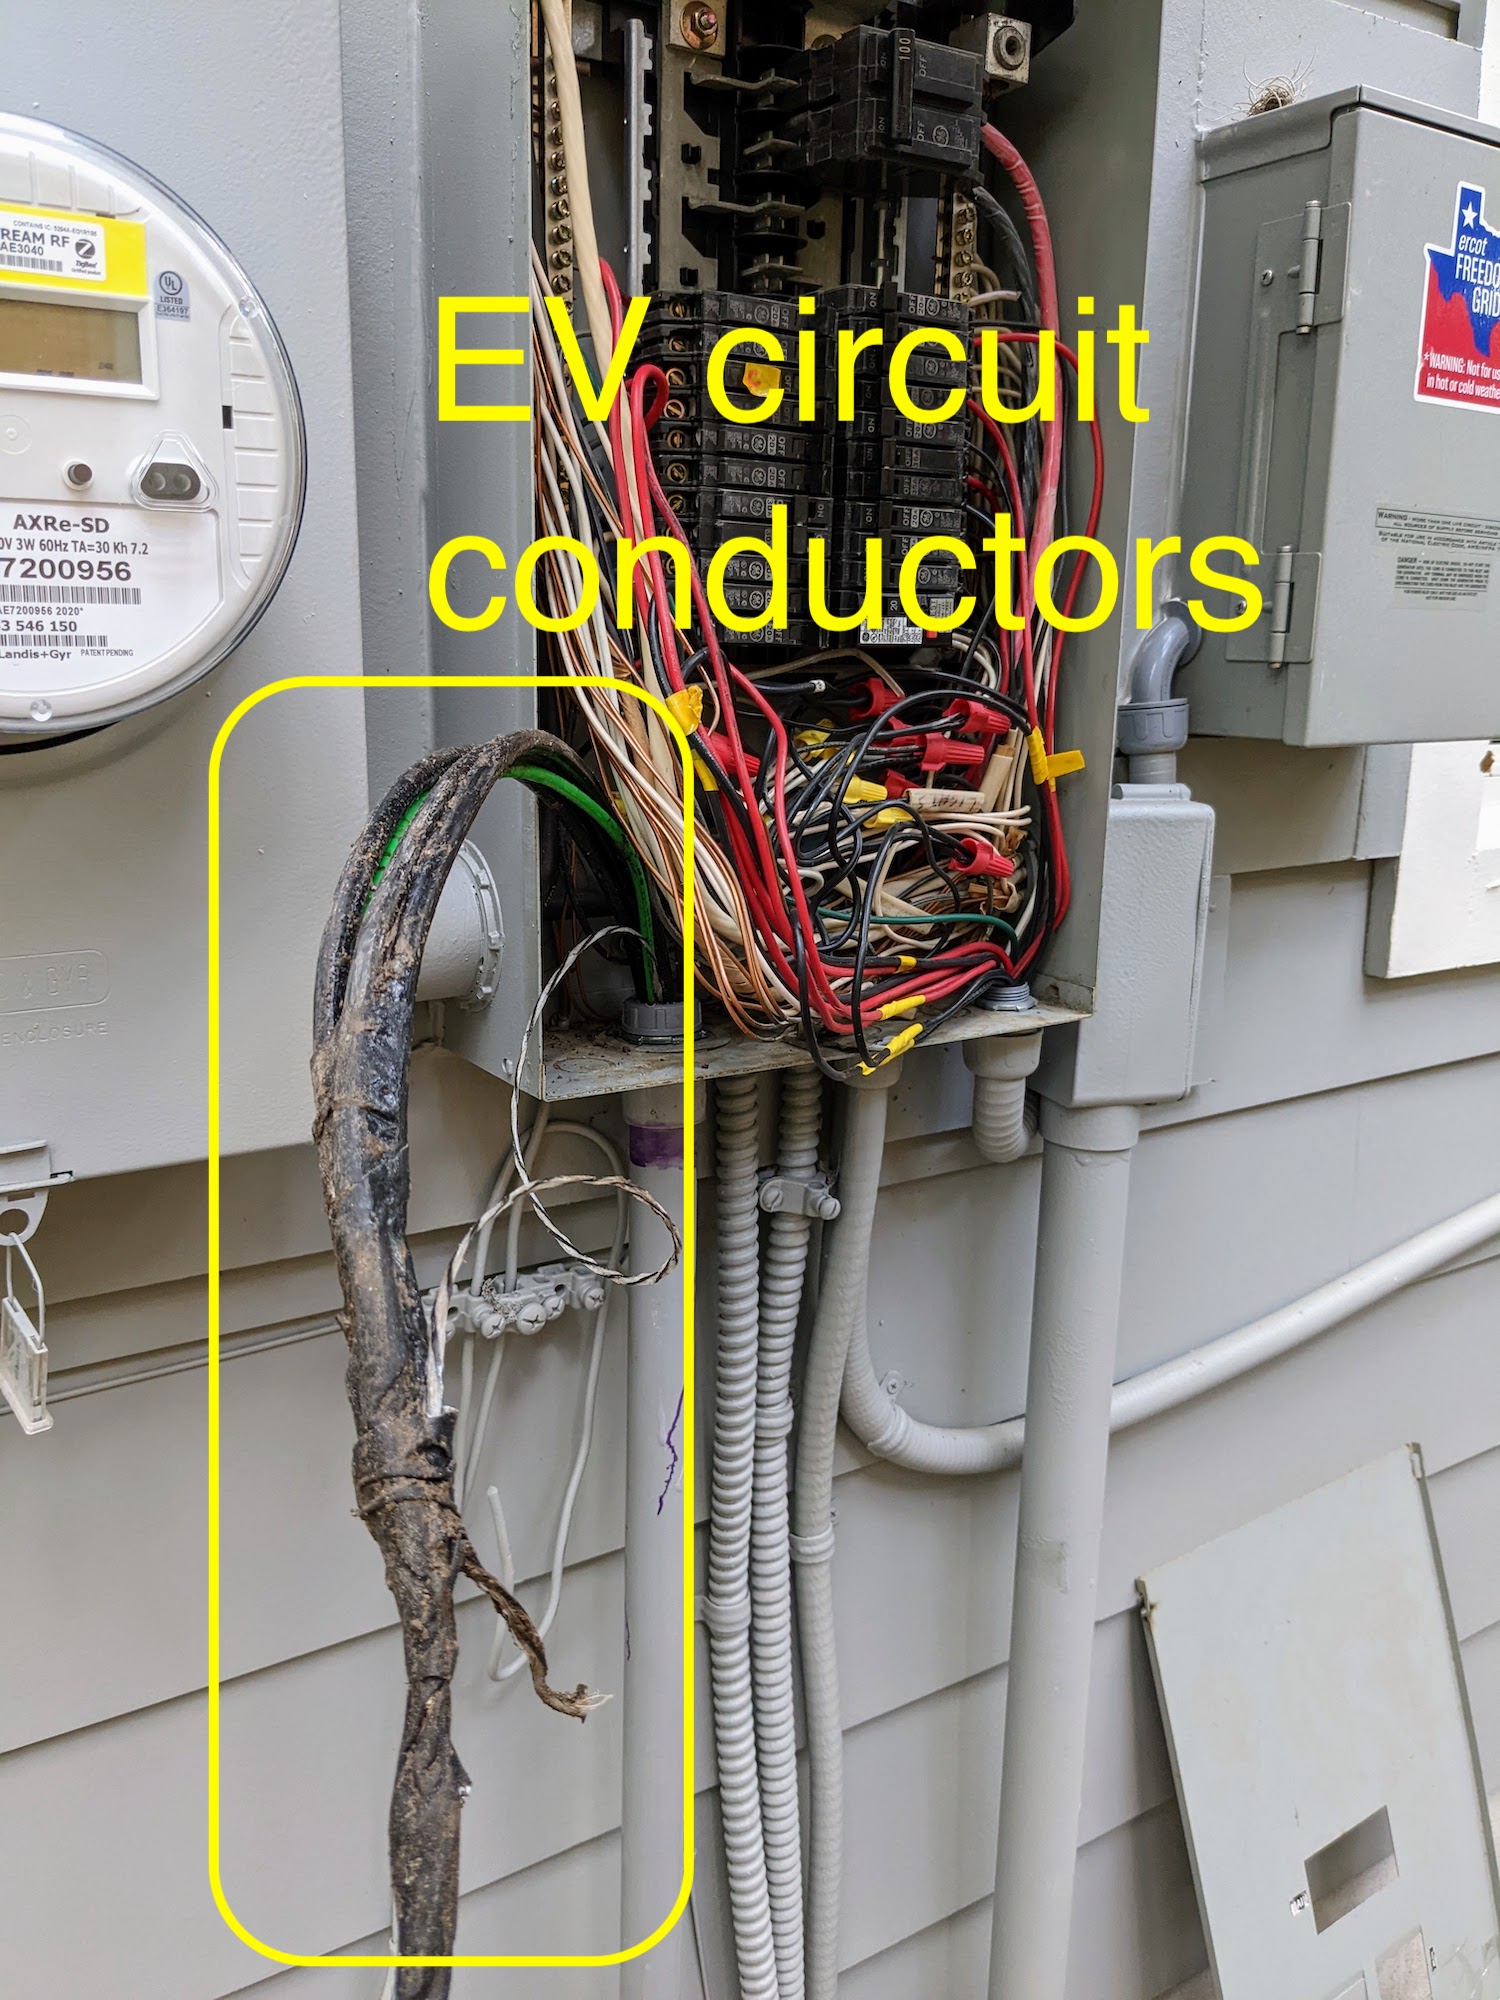
The final and scariest part was to connect the subpanel to a new 60A circuit on the main house service. The routing these huge wires was beastly; it’s pretty crowded in there. You can see the new 60A breaker on the left, opposite the 100A breaker for the subpanel in the addition.
Finally, I wired up the charger itself. I used the NEMA 14-50 receptacle for ease of routing, but if I ever need more than 50A, I can hardwire as well.
It’s been installed for several months now and has weathered rain and heat just fine. Seemingly everyone asks about the possibility of someone stealing watts by charging their car on my charger, sitting as it is right there by the road. Well, it hasn’t happened yet, although there’s nothing to prevent it. I’ll let you know if any EV owners are either so entitled or so hard up that they try such a thing :)
In all, I saved at least 50% over a professional installation, and I got to learn a bunch about the electrical code and pulling wire through conduit. And also lots of exercise digging a trench!
Comments
Electrical Guy — 2024-11-05 19:08:13
Should have put the conduit in before the cement around the post. Also not a good idea to cement in wood as it rots faster. Just put the post it deep enough for stability without cement. Don’t need a disconnect for 60AMP or less feeds. Code says only great than 60amp… so could have avoided the panel on the back of the post which looks bad. Also should have just hard wired the box to the 60AMP feed as it will deliver the correctly rated voltage to the car. This avoids the cost of the plug , box, 50amp breaker etc.
bryan — 2025-02-14 23:13:52
Awesome, thanks for the feedback! Glad to hear I got this close XD. I do like having the subpanel/disconnect on the post so I can plug in a vacuum.